Quantcast
Channel: TechNet Technology News
Viewing all 13502 articles
Browse latest View live

Cumulative Update #4 for SQL Server 2014 SP2

$
0
0

The 4th cumulative update release for SQL Server 2014 SP2 is now available for download at the Microsoft Downloads site. Please note that registration is no longer required to download Cumulative updates.

To learn more about the release or servicing model, please visit:


Cumulative Update #11 for SQL Server 2014 SP1

$
0
0

The 11th cumulative update release for SQL Server 2014 SP1 is now available for download at the Microsoft Downloads site. Please note that registration is no longer required to download Cumulative updates.

To learn more about the release or servicing model, please visit:

Azure SQL Analytics solution – Public Preview

$
0
0

Microsoft Azure SQL Database is a scalable relational database service that provides capabilities that are familiar to SQL Server to applications that run in Azure. Azure SQL Analytics, which part of OMS Insight and Analytics, collects and visualizes the important SQL Azure performance metrics that enable users to easily create custom monitoring rules and alert on these rules under defined scenarios. The solution, now in public preview, enables you to monitor across multiple Azure subscriptions, resources and elastic pools. More importantly, you can identify issues at each layer of your application stack.

By using the Azure SQL Analytics solution, you can capture metrics (across subscriptions and elastic pools) from Azure SQL Database and elastic pools and visualize them in Operations Management Suite (Log Analytics). This solution takes advantage of Azure Diagnostic metrics and Log Analytics views to present data about all your instances of Azure SQL Database and elastic pools in a single log analytics workspace.

Azure SQL Database and elastic pools in a single log analytics workspace

Prerequisites

  • Azure subscription

If you don’t have one, you can get a free Azure account.

How do I get started?

  1. In the Azure portal, click the Marketplace tile, click Monitoring + Management, and search for Azure SQL Analytics, and then click Azure SQL Analytics in the search results.
  2. Click the Create button to start the configuration wizard in the Azure portal and configure the solution.

The Create button

  1. Follow the steps in the UI to start the installation and configuration of this solution.

Support for more than  one Azure subscription (Advanced scenario)

To support multiple subscriptions, use the PowerShell script in the Enable Azure resource metrics logging using PowerShell blog post. Simply provide the workspace resource ID as a parameter when you execute the script to send diagnostic data from resources in one Azure subscription to an OMS workspace in another Azure subscription.

Example

PS C:\> $WSID = "/subscriptions//resourcegroups/oms/providers/microsoft.operationalinsights/workspaces/omsws"

PS C:\> .\Enable-AzureRMDiagnostics.ps1 -WSID $WSID

Analyze data and create alerts

The solution ships with a handful of useful queries to get started analyzing data that you find when you go to the solution view and scrolling to the far right.

Queries in the solution view

We’ve provided a few alert-based queries in the list that you can use to alert on specific thresholds for both Azure SQL Database and elastic pools. To configure an alert for your OMS workspace:

  1. Go to http://mms.microsoft.com.
  2. Authenticate to the OMS workspace that you have configured for this solution.
  3. Open the solution view for Azure SQL Analytics in your OMS workspace.
  4. Scroll to the far right, and select the query on which you want to create an alert.

Selecting a query

  1. Select alert from the list of options.

Selecting alert from the list of options

  1. Configure the appropriate properties and the specific thresholds.

Example

Configuring properties and thresholds

One of the most useful queries that you can perform is to compare the DTU utilization across all Azure SQL Elastic Pools across all your subscriptions. Database Throughput Unit (DTU) provides a way to describe the relative capacity of a performance level of Basic, Standard, and Premium databases and pools. DTUs are based on a blended measure of CPU, memory, reads, and writes. As DTUs increase, the power offered by the performance level increases. For example, a performance level with 5 DTUs has five times more power than a performance level with 1 DTU. A maximum DTU quota applies to each server and elastic pool.

By running the following query, you can easily tell if you are underutilizing or over utilizing your SQL Azure elastic pools.

Type=AzureMetrics ResourceId=*"/ELASTICPOOLS/"* MetricName=dtu_consumption_percent | measure avg(Average) by Resource | display LineChart

In the following example, we can clearly see one elastic pool has a heavy spike near 100% DTU.  We can then use this information to troubleshoot potential recent changes in our environment by using Azure Activity logs.

Example of an elastic pool that has a heavy spike near 100% DTU

Thank you!

We hope you find this solution useful to help you to gain more insights into your Azure SQL environments. Your feedback helps drive innovation in our solutions.

Jim Britt
Senior Program Manager


Azure App Service Secrets and Web Site Hidden Gems

$
0
0

I just discovered that you can see a preview (almost like a daily build) of the Azure Portal if you go to https://preview.portal.azure.com instead of https://portal.azure.com. Sometimes the changes are big, sometimes they are subtle. It feels faster to me.

Azure Preview Portal

A few days ago I blogged that I had found a number of things in Azure that I wasn't previously aware of like "Metrics per instance (App Service)" which is DEEPLY useful if you run more than one Web App inside an App Service Plan. Remember, an App Service Plan is basically a VM and you can run as many Websites, docker containers, Azure Functions, Mobile Apps, Api Apps, Logic apps, and whatever you can fit in there. Density is the word of the day.

Azure App Service Secrets and Hidden Gems

A bunch of folks agreed that there were some real hidden gems worth exploring so I thought I'd take a moment and do just that. Here's a few of the things that I'm continuously amazed are included for free with App Service.

Console

The Console option under Development Tools

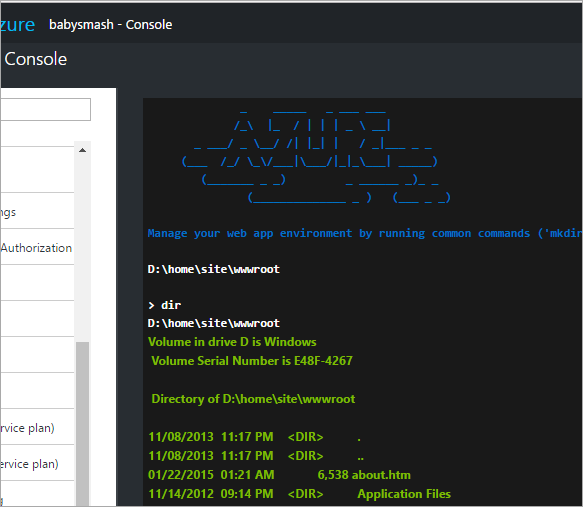
There's a web-based console that you can access from the Azure Portal to explore your apps!

Live HTML5 Console within the Azure Portal

This is basically an HTML 5 bash prompt. I find it useful to double check the contents of certain files in Production, and confirm environment variables are set. I also, for some reason, find it comforting to see that my "cloud web site" actually lives on Drive D:. It calms me to know the Cloud has a D Drive.

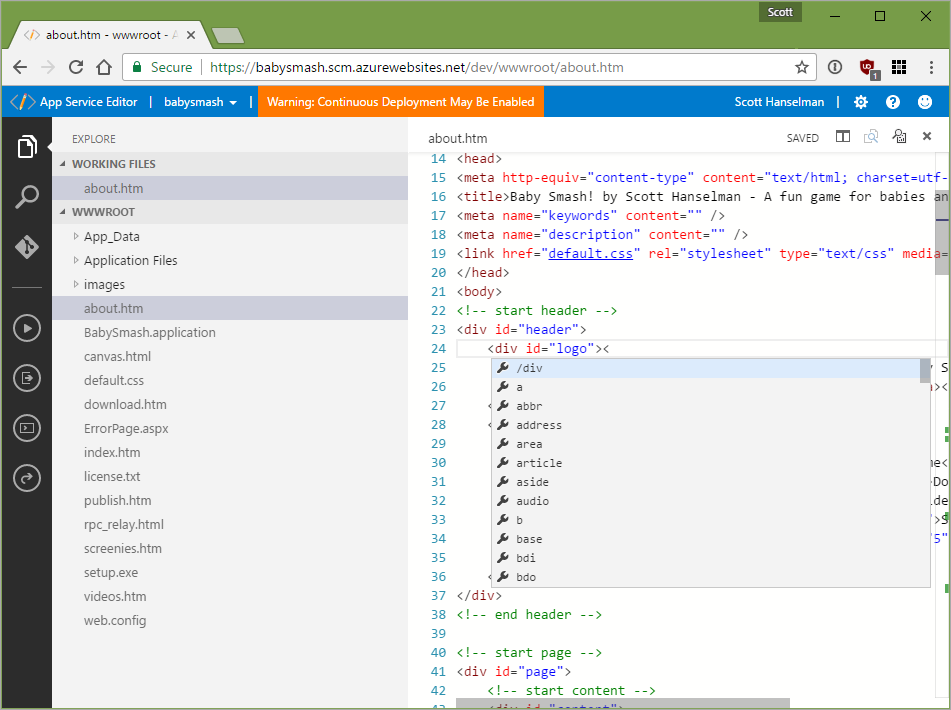
App Service Editor

App Service Editor

App Service Editor is the editor that's codenamed "Monaco" that powers Visual Studio Code. It's amazing and few people know about it. I use it to make quick updates to production, although you do need to be aware if you have Continuous Deployment enabled that your changes will get eventually overwritten.

It's like a whole

Testing in Production - (A/B Testing)

This is an amazing feature that not enough people know about. So, I'm assuming you are aware of Staging Slots? These are things like dev-, test-, or staging- that you can pull from a different branch during CI/CD, or just a separate but near-identical website that runs on the same hardware. The REAL magic is the Testing in Production feature.

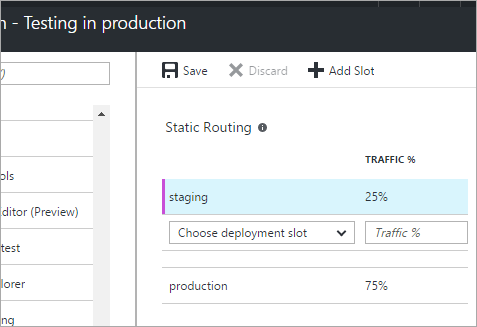
Once you have a slot - I have one here for the Staging Site for BabySmash - you have the option to just "swap" between staging and production...OR...you can set a percentage of traffic you want to go to each slot!

Note that traffic is pinned to a slot for the life of a client session, so you don't have to worry about folks bouncing around if you change the UI or something.

Why is this insanely powerful? You can even make - for example - a "beta" slot and have your customers opt-in to a beta! And you don't have to write any code to enable this! MyApp.com/?x-ms-routing-name=beta would get them there and MyApp.com?x-ms-routing-name=self always points to Production.

Testing in Production 

You could also write a PowerShell script that would slowly move traffic in increments. That way you could ramp up traffic to staging from 5% to 100% - assuming you see no errors or issues.

$siteName = "yourProductionSiteName"
$rule1 = New-Object Microsoft.WindowsAzure.Commands.Utilities.Websites.Services.WebEntities.RampUpRule
$rule1.ActionHostName = "yourSlotSiteName"
$rule1.ReroutePercentage = 10;
$rule1.Name = "stage"

$rule1.ChangeIntervalInMinutes = 10;
$rule1.ChangeStep = 5;
$rule1.MinReroutePercentage = 5;
$rule1.MaxReroutePercentage = 50;
$rule1.ChangeDecisionCallbackUrl = "callBackUrlOfyourChoice-OptionalThatDecidesIfYouShoudlKeepGoing"

Set-AzureWebsite $siteName -Slot Production -RoutingRules $rule1

All this stuff is built-in to the Standard Azure AppServicePlan.

Easy and Cheap Databases

A number of folks in the comments of my last post asked about the 20 websites I have running on my single App Service Plan. Some felt I may have been disingenuous about the pricing and assumed I have a bunch of SQL Server databases behind my sites, or that a site can't be useful without a SQL Server.

There's a few things there to answer. My sites are many different techs, Node.js, Ruby, C# and ASP.NET MVC, and static sites. For example:

  • Running the Ruby Middleman Static Site Generator on Microsoft Azure runs in the cloud when I check code into GitHub but deploys a static site.
  • The Hanselminutes Podcast uses WebMatrix and ASP.NET WebPage's "SQL Compact Edition." This database runs out of a single file that's stored locally.
  • One of my node.js sites uses SQL Lite for its data.
  • One ASP.NET application uses "Azure MySQL in-app" that is also included in Azure App Service. You get a single modest MySQL database that runs in the context of your App Service. It's not super fast and meant for development, but with a little caching it's very workable.
  • One node.js app thinks it is talking MongoDB but actually it's talking via MongoDB protocol support in Azure DocumentDB. You can create an Azure noSQL DocumentDB and point any app that speaks Mongo to it and it Just Works.

There's a number of options, including Easy Tables for your Mobile Apps. Check out http://mobile.azure.com to learn more about how you can get a VERY quick and easy backend for mobile (or web) apps.

Azure App Service Extensions

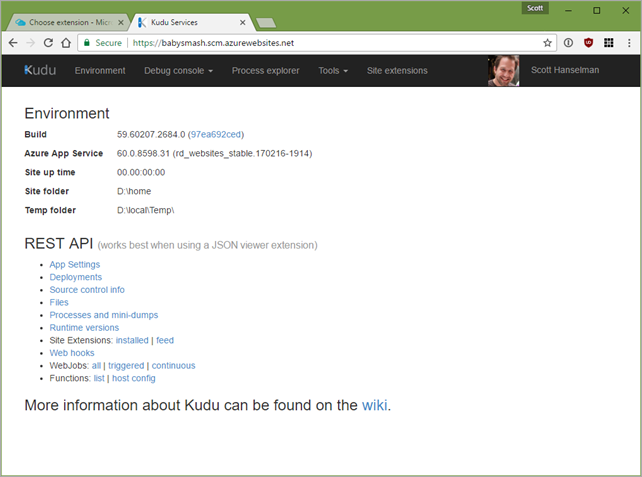
If you have used Git deploy to an Azure App Service, you likely noticed a "Sidecar" website that your app has. I have babysmash.com which is actually babysmash.azurewebsites.net, right? There's also babysmash.scm.azurewebsites.net that you can't access. That sidecar site (when I'm authenticated) has a ton of easy REST GET APIs I can call to get my process list, files, deployments, and lots more. This is all powered by Kudu, which is open source by the way.

The Azure Kudu sidecar site

Kudu's sidecar site is a "site extension." You can not only write your own Azure Site Extension (they are just NuGet packages!) but it turns out there are a TON of useful already vetted and published extensions you can add to your site today. Those extensions live at http://www.siteextensions.net but you add them directly from the Azure Portal. There's 84 at the time of this blog post.

Azure Site Extensions include:

  • phpMyAdmin - for Admin of MySQL over the web
  • Azure Let's Encrypt - Easy install of Let's Encrypt SSL certs!
  • Image Optimizer - Automatic squishing of your site's JPGs and PNGs because you know you forgot!
  • GoLang Support - Azure doesn't officially support Go in Azure Web Apps...but with this extension it works fine!
  • Jekyll - Easy static site generation in Azure
  • Brotli HTTP Compression

You get the idea.

Diagnostics

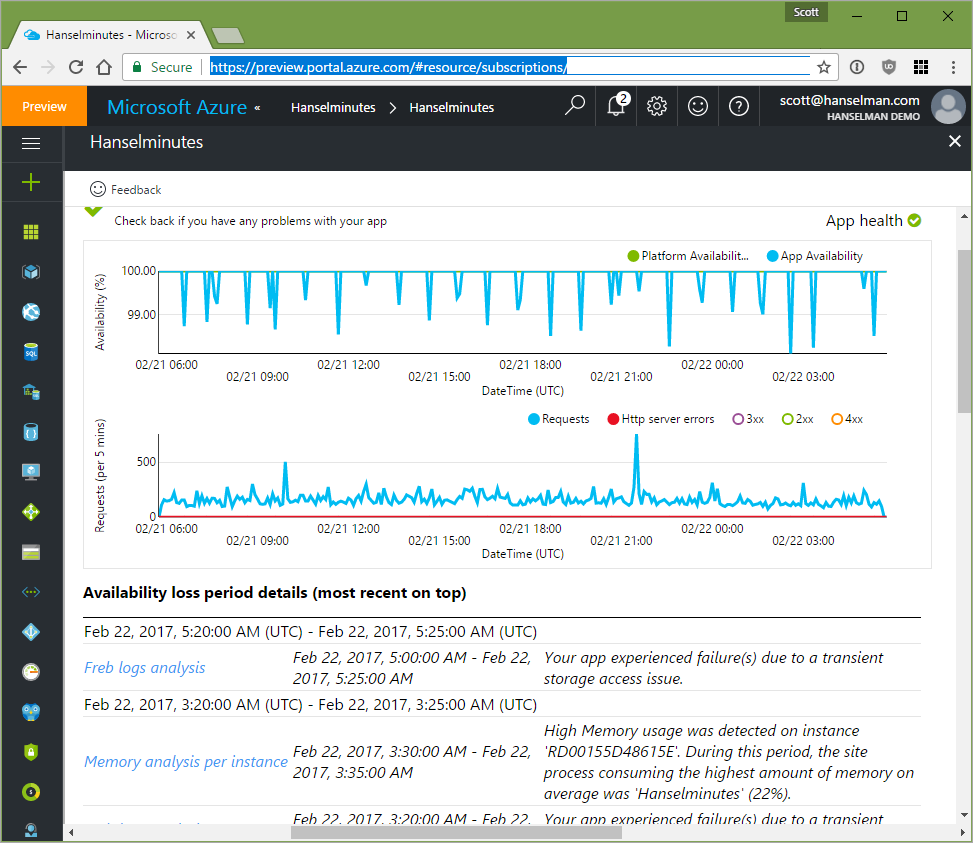
I just discovered this "uptime" blade within my Web Apps in the Azure Portal. It tells me my app's uptime and if it's not 100%, it tells my why not and when!

Azure Diagnostics and Uptime

Again, none of this stuff costs extra. You can add Site Extensions or explore your apps to the limit of the underlying App Service Plan. I'm doing all this on a single Standard 1 (S1) App Service Plan.


Sponsor: Excited about the future in ASP.NET? The folks at Progress held an awesome webinar which gives a 360⁰ view of the new ASP.NET Core and how it compares to WebForms and MVC. Watch it now on demand!


© 2016 Scott Hanselman. All rights reserved.
     

OMS Container Solution – Windows Server and Hyper-V Container Support

$
0
0

Hello everyone. This is Keiko. We have heard many requests about supporting Windows Server Container monitoring. Here you go. Today, we are excited to extend the OMS Container solution support to Windows Server and Hyper-V containers.

Last summer, Microsoft expanded OMS to help developers build, run, test, and deploy distributed applications inside Docker containers on Linux. Because containers are lightweight, pared-down virtual machines that can be easily provisioned, developers have created them sporadically as a solution to support continuous delivery. As containers are being used widely in production and are increasing in numbers, container monitoring has become more challenging.

With a single pane of glass, customers can now monitor containers on hybrid clouds and multiple platforms.

Diagram of OMS monitoring containers

With the OMS Container solution, you’ll now be able to:

  • Centralize and correlate millions of logs from Windows Server, Hyper-V, and Docker containers at scale
  • See real-time information about Container status, image, and affinity

View detailed and secure audit trail of all actions on Container hosts

For more information about Windows Server and Hyper-V Container monitoring on OMS, please go to the Container Solution documentation.

Please note that this solution is still in public preview. Performance monitoring for Windows Server and Hyper-V Containers will come soon.

We will be enhancing more monitoring capabilities for containers. If you have feedback or questions, please feel free to contact us!!

How do I try this?

There are a few different routes to give feedback:

Your feedback is most important to us. If you see any features you like that are not here, we like to hear that from you as well.

Keiko Harada
Program Manager
Microsoft Operations Management Team

The week in .NET – On .NET with Beth Massi, NeinLinq

$
0
0

Previous posts:

.NET Foundation

The .NET Foundation has a new Executive Director, Jon Galloway. Jon replaces Martin Woodward.

On .NET

In last week’s episode, we’re speaking with Beth Massi to celebrate .NET’s 15th anniversary:

This week, Eric Mellino will be on the show to demo CrazyCore, a game engine written on .NET Core. We’ll stream live on Channel 9. We’ll take questions on Gitter’s dotnet/home channel and on Twitter. Please use the #onnet tag. It’s OK to start sending us questions in advance if you can’t do it live during the shows.

Package of the week: NeinLinq

NeinLinq provides helpful extensions for using LINQ providers such as Entity Framework that support only a subset of .NET functions, reusing functions, rewriting queries, even making them null-safe, and building dynamic queries using translatable predicates and selectors.

Here’s an example of a Linq expression that uses a custom function that would otherwise get rejected as not translatable:

User group meeting of the week: Unit Testing in Edmonton, AB

The Edmonton .NET user group is meeting on Wednesday at 6:00PM for a session on unit testing.

.NET

ASP.NET

I’m at the Orchard Harvest conference this week, watching some awesome talk from kickass speakers such as Sébastien Ros, Taylor Mullen, Nick Mayne, and others. I’ll be talking tomorrow about .NET Core, .NET Standard 2.0, and C# 7. I’ve also been live-blogging the whole thing. All the talks are recorded and will be available soon.

F#

New F# Language Suggestions:

Check out F# Weekly for more great content from the F# community.

Xamarin

UWP

Azure

Games

And this is it for this week!

Contribute to the week in .NET

As always, this weekly post couldn’t exist without community contributions, and I’d like to thank all those who sent links and tips. The F# section is provided by Phillip Carter, the gaming section by Stacey Haffner, and the Xamarin section by Dan Rigby, and the UWP section by Michael Crump.

You can participate too. Did you write a great blog post, or just read one? Do you want everyone to know about an amazing new contribution or a useful library? Did you make or play a great game built on .NET? We’d love to hear from you, and feature your contributions on future posts:

This week’s post (and future posts) also contains news I first read on The ASP.NET Community Standup, on Weekly Xamarin, on F# weekly, and on Chris Alcock’s The Morning Brew.

Announcing the public preview of Azure AD group-based license management for Office 365 (and more)!

$
0
0

Howdy folks,

One of the toprequests we hear fromAzure AD and Office 365is forrichertoolsto manage licenses for Microsoft Online Serviceslike Office 365 and the Enterprise Mobility + Security. Admins need easier tools to control who gets a product license and which services are enabled. Some customers have even had todelay service roll-outsas they struggled to find a reliable solution that works at scale.

Today, were happy to be able to fulfill this request by announcing the public preview of a much-anticipated new capability in Azure AD: group-based license management! With this new feature you can define a license templateand assignit to asecurity group in Azure AD. Azure AD willautomatically assign and remove licenses as users join and leave the group.

This preview also includes the highly-requested ability to selectively disable service components in product licenses, making it possible to stage the deployment of large service suites such as Office 365 Enterprise E5.

Keep reading to get an overview of this new capability, or dive straight into our detailed documentation.

Overview

Here are a few key facts about group-based license management:

  • Licenses can be assignedusing any security group in Azure AD, whether synced from on-premises or created directly in Azure AD.
  • All Microsoft Online Services that require user-level licensing are supported.
  • The administrator can disable one or more servicecomponents when assigning a license to a group. This allows staged deployments of rich products like Office 365 Enterprise E5 at scale.
  • The feature is only available in the Azure portal.
  • Licenses are typically added or removed within minutes of a user joining or leaving a group.

There are more details below, or, if youre ready to dig in, just jump straight into our new license management experience in the Azure portal. Thats right, no more going back to the classic portal to license your EMS or Azure AD users! If youre not using Azure AD Basic or above, sign up for a trial.

Easily assign licenses to many users

To assign a license, just choose an individual user or a group. In the example below, Im rolling out the Office 365 Enterprise E3 suite to all information workers in the organization. Since Im doing a staged rollout, I will initially enable only a handful of online services in the suite:

AAD_CBL1

After all users in the group are processed they will inherit licenses from the Information Workers group.

AAD_CBL2

From now on, any newly added group members will be licensed, and when they leave the group the license will be removed from them. You can do more cool things with this, like have users inherit licenses from multiple groups at the same time. Check out this article to learn more about how this functionality works.

Automate even more with dynamic group membership

If you have an Azure AD Premium P1 subscription you can combine dynamic group membership with license management to create an automated license management flow.

Here is an example of two groups that look at extensionAttribute1 and assign licenses based on its value:

“O365 E5 base services”

AAD_CBL3

“EMS E5 licensed users”

AAD_CBL4

A user with attribute value of EMS;E5_baseservices; automatically inherits both licenses:

AAD_CBL5

This functionality keeps you from having to write and maintain scripts to manage licenses and group memberships. All the heavy lifting is done in the cloud, by Azure AD!

Find out more about how to use these features.

Let your users sign up for licenses!

As the admin, you control license assignment in Azure AD, but you can choose to open a group for users so you dont have to be involved in managing a certain product, like Power BI (free).

With Azure AD Premium P1, you can use the powerful self-service management features directly in the cloud to let users decide if they need product licenses by requesting to join a group.

How can I try it?

Visit the Azure portal and give the license management experience a try!

While group-based license management is in public preview you will need an active subscription for Azure AD Basic (or above) in your tenant to assign licenses to groups. If you dont have one, just sign up for an Enterprise Mobility + Security trial. Later, when this functionality becomes generally available it will be included in Office 365 Enterprise E3 and similar products.

As with all previews there are some limits to what we currently support. You can find details about those limitations in our documentation, which we will be updating consistently as things change.

Let us know what you think by leaving a comment below or emailing the Azure AD License Management team. We look forward to hearing from you!

Best regards,

Alex Simons (Twitter: @Alex_A_Simons)

Director of Program Management

Microsoft Identity Division

Willis Towers Watson—increasing business agility with global commitment to Office 365

$
0
0

WTW FI


Today’s post was written by Ron Markezich, corporate vice president for Microsoft.

When Willis Group and Towers Watson merged in January 2016, Willis Towers Watson (WTW) became a leading advisory, broking and solutions company operating in more than 140 countries. The merger created an opportunity for WTW to streamline its IT environment, consolidate vendors and commit to a business productivity platform that empowers every one of its 40,000 employees.

According to Eoghan Doyle, global head of Infrastructure and Operations at WTW, the overall utilization of Microsoft technologies is also driven by the business value of a common platform that enables digital transformation:

“Willis Towers Watson drives business performance for our clients by helping them unlock potential. We aim to do the same for our global workforce. The Microsoft Secure Productive Enterprise E5 solution provides the advanced enterprise security, collaboration and intelligence from Office 365, which our colleagues can use to drive business results. By globally adopting Secure Productive Enterprise solutions, we can increase business agility and productivity, while delivering integrated technology in support of our business objectives. We look forward in particular to cloud-based telephony, interactive self-service business analytics and advanced threat protection to empower everyone in a mobile-first, modern workplace.”

An added benefit for WTW is the $3 million in savings it will achieve from a consistent, integrated set of cloud-based technologies, compared to continuing with its third-party services.

As we continue to innovate on the security and compliance features in our cloud services—capabilities like accelerated eDiscovery analysis workflow and advanced security intelligence—customers in the professional services industry can stay ahead of today’s evolving threat landscape. It’s really gratifying to see how WTW is broadly adopting the Microsoft Cloud to help transform its global business.

We’re looking forward to watching as WTW transforms with the Microsoft Cloud to achieve its vision of doing business in a digital world.

—Ron Markezich

The post Willis Towers Watson—
increasing business agility with global commitment to Office 365
appeared first on Office Blogs.


Introducing Network Performance Monitor for network visibility across public and hybrid clouds

$
0
0

This post was authored by Ajay Gummadi, Principal Program Manager, Enterprise Cloud Management Teamand Abhave Sharma, Program Manager, Enterprise Cloud Management Team.

In todays hybrid IT environment, troubleshooting issues related to application connectivity is complex and challenging, especially due to the difficulty in isolating the source of the problem in a network. As you manage your cloud applications, it is also important to have visibility into the virtual network connections between your datacenters, remote office sites, and critical workloads. An unified network monitoring experience that gives you network visibility across public and hybrid clouds, and helps in proactive identification and resolution of potential issues is essential for managing todays networks.

Today, we are announcing the general availability of Network Performance Monitor (NPM), a cloud-aware network monitoring solution in Operations Management Suite Insight & Analytics, that monitors networks for performance degradation and outages. The solution continuously tests for reachability between various points on the network across public clouds, datacenters and user locations, and enables application administrators to quickly identify the specific network segment or device that may be causing the problem.

One customer, TrueSec, Inc., has already seen the power of Azure and Network Performance Monitor together. Using these technologies has not just helped us monitor the network, but also, detect network links with poor performance, says Markus Lassfolk, Chief Executive Officer. NPM has also made it easier for both the admins and networking team to see patterns and get alerts when something abnormal is happening before the users experience the problem and contact us.”

Interactive network monitoring, from any browser

Since the public preview release last year, thousands of customers have used the solution and shared their feedback and suggestions. The following new features and enhancements have been added to the Network Performance Monitor solution to aid in comprehensive monitoring and faster troubleshooting:

  • ICMP based reachability tests: NPM can detect connectivity using Internet Control Message Protocol (ICMP), in addition to TCP. ICMP-based probing is used in environments with restrictive firewall configurations, that prevent routers, switches, and hosts from responding to TCP based probes. This post provides guidance on selection of the right protocol for your environment.
  • Network State Recorder: Enhancements to NPM, enable the admin to view the state of the network at any point in the past. To investigate a network connectivity incident, that a user may have encountered last Friday night select the date and time and NPM presents the connectivity, loss, and latency status at that instant.
  • Topology Map: This map presents all the network paths between the endpoints and helps localize a network problem to a particular path. You can drill down into the node links and visualize the hop-by-hop topology of routes. The topology map is now interactive, enabling the filtering of paths by health status (e.g. paths with a high loss), addition/removal of network hops, zoom, and more.

NPMGABlog-Picture1-Topology

  • Improved Alert Management: NPM now leverages the alert management capabilities in OMS. Users can now get email-based alerts, in addition to the existing alerts within NPM. Alerts can also be used to trigger remedial actions via runbooks or integrate with existing service management solutions using webhooks.

NPMGABlog-Picture2-Alert

  • Windows desktop support: NPM agents can now run on Windows desktops/client operating systems (Windows 10, Windows 8.1, Windows 8, and Windows 7), in addition to the previously supported Windows Server OS.
  • Linux support: NPM agents can now test network connectivity from Linux workstations and servers. The following distributions are supported: CentOS Linux 7, Red Hat Enterprise Linux 7.2, Ubuntu 14.04 LTS, Ubuntu 15.04, Ubuntu 16.04 LTS, Debian 8, and SUSE Linux Server 12.
  • Search: Improvements in search, enable quicker drill-down to the specific network and subnets that may be faulty, thereby enabling faster identification and remediation.

These enhancements are available to users today and do not require any manual upgrades of your agents. Learn more by visiting the documentation page, and provide feedback via the User Voice forum. See for yourself and sign-up for a free trial online today!

OneNote Class Notebook add-in now includes grade scales, improved LMS integration and sticker customization

$
0
0

Since launching the OneNote Class Notebook add-in a year ago, hundreds of thousands of teachers have downloaded and started using the add-in. Teachers all over the world have saved time in distributing assignments, individualizing learning, connecting to their existing systems’ assignments/grades and reviewing student work all within Class Notebooks.

First-grade teacher at the Ashton Elementary School, Rachel Montisano, said, “Now, with two clicks, I can send out all the tabs/pages I created or wanted to share with the students. Truly remarkable! Microsoft had just given me a tool that made me an even more effective teacher and gave me time back!”

Today’s updates for the Class Notebook add-in for OneNote desktop update include:

  • Grade scale support for Canvas and Skooler.
  • Skooler joins the OneNote add-in family.
  • Stickers—now includes the ability to customize.

Grade scale support for Canvas and Skooler

Last spring, we released Assignment and Grade integration for the OneNote Class Notebook. A top request from teachers and schools using Learning Management Systems (LMS) and Student Information Systems (SIS) has been to support additional assignment values beyond just 1-100 points. Many LMS and SIS have richer grade scales—such as custom points, letter grades, pass/fail, percentages—and teachers want to be able to have more flexibility in the assignments they create.

Today, we are releasing the initial updates to allow grade scale support, depending on the LMS or SIS being used. The first two partners that support grades scales are Canvas and Skooler. The Class Notebook add-in will support different grade scales, based on what the specific LMS or SIS supports.

In the example below, a teacher can choose a “Letter Grade” type when creating the assignment, and the assignment will be created in Canvas with that attribute. When the teacher goes to enter grades under the Review Student Work choice, a letter grade can be entered.

Example of grade scale support in Canvas.

Skooler joins the OneNote add-in family

Today, we welcome Skooler to the Class Notebook add-in family for assignment and grade support. Watch the Getting Started with Skooler video to learn more. As mentioned above, our Skooler integration will also add grade scale support.

To see the current list of committed education partners, please visit our new OneNote Education Partners page.

Stickers—now includes the ability to customize

Last month, we announced the arrival of stickers for OneNote Online and Windows 10. Today, the Class Notebook add-in for OneNote 2013 and OneNote 2016 for the desktop includes stickers, including the ability to customize them. To add a sticker to your page, check the Insert menu after you install the latest version of the add-in. We will release more sticker packs in the future—based on student and teacher feedback—so stay tuned!

OneNote Class Notebook add-in updates 2

Customizable stickers in OneNote desktop.

Since the school year started, we’ve been making improvements to the Class Notebook add-in for OneNote on the desktop. To update your OneNote Class Notebook add-in, just click the Update button on your toolbar to download and install the latest version. If you’ve never installed the Class Notebook add-in, you can get it from the OneNote Class Notebook website.

The post OneNote Class Notebook add-in now includes grade scales, improved LMS integration and sticker customization appeared first on Office Blogs.

Announcing TypeScript 2.2

$
0
0
Today our team is happy to present our latest release with TypeScript 2.2!

For those who haven’t yet heard of it, TypeScript is a simple extension to JavaScript to add optional types along with all the new ECMAScript features. TypeScript builds on the ECMAScript standard and adds type-checking to make you way more productive through cleaner code and stronger tooling. Your TypeScript code then gets transformed into clean, runnable JavaScript that even older browsers can run.

While there are a variety of ways to get TypeScript set up locally in your project, the easiest way to get started is to try it out on our site or just install it from npm:

npm install -g typescript

If you’re a Visual Studio 2015 user with update 3, you can install TypeScript 2.2 from here. You can also grab this release through NuGet. Support in Visual Studio 2017 will come in a future update.

If you’d rather not wait for TypeScript 2.2 support by default, you can configure Visual Studio Code and our Sublime Text plugin to pick up whatever version you need.

As usual, we’ve written up about new features on our what’s new page, but we’d like to highlight a couple of them.

More quick fixes

One of the areas we focus on in TypeScript is its tooling – tooling can be leveraged in any editor with a plugin system. This is one of the things that makes the TypeScript experience so powerful.

With TypeScript 2.2, we’re bringing even more goodness to your editor. This release introduces some more useful quick fixes (also called code actions) which can guide you in fixing up pesky errors. This includes

  • Adding missing imports
  • Adding missing properties
  • Adding forgotten this. to variables
  • Removing unused declarations
  • Implementing abstract members

With just a few of these, TypeScript practically writes your code for you.

As you write up your code, TypeScript can give suggestions each step of the way to help out with your errors.

Expect similar features in the future. The TypeScript team is committed to ensuring that the JavaScript and TypeScript community gets the best tooling we can deliver.

With that in mind, we also want to invite the community to take part in this process. We’ve seen that code actions can really delight users, and we’re very open to suggestions, feedback, and contributions in this area.

The object type

The object type is a new type in 2.2 that matches any types except for primitive types. In other words, you can assign anything to the object type except for boolean, number, string, null, undefined, and symbol.

object is distinct from the {} type and Object types in this respect due to structural compatibility. Because the empty object type ({}) also matches primitives, it couldn’t model APIs like Object.create which truly only expect objects – not primitives. object on the other hand does well here in that it can properly reject being assigned a number.

We’d like to extend our thanks to members of our community who proposed and implemented the feature, including François de Campredon and Herrington Darkholme.

Easier string indexing behavior

TypeScript has a concept called index signatures. Index signatures are part of a type, and tell the type system what the result of an element access should be. For instance, in the following:

interfaceFoo {// Here is a string index signature:
    [prop:string]:boolean;
}declareconst x:Foo;const y =x["hello"];

Foo has a string index signature that says “whenever indexing with a string, the output type is a boolean.” The core idea is that index signatures here are meant to model the way that objects often serve as maps/dictionaries in JavaScript.

Before TypeScript 2.2, writing something like x["propName"] was the only way you could make use of a string index signature to grab a property. A little surprisingly, writing a property access like x.propName wasn’t allowed. This is slightly at odds with the way JavaScript actually works since x.propName is semantically the same as x["propName"]. There’s a reasonable argument to allow both forms when an index signature is present.

In TypeScript 2.2, we’re doing just that and relaxing the old restriction. What this means is that things like testing properties on a JSON object has become dramatically more ergonomic.

interfaceConfig {
    [prop:string]:boolean;
}declareconst options:Config;// Used to be an error, now allowed!if (options.debugMode) {// ...
}

Better class support for mixins

We’ve always meant for TypeScript to support the JavaScript patterns you use no matter what style, library, or framework you prefer. Part of meeting that goal involves having TypeScript more deeply understand code as it’s written today. With TypeScript 2.2, we’ve worked to make the language understand the mixin pattern.

We made a few changes that involved loosening some restrictions on classes, as well as adjusting the behavior of how intersection types operate. Together, these adjustments actually allow users to express mixin-style classes in ES2015, where a class can extend anything that constructs some object type. This can be used to bridge ES2015 classes with APIs like Ember.extend.

As an example of such a class, we can write the following:

typeConstructable=new (...args:any[]) =>object;functionTimestamped<BCextendsConstructable>(Base:BC) {returnclassextendsBase {private _timestamp =newDate();get timestamp() {return_timestamp;
        }
    };
}

and dynamically create classes

classPoint {
    x:number;
    y:number;constructor(x:number, y:number) {this.x=x;this.y=y;
    }
}constTimestampedPoint=Timestamped(Point);

and even extend from those classes

classSpecialPointextendsTimestamped(Point) {
    z:number;constructor(x:number, y:number, z:number) {super(x, y);this.z=z;
    }
}let p =newSpecialPoint(1, 2, 3);// 'x', 'y', 'z', and 'timestamp' are all valid properties.let v =p.x+p.y+p.z;p.timestamp.getMilliseconds()

The react-native JSX emit mode

In addition to the preserve and react options for JSX, TypeScript now introduces the react-native emit mode. This mode is like a combination of the two, in that it emits to .js files (like --jsx react), but leaves JSX syntax alone (like --jsx preserve).

This new mode reflects React Native’s behavior, which expects all input files to be .js files. It’s also useful for cases where you want to just leave your JSX syntax alone but get .js files out from TypeScript.

Support for new.target

With TypeScript 2.2, we’ve implemented ECMAScript’s new.target meta-property. new.target is an ES2015 feature that lets constructors figure out if a subclass is being constructed. This feature can be handy since ES2015 doesn’t allow constructors to access this before calling super().

What’s next?

Our team is always looking forward, and is now hard at work on TypeScript 2.3. While our team’s roadmap should give you an idea of what’s to come, we’re excited for our next release, where we’re looking to deliver

  • default types for generics
  • async iterator support
  • downlevel generator support

Of course, that’s only a preview for now.

We hope TypeScript 2.2 makes you even more productive, and allows you to be even more expressive in your code. Thanks for taking the time to read through, and as always, happy hacking!

Real-Time Communications on the Universal Windows Platform with WebRTC and ORTC

$
0
0

Readers of this blog interested in Real-Time Communications are probably familiar with Google’s WebRTC project. From the WebRTC site:

“WebRTC is a free, open project that provides browsers and mobile applications with Real-Time Communications (RTC) capabilities via simple APIs. The WebRTC components have been optimized to best serve this purpose.”

At Microsoft, we’ve seen tremendous support grow for WebRTC over the past five years. One of the most pivotal uses of WebRTC is building native video chat apps, which now reach more than one billion users.

Google’s native supported platforms for WebRTC include iOS, Android and traditional Win32 desktop apps. On Windows, Microsoft Edge already supports ORTC APIs and now supports WebRTC 1.0 APIs in Insider Preview builds on Desktop devices. For example, if you need to build a WebRTC app in HTML/JS targeted at desktop browsers or desktop web apps using the Web App Template, then Microsoft Edge and Windows web platform are a great choice.

But what if you want to write in C# or C++ and run WebRTC on Xbox, HoloLens, Surface Hub or Windows Phone, or write in HTML/JS and run on Raspberry Pi? What if you are using Google’s iOS and Android libraries and need bit-for-bit compatibility for your UWP application? What if you modify WebRTC source in your application and need to use those modifications in your Universal Windows Platform (UWP) application?

To fulfill these additional scenarios, we have ported and optimized WebRTC 1.0 for UWP. This is now available as an Open Source project on GitHub as well as in binary form as a NuGet package. The project is 100 percent compatible with Google’s source, enabling scenarios such as a WebRTC video call from Xbox running UWP to a Chrome browser on the Desktop.


WebRTC ChatterBox sample running as a native Windows 10 application.

Microsoft has also long been a supporter of the ORTC APIs and we work closely with the Open Peer Foundation to ensure optimal support of ORTC  for UWP apps. ORTC is an evolution of the WebRTC API, which gives developers fine-grained control over the media and data transport channels, and uses a standard JSON format to describe peer capabilities rather than SDP, which is unique to WebRTC.

ORTC was designed with WebRTC interoperability in mind and all media is wire-compatible with WebRTC. ORTC also includes an adapter that converts SDP to JSON and exposes APIs that match WebRTC. Those two considerations make it possible for developers to migrate from WebRTC to ORTC at their own pace and enable video calls between WebRTC and ORTC clients. ORTC for UWP is available both as an Open Source project on GitHub as well as a NuGet package.

The net result of combined UWP and Edge support for WebRTC 1.0 and ORTC is that all Windows 10 platforms support RTC and developers can choose the solution they prefer.

Let’s take a look at an example from our samples repository on GitHub.

DataChannel via ORTC

The DataChannel, part of both the WebRTC and ORTC specs, is a method for two peers to exchange arbitrary data. This can be very useful in IoT applications – for example, a Raspberry Pi may collect sensor data and relay it to a Mobile or HoloLens peer in real-time.  Keep in mind that while the sample code below uses ORTC APIs, the same scenario is possible via WebRTC.

To exchange messages between peers in ORTC, a few things must happen first (see MainPage.OpenDataChannel() in the sample code):

  1. The peers must exchange ICE candidates, a successful pair of which will be used to establish a peer-to-peer connection.
  2. The peers must exchange ICE parameters and start an ICE transport session – the underlying data path used for the peers to exchange data.
  3. The peers must exchange DTLS parameters. which includes encryption certificate and fingerprint data used to establish a secure peer-to-peer connection, and start a DTLS transport session.
  4. The peers must exchange SCTP capabilities and start an SCTP transport session. At this stage, a secure connection between the peers has been established and a DataChannel can be opened.

It’s important to understand two things about the above sequence. First, the data exchanges are in simple JSON, and as long as two peers can exchange strings, they can exchange all necessary data. Second, the identification of the peers and the exchange of these parameters, called signaling, is outside of the specification of ORTC and WebRTC by design. There are plenty of mechanisms available for signaling and we won’t go into them, but NFC, Bluetooth RFCOMM or a simple TCP socket server like the one included in the sample code, would suffice.

With the SCTP transport session established, the peers can open a Data Channel. The peer initiating the call creates an instance of an RTCDataChannel() passing the SCTP transport instance, and the remote peer receives the event RTCSctpTransport.OnDataChannel.  When the remote peer receives this event, the Data Channel has been established and the peers can send messages to each other.

The code below is an excerpt from MainPage.Signaler_MessageFromPeer() in the sample code. The string message contains data received from the peer via the signaling method (in this case, the TCP socket server):


var sctpCaps = RTCSctpCapabilities.FromJsonString(message);
 
if (!_isInitiator)
{
// The remote side will receive notification when the data channel is opened.  Send SCTP capabilities back to the initiator and wait.
_sctp.OnDataChannel += Sctp_OnDataChannel;
_sctp.Start(sctpCaps);
 
var caps = RTCSctpTransport.GetCapabilities();
_signaler.SendToPeer(peer.Id, caps.ToJsonString());
}
else
{
// The initiator has received SCTP caps back from the remote peer, which means the remote peer has already
// called _sctp.Start().  It's now safe to open a data channel, which will fire the Sctp.OnDataChannel event on the remote peer.
_sctp.Start(sctpCaps);
_dataChannel = new RTCDataChannel(_sctp, _dataChannelParams);
_dataChannel.OnMessage += DataChannel_OnMessage;
_dataChannel.OnError += DataChannel_OnError;
}

When the DataChannel has been established, the remote peer receives the OnDataChannel event. The parameter data for that event includes a secure DataChannel which is open and ready to send messages:


private void Sctp_OnDataChannel(RTCDataChannelEvent evt)
{
_dataChannel = evt.DataChannel;
_dataChannel.OnMessage += DataChannel_OnMessage;
_dataChannel.OnError += DataChannel_OnError;
 
_dataChannel.SendMessage("Hello ORTC peer!");
}

You can now freely exchange encrypted messages between the peers over the DataChannel. The signaling server is no longer required and that connection can be closed.

Real-time peer connectivity in Universal Windows Applications enables many exciting scenarios. We’ve seen developers use this technology to enable a remote peer to see what HoloLens users sees in real-time and interact with their 3D environment. Xbox developers have used the DataChannel to enable low-latency FPS style gaming. And one of our close collaborators, Blackboard, relies on the technology to stream classroom video feeds and enable collaboration in their Windows app. Check out our Universal Windows samples and the library source on GitHub– we look forward to your PRs!

The post Real-Time Communications on the Universal Windows Platform with WebRTC and ORTC appeared first on Building Apps for Windows.

Learn C++ Concepts with Visual Studio and the WSL

$
0
0

Concepts promise to fundamentally change how we write templated C++ code. They’re in a Technical Specification (TS) right now, but, like Coroutines, Modules, and Ranges, it’s good to get a head start on learning these important features before they make it into the C++ Standard. You can already use Visual Studio 2017 for Coroutines, Modules, and Ranges through a fork of Range-v3. Now you can also learn Concepts in Visual Studio 2017 by targeting the Windows Subsystem for Linux (WSL). Read on to find out how!

About concepts

Concepts enable adding requirements to a set of template parameters, essentially creating a kind of interface. The C++ community has been waiting years for this feature to make it into the standard. If you’re interested in the history, Bjarne Stroustrup has written a bit of background about concepts in a recent paper about designing good concepts. If you’re just interested in knowing how to use the feature, see Constraints and concepts on cppreference.com. If you want all the details about concepts you can read the Concepts Technical Specification (TS).

Concepts are currently only available in GCC 6+. Concepts are not yet supported by the Microsoft C++ Compiler (MSVC) or Clang. We plan to implement the Concepts TS in MSVC but our focus is on finishing our existing standards conformance work and implementing features that have already been voted into the C++17 draft standard.

We can use concepts in Visual Studio 2017 by targeting the Linux shell running under WSL. There’s no IDE support for concepts–thus, no IntelliSense or other productivity features that require the compiler–but it’s nice to be able to learn Concepts in the same familiar environment you use day to day.

First we have to update the GCC compiler. The version included in WSL is currently 4.8.4–that’s too old to support concepts. There are two ways to accomplish that: installing a Personal Package Archive (PPA) or building GCC-6 from source.

But before you install GCC-6 you should configure your Visual Studio 2017 install to target WSL. See this recent VCBlog post for details: Targeting the Windows Subsystem for Linux from Visual Studio. You’ll a working setup of VS targeting Linux for the following steps. Plus, it’s always good to conquer problems in smaller pieces so you have an easier time figuring out what happened if things go wrong.

Installing GCC-6

You have two options for installing GCC-6: installing from a PPA or building GCC from source.

Using a PPA to install GCC

A PPA allows developers to distribute programs directly to users of apt. Installing a PPA tells your copy of apt that there’s another place it can find software. To get the newest version of GCC, install the Toolchain Test PPA, update your apt to find the new install locations, then install g++-6.

sudo add-apt-repository ppa:ubuntu-toolchain-r/test
sudo apt update
sudo apt install g++-6

The PPA installs GCC as a non-default compiler. Running g++ --version shows version 4.8.4. You can invoke GCC by calling g++-6 instead of g++. If GCC 6 isn’t your default compiler you’ll need to change the remote compiler that VS calls in your Linux project (see below.)

g++ --version
g++-6 --version
Building GCC from source

Another option is to build GCC 6.3 from source. There are a few steps, but it’s a straightforward process.

  1. First you need to get a copy of the GCC 6.3 sources. Before you can download this to your bash shell, you need to get a link to the source archive. Find a nearby mirror and copy the archive’s URL. I’ll use the tar.gz in this example:
    wget http://[path to archive]/gcc-6.3.0.tar.gz
  2. The command to unpack the GCC sources is as follows (change /mnt/c/tmp to the directory where your copy of gcc-6.3.0.tar.gz is located):
    tar -xvf /mnt/c/tmp/gcc-6.3.0.tar.gz
  3. Now that we’ve got the GCC sources, we need to install the GCC prerequisites. These are libraries required to build GCC. (See Installing GCC, Support libraries for more information.) There are three libraries, and we can install them with apt:
    sudo apt install libgmp-dev
    sudo apt install libmpfr-dev
    sudo apt install libmpc-dev
  4. Now let’s make a build directory and configure GCC’s build to provide C++ compilers:
    cd gcc-6.3.0/
    mkdir build
    cd build
    ../configure --enable-languages=c,c++ --disable-multilib
  5. Once that finishes, we can compile GCC. It can take a while to build GCC, so you should use the -j option to speed things up.
    make -j

    Now go have a nice cup of coffee (and maybe watch a movie) while the compiler compiles.

  6. If make completes without errors, you’re ready to install GCC on your system. Note that this command installs GCC 6.3.0 as the default version of GCC.
    sudo make install

    You can check that GCC is now defaulting to version 6.3 with this command:

    $ gcc --version
    gcc (GCC) 6.3.0
    Copyright (C) 2016 Free Software Foundation, Inc.
    This is free software; see the source for copying conditions.  There is NO
    warranty; not even for MERCHANTABILITY or FITNESS FOR A PARTICULAR PURPOSE.

Trying out Concepts in VS

Now that you’ve updated GCC you’re ready to try out concepts! Let’s restart the SSH service again (in case you exited all your bash instances while working through this walkthrough) and we’re ready to learn concepts!

sudo service ssh start

Create a new Linux project in VS:

newlinuxproject

Add a C++ source file, and add some code that uses concepts. Here’s a simple concept that compiles and executes properly. This example is trivial, as the compile would fail for any argument i that doesn’t define operator==, but it demonstrates that concepts are working.

#include 

template 
concept bool EqualityComparable() {
	return requires(T a, T b) {
		{a == b}->bool;
		{a != b}->bool;
	};
}

bool is_the_answer(const EqualityComparable& i) {
	return (i == 42) ? true : false;
}

int main() {
	if (is_the_answer(42)) {
		std::cout << "42 is the answer to the ultimate question of life, the universe, and everything." << std::endl;
	}
	return 0;
}

You’ll also need to enable concepts on the GCC command line. Go to the project properties, and in the C++ > Command Line box add the compiler option -fconcepts.

fconcepts

If GCC 6 isn’t the default compiler in your environment you’ll want to tell VS where to find your compiler. You can do that in the project properties under C++ > General > C++ compiler by typing in the compiler name or even a full path:

gplusplus6

Now compile the program and set a breakpoint at the end of main. Open the Linux Console so you can see the output (Debug > Linux Console). Hit F5 and watch concepts working inside of VS!

concepts

Now we can use Concepts, Coroutines, Modules, and Ranges all from inside the same Visual Studio IDE!

In closing

As always, we welcome your feedback. Feel free to send any comments through e-mail at visualcpp@microsoft.com, through Twitter @visualc, or Facebook at Microsoft Visual Cpp.

If you encounter other problems with Visual C++ in VS 2017 please let us know via the Report a Problem option, either from the installer or the Visual Studio IDE itself. For suggestions, let us know through UserVoice. Thank you!

MSRT February 2017: Chuckenit detection completes MSRT solution for one malware suite

$
0
0

In September 2016, we started adding to Microsoft Malicious Software Removal Tool (MSRT) a malware suite of browser modifiers and other Trojans installed by software bundlers. We documented how the malware in this group install other malware or applications silently, without your consent. This behavior ticks boxes in the evaluation criteria that Microsoft Malware Protection Center (MMPC) uses for identifying unwanted software. Installing software without your permission, interaction, or consent is considered unwanted behavior because that can take away the choice you should have in determining what applications to install on your computer.

By October 2016, MSRT detected and removed most of the malware families in this suite:

  • Sasquor, which changes browser search and homepage settings to circumvent the browser’s supported methods and bypass your consent, and can install other malware like Xadupi and Suweezy
  • SupTab, which also changes browser search and homepage settings, and installs services and scheduled tasks that regularly install additional malware
  • Suweezy, which attempts to modify settings for various antivirus software, including Windows Defender, creating a significant danger to your computer’s overall security
  • Xadupi, which registers a service that regularly installs other apps, including Ghokswa and SupTab, and is ostensibly an update service for an app that has some user-facing functionality: CornerSunshine displays weather information on the taskbar, WinZipper can open and extract archive files, and QKSee can be used to view image files
  • Ghokswa, which installs a customized version of Chrome or Firefox browsers, modifying the home page and search engine front-end or stopping processes and replacing shortcuts and associations for the legitimate browser with ones pointing to its own version

This month, we’re adding Chuckenit, the last remaining malware in this group, to MSRT, helping make sure the whole suite is detected and removed from your computer and doesn’t interfere with your computing experience.

Chuckenit is an application called “Uncheckit”, whose main purpose is to uncheck checkboxes in installation dialogue boxes, effectively messing with choices without your knowledge during installation.

Chuckenit is installed together with Suptab and Ghokswa when Xadupi downloads and installs updates. Xadupi, meanwhile is installed by Sasquor, although it may also be installed directly by software bundlers.

chuckenit-infection_chart1

Figure 1. Chuckenit is installed silently by Xadupi, which is installed by Sasquor.

chuckenit-infection_chart2

Figure 2. Xadupi may also be installed directly by software bundlers, such as ICLoader.

Similar to the other malware in this suite, as part of its installation, Chuckenit adds several Scheduled Tasks and registers a couple of services to automatically download updates, which may come with other applications or malware.

Since May 2016, Windows Defender has encountered this threat in over 418,000 computers, of which 12% are in Brazil, 7% are in India, and 7% are in Russia.

chuckenit-country

Figure 3. Geographic distribution of Chuckenit encounters

Prevention, detection, and recovery

Chuckenit is part of an infection chain that involves malware and software bundlers silently installing other applications. You need security solutions that detect and remove all components of this type of infection.

Ensure you get the latest protection from Microsoft. Keep your Windows operating system and antivirus up-to-date and, if you haven’t already, upgrade to Windows 10.

Ensure your antimalware protection, such as Windows Defender and Microsoft Malicious Software Removal Tool, is up-to-date. In Windows Defender, you can check your exclusion settings to see whether the malware added some entries in an attempt to exclude folders from being scanned. To check and remove excluded items in Windows Defender: Navigate to Settings>Update & security>Windows Defender>Add an exclusion. Go through the lists under Files and File locations, select the excluded item that you want to remove, and click Remove. Click OK to confirm.

Use cloud protection to get protection against the latest malware threats. It’s turned on by default for Microsoft Security Essentials and Windows Defender for Windows 10. Go to Settings> Update & security>Windows Defender and make sure that your Cloud-based Protection settings is turned On.

Use the Settings app to reset to Microsoft recommended defaults that may have been changed by the malware in this suite. Launch the Settings app. Navigate to the Default apps page. From Home go to System>Default apps, then click Reset.

For enterprises, use Device Guard, which can lock down devices and provide kernel-level virtualization-based security, allowing only trusted applications to run.

Use Windows Defender Advanced Threat Protection to get alerts about suspicious activities, including the download of malware, so you can detect, investigate, and respond to attacks in enterprise networks. Evaluate Windows Defender Advanced Threat Protection for free.

James Patrick Dee
MMPC

Code Coverage – Part 2

$
0
0

In my last post on code coverage, I shared the process for you to collect coverage for your environment. This week, I’ll be describing a way to use our tools to create new tests and show how you can measure the increase of coverage for PowerShell Core after adding new tests. To recap, we can collect code coverage with the OpenCover module, and then inspect the coverage. In this case I would like to know about coverage for a specific cmdlet. For this post, we’re going to focus on the Clear-Content Cmdlet because coverage is ok, but not fantastic and it is small enough to go over easily.

Here’s a partial capture from running the OpenCover tools:

coverage-2a

By selecting the class Microsoft.PowerShell.Commands.ClearContentCommand we can drill into the specifics about the class which implements the Clear-Content cmdlet. We can see that we have about 47% line coverage for this class which isn’t fantastic, by inspecting the red-highlights we can see what’s missing.

coverage-2b

coverage-2c

coverage-2d

It looks like there are some error conditions, and some code which represents whether the underlying provider supports should process are not being tested. We can create tests for these missing areas fairly easily, but I need to know where these new tests should go.

Test Code Layout

Now is a good time to describe how our tests are laid out.

https://github.com/PowerShell/PowerShell/test contains all of the test code for PowerShell. This includes our native tests, C-Sharp tests and Pester tests as well as the tools we use. Our Pester tests should all be found in https://github.com/PowerShell/PowerShell/test/powershell and in that directory there is more structure to make it easier to find tests. For example, if you want to find those tests for a specific cmdlet, you would look in the appropriate module directory for those tests. In our case, we’re adding tests for Clear-Content, which should be found in https://github.com/PowerShell/PowerShell/test/powershell/Modules/Microsoft.PowerShell.Management. (You can always find which module a cmdlet resides via get-command). If we look in this directory, we can already see the file Clear-Content.Tests.ps1, so we’ll add our tests to that file. If that file didn’t exist, you should just create a new file for your tests. Sometimes the tests for a cmdlet may be combined with other tests. Take this as an opportunity to split up the file to make it easier for the next person adding tests. If you want more information about how we segment our tests, you can review https://github.com/PowerShell/PowerShell/docs/testing-guidelines/testing-guidelines.md.

New Test Code

Based on the missing code coverage, I created the following replacement for Clear-Content.Tests.ps1 which you can see in this PR: https://github.com/PowerShell/PowerShell/pull/3157. After rerunning the code coverage tools, I can see that I’ve really improved coverage for this cmdlet.

coverage-2e

There seems to be a small issue with OpenCover as some close braces are not being marked as missed, but you can see the improvement:

coverage-2f

Now it’s your turn and we could really use your help. If you have areas of the product that you rely on, and don’t have the tests that you think they should have, please consider adding tests!


Get ready for the biggest night in Hollywood

$
0
0

This award season has been a flurry of excitement, inspiring speeches, and of course, great fashion. However, this Sunday, February 26, it all comes to a head when the biggest names in Hollywood hit the red carpet for the 89th Academy Awards*.

To prep for the show, or catch up on all the buzz after the event, head to Bing and search “Academy Awards” and check out nominees, predictions, and more. For now, read on to see all the results you’ll discover by searching on Bing, including our new red carpet shopping experience.

Nominees and Predictions

Use the Bing nominee carousel to see who’s in the running for each category, and who Bing predicts will take home a little Gold Man. For example, will “La La Land” take home the award for Best Picture? Bing Predicts thinks so. If you’re someone who likes to play along, download the ballot we’ve created.

Shop Red Carpet Looks

One of the best things about the Oscars is the glitz and glamour. In advance of the show, you can revisit last year’s fashions, then on the night of the event, we’ll show you the red carpet styles of 2017. Come back to Bing the morning after (Monday, February 27) and we’ll show where you can buy similar red carpet looks! Bing image-recognition technology scans photos of a celebrity’s clothes, searches for the best matches, and then help you discover the shopping sites where you can find similar outfits.

Must-Watch Moments

Interesting things often happen at these shows. Some magical. Some odd. Either way, they’re worth watching. We’ll have these must-watch clips on Bing so you can view before you connect with friends to discuss the night’s events. Just look for the link “Best Moments” after the show ends.

Here are a few more ways to get in the Oscars spirit. See which Best Picture nominees are still playing in a theater near you by searching “movies near me.” Next, read up on the latest Academy Awards coverage here. Finally, connect with Zo (our social AI with #friendgoals) this Sunday on Facebook Messenger or Kik and chat about the event as it happens.

Happy viewing!

- The Bing Team

“OSCAR®,” “OSCARS®,” “ACADEMY AWARD®,” and “ACADEMY AWARDS®,” are trademarks and service marks of the Academy of Motion Picture Arts and Sciences.

Blob Auditing in Azure SQL Database is Generally Available

$
0
0

We are excited to announce that SQL Blob Auditing is now Generally Available in Azure SQL Database.

Blob Auditing tracks database events and writes audited events to an audit log in your Azure Storage account. Auditing can help maintain regulatory compliance, understand database activity, and gain insight into discrepancies and anomalies that could indicate business concerns or suspected security violations.

Blob Auditing will be replacing Table Auditing, which has been Generally Available since November 2014, processing billions of daily queries. Blob Auditing will continue to provide the high quality service that Table Auditing has been providing to thousands of SQL customers over the past two years, while generating additional value for existing, as well as new customers:

  • Better performance
  • Advanced filtering options with higher object-level granularity
  • Reduced storage costs
  • SQL Server box compatibility

Blob Auditing also supports Threat Detection, providing an additional layer of security that detects anomalous activities that could indicate a threat to the database:

  • Threat Detection alerts on suspicious activities and enables customers to investigate and respond to potential threats as they occur.
  • Customers can investigate events in the audit log correlated with the suspicious activity, without the need to be a security expert or manage advanced security monitoring systems.

Existing Table Auditing customers are strongly encouraged to switch their database auditing to Blob Auditing.

To get started using Blob Auditing for your Azure SQL database, please review our Get started with SQL database Auditing guide, which shows how to configure SQL DB Blob Auditing as well as provides information on different methods to process & analyze the audit logs.

SQL Security team

microsoft

Loading files from Azure Blob Storage into Azure SQL Database

$
0
0

Azure SQL Database enables you to directly load files stored on Azure Blob Storage using the BULK INSERT T-SQL command and OPENROWSET function.

Loading content of files form Azure Blob Storage account into a table in SQL Database is now single command:

BULK INSERT Product
FROM 'data/product.dat'
WITH ( DATA_SOURCE = 'MyAzureBlobStorageAccount');


BULK INSERT is existing command in T-SQL language that enables you to load files from file system into a table. New DATA_SOURCE option enables you to reference Azure Blob Storage account.

You can also use OPENROWSET function to parse content of the file and execute any T-SQL query on returned rows:

SELECT Color, count(*)
FROM OPENROWSET(BULK 'data/product.bcp', DATA_SOURCE = 'MyAzureBlobStorage',
 FORMATFILE='data/product.fmt', FORMATFILE_DATA_SOURCE = 'MyAzureBlobStorage') as data
GROUP BY Color;

OPENROWSET function enables you to specify data sources where input file is placed, and data source where format file (the file that defines the structure of file) is placed.

If your file is placed on a public Azure Blob Storage account, you need to define EXTERNAL DATA SOURCE that points to that account:


CREATE EXTERNAL DATA SOURCE MyAzureBlobStorage
 WITH ( TYPE = BLOB_STORAGE, LOCATION = 'https://myazureblobstorage.blob.core.windows.net');

Once you define external data source, you can use the name of that source in BULK INSERT and OPENROWSET.

CREATE MASTER KEY ENCRYPTION BY PASSWORD ='some strong password';
CREATE DATABASE SCOPED CREDENTIAL MyAzureBlobStorageCredential
 WITH IDENTITY = 'SHARED ACCESS SIGNATURE',
 SECRET = 'sv=2015-12-11&ss=b&srt=sco&sp=rwac&se=2017-02-01T00:55:34Z&st=2016-12-29T16:55:34Z&spr=https&sig=copyFromAzurePortal';
CREATE EXTERNAL DATA SOURCE MyAzureBlobStorage
 WITH ( TYPE = BLOB_STORAGE,       LOCATION = 'https://myazureblobstorage.blob.core.windows.net',
        CREDENTIAL= MyAzureBlobStorageCredential);


You can find full example with some sample files on SQL Server GitHub account.

Announcing new Azure Functions capabilities to accelerate development of serverless applications

$
0
0

Ever since the introduction of Azure Functions, we have seen customers build interesting and impactful solutions using it.  The serverless architecture, ability to easily integrate with other solutions, streamlined development experience and on-demand scaling enabled by Azure Functions continue to find great use in multiple scenarios.

Today we are happy to announce preview support for some new capabilities that will accelerate development of serverless applications using Azure Functions.

Integration with Serverless Framework

Today we’re announcing preview support for Azure Functions integration with the Serverless Framework. The Serverless Framework is a popular open source tool which simplifies the deployment and monitoring of serverless applications in any cloud. It helps abstract away the details of the serverless resources and lets developers focus on the important part – their applications. This integration is powered by a provider plugin, that now makes Azure Functions a first-class participant in the serverless framework experience.  Contributing to this community effort was a very natural choice, given the origin of Azure Functions was in the open-source Azure WebJobs SDK.

You can learn more about the plugin in the Azure Functions Serverless Framework documentation and in the Azure Functions Serverless Framework blog post. 

Azure Functions Proxies

Functions provide a fantastic way to quickly express actions that need to be performed in response to some triggers (events).  That sounds an awfully lot like an API, which is what several customers are already using Functions for.  We’re also seeing customers starting to use Functions for microservices architectures, with a need for deployment isolation between individual components.

Today, we are pleased to announce the preview of Azure Functions Proxies, a new capability that makes it easier to develop APIs using Azure Functions. Proxies let you define a single API surface for multiple function apps. Any function app can now define an endpoint that serves as a reverse proxy to another API, be that another function app, an API app, or anything else.

You can learn more about Azure Functions Proxies by going to our documentation page and in the Azure Functions Proxies public preview blog post. The feature is free while in preview, but standard Functions billing applies to proxy executions. See the Azure Functions pricing page for more information.

Integration with PowerApps and Flow

PowerApps and Flow are services that enable business users within an organization to turn their knowledge of business processes into solutions. Without writing any code, users can easily create apps and custom automated workflows that interact with a variety of enterprise data and services. While they can leverage a wide variety of built-in SaaS integrations, users often find the need to incorporate company-specific business processes. Such custom logic has traditionally been built by professional developers, but it is now possible for business users building apps to consume such logic in their workflows.

Azure App Service and Azure Functions are both great for building organizational APIs that express important business logic needed by many apps and activities.  We've now extended the API Definition feature of App Service and Azure Functions to include an "Export to PowerApps and Microsoft Flow" gesture. This walks you through all the steps needed to make any API in App Service or Azure Functions available to PowerApps and Flow users. To learn more, see our documentation and read the APIs for PowerApps and Flow blog post.

We are excited to bring these new capabilities into your hands and look forward to hearing from you through our forums, StackOverFlow, or Uservoice.

#AzureAD now supports Federated SSO and Provisioning with Slack

$
0
0

Howdy folks,

We have a very cool integration to announce today: Azure AD now supports both automated user provisioning and federated single sign-on to Slack!

With this integration, businesses can now use Azure AD to automatically provision and manage employee access to Slack, based on things like group membership or account status. In addition to provisioning user accounts, Azure AD can also create and manage groups inside of Slack, based on groups in Azure AD and Active Directory.


As one of the featured apps in the Azure AD app gallery, Azure AD also supports fully-federated single sign-on with Slack, in addition to an easy click-through setup for admins.

See our documentation for more information on setting up user provisioning between Azure AD and Slack. The Azure AD Integration is available for customers on Slack’s Plus plan or those using their recently-announced Enterprise Grid product.

We’d like to thank the Slack team for their great partnership and support in delivering this integration, and look forward to continuing our work with them to deliver great experiences for our mutual customers!

Let us know what you think about this integration! Leave us your comments at the end of this post or reach out to us on Twitter. We’re always listening.

Best regards,

Alex Simons (Twitter: @Alex_A_Simons)

Director of Program Management

Microsoft Identity Division

Viewing all 13502 articles
Browse latest View live


<script src="https://jsc.adskeeper.com/r/s/rssing.com.1596347.js" async> </script>