Quantcast
Channel: TechNet Technology News
Viewing all 13502 articles
Browse latest View live

What’s new in Hyper-V for the Windows 10 Creators Update?

$
0
0

Microsoft just released the Windows 10 Creators Update.  Which means Hyper-V improvements!

New and improved features in Creators Update:

  • Quick Create
  • Checkpoint and Save for nested Hyper-V
  • Dynamic resize for VM Connect
  • Zoom for VM Connect
  • Networking improvements (NAT)
  • Developer-centric memory management

Keep reading for more details.  Also, if you want to try new Hyper-V things as we build them, become a Windows Insider.

Faster VM creation with Quick Create

clip_image001

Hyper-V Manager has a new option for quickly and easily creating virtual machines, aptly named “Quick Create”.  Introduced in build 15002, Quick Create focuses on getting the guest operating system up and running as quickly as possible — including creating and connecting to a virtual switch.

When we first released Quick Create, there were a number of issues mostly centered on our default virtual machine settings (read more).  In response to your feedback, we have updated the Quick Create defaults.

Creators Update Quick Create defaults:

  • Generation: 2
  • Memory: 2048 MB to start, Dynamic Memory enabled
  • Virtual Processors: 4
  • VHD: dynamic resize up to 100GB

Checkpoint and save work on nested Hyper-V host

Last year we added the ability to run Hyper-V inside of Hyper-V (a.k.a. nested virtualization).  This has been a very popular feature, but it initially came with a number of limitations.  We have continued to work on the performance, compatibility and feature integration of nested virtualization.

In the Creator update for Windows 10 you can now take checkpoints and saved states on virtual machines that are acting as nested Hyper-V hosts.

Dynamic resize for Enhanced Session Mode VMs

dynamic_resize

The picture says it all.  If you are using Hyper-V’s Enhanced Session Mode, you can dynamically resize your virtual machine.  Right now, this is only available to virtual machines that support Hyper-V’s Enhanced Session mode.  That includes:

  • Windows Client: Windows 8.1, Windows 10 and later
  • Windows Server: Windows Server 2012 R2, Windows Server 2016 and later

Read blog announcement.

Zoom for VM Connect

Is your virtual machine impossible to read?  Alternately, do you suffer from scaling issues in legacy applications?

VMConnect now has the option to adjust Zoom Level under the View Menu.

image

Multiple NAT networks and IP pinning

NAT networking is vital to both Docker and Visual Studio’s UWP device emulators.  When we released Windows Containers, developers discovered number of networking differences between containers on Linux and containers on Windows.  Additionally, introducing another common developer tool that uses NAT networking presented new challenges for our networking stack.

In the Creators Update, there are two significant improvements to NAT:

  1. Developers can now use for multiple NAT networks (internal prefixes) on a single host.
    That means VMs, containers, emulators, et. al. can all take advantage of NAT functionality from a single host.
  2. Developers are also able to build and test their applications with industry-standard tooling directly from the container host using an overlay network driver (provided by the Virtual Filtering Platform (VFP) Hyper-V switch extension) as well as having direct access to the container using the Host IP and exposed port.

Improved memory management

Until recently, Hyper-V has allocated memory very conservatively.  While that is the right behavior for Windows Server, UWP developers faced out of memory errors starting device emulators from Visual Studio (read more).

In the Creators Update, Hyper-V gives the operating system a chance to trim memory from other applications and uses all available memory.  You may still run out of memory, but now the amount of memory shown in task manager accurately reflects the amount available for starting virtual machines.

Introduced in build 15002.

As always, please send us feedback!

Once more, because I can’t emphasize this enough, become a Windows Insider– almost everything here has benefited from your early feedback.

Cheers,
Sarah


Building Your App in a CI Pipeline with Customized Build Servers (Private Agents)

$
0
0

With the expanding number of tools to help you become more productive or to improve the functionality of your app, you may have a requirement for a custom tool or specific version to be used during the build process in a Continuous Integration build. If using Visual Studio Team Services, there may be instances when the Hosted agent won’t work to build your app if you have such dependencies on tools or versions that don’t exist on the Hosted agent. Is it possible to build an app with customized build servers? Of course!

There are several benefits beyond simply the available versions of specific software to setting up your own build agents.

These include:

  1. Your server can cache dependencies such as NuGet or Maven packages.
  2. You can run incremental builds.
  3. You can have a faster machine.

Donovan Brown has an excellent article that has more detailed list on his blog.

How do I build my app in a Continuous Integration pipeline that requires custom dependencies?

In this case, you can easily install and configure a private agent that does have these dependencies installed on the machine to build your app through Visual Studio Team Services. The machine can be hosted in the cloud or on-premises as long as it can communicate back to Visual Studio Team Services. Any tool that you need installed for the build process to succeed can be installed on a machine that has a private agent on it. You just need to point the build definition to your agent pool with the private agent in it and you’re good to go.

With a private agent, there are no limits to the apps that you can build in Visual Studio Team Services. Your build definition can have any number of custom tasks and processes that you can point to the private agent. And you can use these same agents if you want to deploy to those machines as well!

How do I get started to build my app with a private agent?

If you want to host your agents on your own hardware or on VMs in the cloud, you can find detailed instructions on deploying the agent to each of our supported platforms.

We also publish container images to https://hub.docker.com/r/microsoft/vsts-agent/ and of course we open source the Docker files we use to create them.

While your agent can be deployed on any cloud or on-premises machine that can access VSTS, the Azure DevTest Labs service provides some great features to help you manage both your agents and the software installed on them. Using the artifacts and formulas you can rapidly deploy a pool of identical build and release agents, there is even a built-in artifact for adding the agent to your VM. In addition to the repeatable deployment of agents, DevTest Labs has a great set of policies that can help you control your costs by automatically turning some of your agents at certain times during the day when they may not be needed. You can find a more detailed walkthrough of this process in How to Create a Monster Build Agent in Azure for Cheap! By Peter Huage.

In any of the scenarios listed above you will need to start by creating a Personal Access Token (PAT). It is important to note that this PAT is only used for the agent registration process and is not persisted to the agent machine, so you don’t have to worry about the expiration. When you create the PAT you can limit the scope to Agent Pools (read, manage).

image

Then, download and install the private agent onto your machine. You can add the agent to the Default agent pool or a custom agent pool that you create in Visual Studio Team Services.

image

image

Follow these steps to create a build definition.

After you’ve added in the tasks to build (and test) your app into your build definition, ensure that the Continuous Integration trigger is set in the “Triggers” tab of the definition (the branch filter may look different if you’re using TFVC).

image

In the “General” tab of the build definition, set the default agent queue to be “Default” or the agent pool that you configured your private agent in.

image

When your build definition queues automatically after code has been checked in, you’ll be able to see that your build ran on the private agent you created:

image

How many builds and releases can I run in parallel?

VSTS allows you to register as many build and release agents as you want with the service. However, the number of builds and release you can run concurrently is controlled by the number of pipelines you have available in your account. By default, your account includes 2 pipelines and 240 minutes of compute in the Hosted pool. This means you can run 2 concurrent build and releases across all agents, hosted or private, in your account. For details on how pipelines are consumed and how you can purchase additional pipelines please see the documentation.

For further reading, see the documentation on Build and Release Agents.

We now have a Continuous Integration build pipeline that connects to a private agent that we’ve configured on our machine, a customized build server.

Visual Studio Team Services makes it easy to build any app, even if it requires custom tools or dependencies.

Five reasons to run SQL Server 2016 on Windows Server 2016 – No. 4: Reach insights faster by running analytics at the point of creation

$
0
0

This is the fourth post in a five-part blog series. Keep an eye out for upcoming posts and catch up on the first, second, and third in the series.

In addition, join us for Microsoft Data Amp on April 19 at 8 AM PT. The online event will showcase how data is the nexus between application innovation and artificial intelligence. You’ll learn how data and analytics powered by the most trusted and intelligent cloud can help companies differentiate and out-innovate their competition. Microsoft Data Amp—where data gets to work.

Data! Data! Data! … I can’t make bricks without clay!” – Sherlock Holmes (Sir Arthur Conan Doyle)

If he lived today, Sherlock Holmes might be a data scientist, working to solve cases faster by using advanced analytics to augment his legendary deductive powers. And Sherlock would insist on the fastest means possible for reaching insights. So what’s the best way to process massive amounts of data quickly to get faster time to insight?

It’s elementary: Sherlock would deduce that SQL Server 2016 and Windows Server 2016 are an exceptional platform for delivering built-in fast analytics by running queries at the point of creation.

At the OS level, Windows Server 2016 delivers new levels of performance with capabilities such as Persistent Memory (or Storage Class Memory), which improves latency by 3x, and Storage Spaces Direct, which gives you highly available, scalable storage area network functionality on inexpensive industry-standard servers and produces read speeds that can exceed 25 GB per second.

These features are built into the OS, so no additional licenses are required. For full details on Windows Server 2016 price/performance benefits, read the blog post “Five reasons to run SQL Server 2016 on Windows Server 2016 – No. 2: Performance and cost.”

In addition, at the data platform level, SQL Server 2016 delivers innovative analytics tools such as SQL Server R Services, real-time operational analytics, and new R-models.

Combined, SQL Server 2016 and Windows Server 2016 provide multithreading and massively parallel processing for high-performance data analysis.

SQL Server R Services built into T-SQL

R is a respected data-mining tool for uncovering insights and making predictions. SQL Server R Services is built into T-SQL and brings advanced predictive analytics to the data.

As a SQL Server 2016 data professional, you probably use T-SQL daily. Now, you can take advantage of R through the T-SQL interface. With R Services support for in-database analytics, you can work with data in SQL Server 2016, and applications can use T-SQL system stored procedures to call R scripts. If you’re an application developer, you don’t need to deep dive into R. You can rely on the T-SQL API for such tasks as creating SQL Server Reporting Services reports or Power BI dashboards with scores, predictions, and visuals from R.

You also get SQL Server built-in functions and mechanisms to accelerate performance and integration. For example, you can use columnstore indexes with R for faster queries. Built-in resource governance can control the resources allocated to the R runtime. The stored procedure interface gives you smooth integration with SQL Server Integration Services for integration with common extract, transform, and load and job scheduling. Learn more about SQL Server 2016 R Services and read about a real-world implementation.

Real-time operational analytics

With SQL Server 2016, you can do real-time operational analytics in two ways: on disk-based and memory-optimized tables. This means you don’t have to make changes to your applications when you perform real-time analytics.

SQL Server 2016 Real-Time Operational Analytics lets you use columnstore indexes to run analytics queries directly on your operational workload. Figure 1 shows a possible configuration, which uses Analysis Server in Direct Query mode, but if you have other analytics tools or a custom solution, you can use those, too. When you use both memory-optimized and columnstore, you get the best of online transaction processing performance and analytics query performance. Learn more about real-time operational analytics using in-memory technology.

Figure 1: A real-time operational analytics example

clip_image002

Multithreading and massive parallel processing

The cloud is built into SQL Server 2016, making it possible for you to take advantage of multithreading and massive parallel processing (MPP) to achieve high-performance data analysis. Azure SQL Data Warehouse uses an elastic MPP architecture built on the SQL Server 2016 database engine. This means you can continue using the SQL Server-based tools and BI applications that you use today when you want to interactively query and analyze data. Azure SQL Data Warehouse has built-in performance analytics and storage compression, the aggregation capabilities of SQL Server, and cutting-edge query optimization capabilities. In addition, with Polybase built in, you can query Hadoop systems directly, so that you have a single SQL-based query surface for all your data.

New R-models

SQL Server and Windows Server come with built-in functionality to make your job easier. In addition, Azure data services provides access to the work data scientists have already done by creating R-models that you can use. You can find a model you need in the Azure marketplace.

The Cortana Intelligence Solutions Gallery is the Microsoft Data Science VM that comes loaded with all the tools a data scientist needs. You can also find the code on GitHub, so you can run it locally on your own machine.

To learn more, see “Cortana Intelligence and Machine Learning Blog: Using SQL Server 2016 with R Services for Campaign Optimization” and the Microsoft R Server video.

SQL Server 2016 and Windows Server 2016: It’s all built in

The role of data in business decision-making is taking on ever greater importance, and the difference between success and failure can hinge on how fast you’re able to analyze data. As a result, business intelligence and advanced analytics are changing the very nature of business. By examining all the built-in capabilities, surely Sherlock Holmes would deduce that with the combination of SQL Server 2016, Windows Server 2016, and Azure, you can make sure your business is equipped for success. For an overview of SQL Server 2016 advanced analytics and business intelligence, see “Decisions @ the speed of thought with SQL Server 2016.” For details on price/performance, see “Five reasons to run SQL Server 2016 on Windows Server 2016 – No. 2: Performance and cost.”

Northern Illinois University—giving everyone the best tools for learning with Office 365

$
0
0

Today’s Office 365 post was written by Brett Coryell, chief information officer at Northern Illinois University.

A key role of any university is to provide students, faculty and staff with access to amazing resources: world-class libraries, state-of-the-art labs and innovative research facilities, to name just a few. As the CIO and vice president of Information Technology at Northern Illinois University (NIU), I make sure the wealth of campus resources that the campus community enjoys is also reflected in the technology they use. Higher education is synonymous with innovation, collaboration and communication. We enhanced these values at NIU by bringing in Microsoft Office 365 cloud-based services.

When I joined NIU in 2014, the IT environment had a distinct divide between students, who used Google G Suite for Education, and faculty and staff, who used Novell GroupWise. The very first decision I made as CIO was to move faculty from an outdated, on-premises solution to Office 365. Next, I addressed one of the chief complaints of our faculty members, which was the difficulty of navigating the Google environment to collaborate with their students. Collaboration between students and faculty is fundamental to learning, and it simply didn’t make sense to keep students and teachers on separate software platforms. For that reason, we migrated all 19,000 students to Office 365, completing a campus-wide move to the cloud.

Any time we make a change at NIU, we think first about the effect it will have on our students. Our change management team did a stellar job of keeping students in the loop when it came time to migrate, using an impressive 33 channels of communication to ensure they understood the benefits of moving to Office 365. Now that everyone is on the same page, communication issues have naturally dissipated, and closer connections are being forged. I can see this in the enthusiasm with which students and educators have adopted the dynamic email and collaboration tools. Shared calendaring is an incredible way for professors and students to coordinate their schedules and implement flexible “digital” office hours. Using tools for anytime, anywhere collaboration among individuals both on campus and off improves teamwork on projects. There are many benefits to an integrated, multiplatform suite where you can store data online so it’s always available. Amazingly, I’m seeing students start to write their papers on their smartphones and finish the work at home on their laptop or in the computer lab.

Email and data security at NIU gets a boost from Office 365 features like Microsoft Exchange Online Protection, which streamlines how we deal with compromised accounts, and Exchange Online Archiving, which we use to ensure compliance. By adding these features, our IT team has gained more time to focus on strategic projects instead of putting out fires.

There is a tangible value to moving to Office 365 as well. Previously, we had a surplus of videoconferencing solutions—everything from WebEx to Polycom. By consolidating on Skype for Business Online, we are saving US$300,000 a year on licensing. The switch from Google to Office 365 gives our students a yearly benefit of US$400,000 in services they didn’t have before, all for the cost of tuition. And we are avoiding half a million dollars in hardware upgrades.

Universities are about preparing for the future, and I’m excited about the future of Office 365 at NIU. For example, we plan to use Office 365 Video to boost learning with short clips that help students solve an equation. I anticipate the combination of Office Delve and Office 365 Video will be a powerful new way to help students gain access to visual learning.

When it comes to standardizing on a productivity platform across NIU, I’m thrilled that today we have a broad group of powerful tools that are equally available to everybody. Not only will students be learning the technology they will most likely use once they graduate, but everyone has the same opportunity to take those tools and achieve their personal best.

Read the full NIU case study.

The post Northern Illinois University—giving everyone the best tools for learning with
Office 365
appeared first on Office Blogs.

Five reasons to run SQL Server 2016 on Windows Server 2016, part 4

$
0
0

This is the fourth post in a five-part blog series. Keep an eye out for upcoming posts and catch up on the first, second, and third in the series.

Reach insights faster by running analytics at the point of creation

Data! Data! Data! I cant make bricks without clay! Sherlock Holmes (Sir Arthur Conan Doyle)

If he lived today, Sherlock Holmes might be a data scientist, working to solve cases faster by using advanced analytics to augment his legendary deductive powers. Sherlock would insist on the fastest means possible of reaching insights. So whats the best way to process massive amounts of data quickly to get faster time to insight?

Its elementary: Sherlock would deduce that SQL Server 2016 and Windows Server 2016 are an exceptional platform in delivering built-in fast analytics by running queries at the point of creation.

At the OS level, Windows Server 2016 delivers new levels of performance with capabilities such as Persistent Memory (or Storage Class Memory), which improves latency by 3x, and Storage Spaces Direct, which gives you highly available, scalable storage area network (SAN) functionality on inexpensive industry-standard servers and produces read speeds that can exceed 25GB/second.

These features are built-in to the OS, so no additional licenses are required. For full details on Windows Server 2016 price/performance benefits, read the blog post.

Additionally, at the data platform level, SQL Server 2016 delivers innovative analytics tools such as SQL Server R Services, real-time operational analytics, and new R-models.

Combined, SQL Server 2016 and Windows Server 2016 provide multi-threading and massively parallel processing for high-performance data analysis.

SQL Server R Services built into T-SQL

R is a respected data mining tool for uncovering insights and making predictions. SQL Server R Services is built into T-SQL and brings advanced predictive analytics to the data.

As a SQL Server 2016 data professional, you probably use T-SQL daily. Now, you can take advantage of R through the T-SQL interface. With R Services support for in-database analytics, you can work with data in SQL Server 2016, and applications can use T-SQL system stored procedures to call R scripts. If youre an application developer, you dont need to deep dive into R. You can rely on the T-SQL API for such tasks as creating SQL Server Reporting Services reports or Power BI dashboards with scores, predictions, and visuals from R.

You also get SQL Server built-in functions and mechanisms to accelerate performance and integration. For example, you can use ColumnStore indexes with R for faster queries. Built-in resource governance can control the resources allocated to the R runtime. The stored procedure interface gives you smooth integration with SQL Server Integration Services (SSIS) for integration with common extract, transform, and load (ETL) and job scheduling. Learn more about SQL Server 2016 R Services and read about a real-world implementation.

Real-time operational analytics

With SQL Server 2016, you can do real-time operational analytics in two ways: on disk-based and memory-optimized tables. This means you dont have to make changes to your applications when you perform real-time analytics.

SQL Server 2016 Real-Time Operational Analytics lets you use columnstore indexes to run analytics queries directly on your operational workload. Figure 1 shows a possible configuration, which uses Analysis Server in Direct Query mode, but if you have other analytics tools or a custom solution, you can use those, too. When you use both memory-optimized and columnstore, you get the best ofonline transaction processing (OLTP)performance and analytics query performance. Learn more about real-time operational analytics using in-memory technology.

Figure 1: A Real-Time Operational Analytics Example

OLTP

Multi-threading and Massive Parallel Processing

The cloud is built into SQL Server 2016, making it possible for you to take advantage of multi-threading and massive parallel processing (MPP) to achieve high-performance data analysis. Azure SQL Data Warehouse uses an elastic MPP architecture built on the SQL Server 2016 database engine. This means you can continue using the SQL Server-based tools and BI applications that you use today when you want to interactively query and analyze data. It has built-in performance analytics and storage compression, the aggregation capabilities of SQL Server, and cutting-edge query optimization capabilities. In addition, with Polybase built in, you can query Hadoop systems directly, so that you have a single SQL-based query surface for all your data.

New R-models

SQL Server and Windows Server come with built-in functionality to make your job easier. In addition, Azure data services provides access to the work data scientists have already done by creating R-models that you can use. You can just find a model you need in the Azure marketplace.

The Cortana Intelligence Solutions Gallery is the Microsoft Data Science VM (DSVM) that comes loaded with all the tools a data scientist needs. You can also find the code on GitHub, so you can run it locally on your own machine.

To learn more, see “Cortana Intelligence and Machine Learning Blog: Using SQL Server 2016 with R Services for Campaign Optimization” and the Microsoft R Server video.

SQL Server 2016 and Windows Server 2016: Its all built in

The role of data in business decision-making is taking on ever greater importance, and the difference between success and failure can hinge on how fast youre able to analyze data. As a result, business intelligence and advanced analytics are changing the very nature of business. By examining all the built-in capabilities, surely Sherlock Holmes would deduce that with the combination of SQL Server 2016, Windows Server 2016, and Azure, you can make sure your business is equipped for success.

For an overview of SQL Server 2016 advanced analytics and business intelligence, see “Decisions @ the speed of thought with SQL Server 2016.” For details on price/performance, see Five reasons to run SQL Server 2016 on Windows Server 2016, part 2.

COM Server and OLE Document support for the Desktop Bridge

$
0
0

The Windows 10 Creators Update adds out-of-process (OOP) COM and OLE support for apps on the Desktop Bridge – a.k.a Packaged COM. Historically, Win32 apps would create COM extensions that other applications could use. For example, Microsoft Excel exposes its Excel.Application object so third-party applications can automate operations in Excel, leveraging its rich object model. But in the initial release of the Desktop Bridge with the Windows 10 Anniversary Update, an application cannot expose its COM extension points, as all registry entries are in its private hive and not exposed publicly to the system. Packaged COM provides a mechanism for COM and OLE entries to be declared in the manifest so they can be used by external applications. The underlying system handles the activation of the objects so they can be consumed by COM clients – all while still delivering on the Universal Windows Platform (UWP) promise of having a no-impact install and uninstall behavior.

How it works

Packaged COM entries are read from the manifest and stored in a new catalog that the UWP deployment system manages. This solves one of the main problems in COM in which any application or installer can write to the registry and corrupt the system, e.g. overwriting existing COM registrations or leaving behind registry entries upon uninstall.

At run-time when a COM call is made, i.e. calling CLSIDFromProgID() or CoCreateInstance(), the system first looks in the Packaged COM catalog and, if not found, falls back to the system registry. The COM server is then activated and runs OOP from the client application.

When to use Packaged COM

Packaged COM is very useful for apps that expose third-party extension points, but not all applications need it. If your application uses COM only for its own personal use, then you can rely on COM entries in the application’s private hive (Registry.dat) to support your app. All binaries in the same package have access to that registry, but any other apps on the system cannot see into your app’s private hive. Packaged COM allows you explicit control over which servers can be made public and used by third-parties.

Limitations

As the Packaged COM entries are stored in a separate catalog, applications that directly read the registry (e.g. calling RegOpenKeyEx() or RegEnumKeyEx()) will not see any entries and will fail. In these scenarios, applications providing extensions will need to work with their partners to go through COM API calls or provide another app-to-app communication mechanism.

Support is scoped to OOP servers, allowing two key requirements. First, OOP server supports means the Desktop Bridge can maintain its promise of serviceability. By running extensions OOP, the update manager can shut down the COM server and update all binaries because there are no dlls in use loaded by other processes. Second, OOP allows for a more robust extension mechanism. If an in-process COM server is hung, it will also hang the app; for OOP, the host app will still function and can decide how to handle the misbehaving OOP server.

We do not support every COM and OLE registration entry, for the full list of what we support please refer to the element hierarchy in the Windows 10 app package manifest on MSDN: https://docs.microsoft.com/uwp/schemas/appxpackage/uapmanifestschema/root-elements

Taking a closer look

The keys to enabling this functionality are the new manifest extension categories “windows.comServer” and “windows.comInterface.” The “windows.comServer” extension corresponds to the typical registration entries found under the CLSID (i.e.  HKEY_CLASSES_ROOT\CLSID\{MyClsId}) for an application supporting executable servers and their COM classes (including their OLE registration entries), surrogate servers, ProgIDs and TreatAs classes. The “windows.comInterface” extension corresponds to the typical registration entries under both the HKCR \Interface\{MyInterfaceID} and HKCR\Typelib\{MyTypelibID}, and supports Interfaces, ProxyStubs and Typelibs.

If you have registered COM classes before, these elements will look very familiar and straightforward to map from the existing registry keys into manifest entries. Here are a few examples.

Example #1: Registering an .exe COM server

In this first example, we will package ACDual for the Desktop Bridge. ACDual is an MFC OLE sample that shipped in earlier versions of Visual Studio. This app is an .exe COM server, ACDual.exe, with a Document CoClass that implements the IDualAClick interface. A client can then consume it. Below is a picture of the ACDual server and a simple WinForms client app that is using it:

Fig. 1 Client WinForms app automating AutoClick COM server

Store link: https://www.microsoft.com/store/apps/9nm1gvnkhjnf

GitHub link: https://github.com/Microsoft/DesktopBridgeToUWP-Samples/tree/master/Samples/PackagedComServer

Registry versus AppxManifest.xml

To understand how Packaged COM works, it helps to compare the typical entries in the registry with the Packaged COM entries in the manifest. For a minimal COM server, you typically need a CLSID with the LocalServer32 key, and an Interface pointing to the ProxyStub to handle cross-process marshaling. ProgIDs and TypeLibs make it easier to read and program against. Let’s take a look at each section and compare what the system registry looks like in comparison to Packaged COM snippets. First, let’s look at the following ProgID and CLSID entry that registers a server in the system registry:

; ProgID registration

[HKEY_CLASSES_ROOT\ACDual.Document]

@=”AClick Document”

[HKEY_CLASSES_ROOT\ACDual.Document\CLSID]

@=”{4B115281-32F0-11CF-AC85-444553540000}”

[HKEY_CLASSES_ROOT\ACDual.Document\DefaultIcon]

@=”F:\\VCSamples\\VC2010Samples\\MFC\\ole\\acdual\\Release\\ACDual.exe,1″


; CLSID registration

[HKEY_CLASSES_ROOT\CLSID\{4B115281-32F0-11CF-AC85-444553540000}]

@=”AClick Document”

[HKEY_CLASSES_ROOT\CLSID\{4B115281-32F0-11CF-AC85-444553540000}\InprocHandler32]

@=”ole32.dll”

[HKEY_CLASSES_ROOT\CLSID\{4B115281-32F0-11CF-AC85-444553540000}\LocalServer32]

@=”\”C:\\VCSamples\\MFC\\ole\\acdual\\Release\\ACDual.exe\””

[HKEY_CLASSES_ROOT\CLSID\{4B115281-32F0-11CF-AC85-444553540000}\ProgID]

@=”ACDual.Document”

For comparison, the translation into the package manifest is straightforward. The ProgID and CLSID are supported through the windows.comServer extension, which must be under your app’s Application element along with all of your other extensions. Regarding ProgIDs, you can have multiple ProgID registrations for your server. Notice that there is no default value of the ProgID to provide a friendly name, as that information is stored with the CLSID registration and one of the goals of the manifest schema is to reduce duplication of information. The CLSID registration is enabled through the ExeServer element with an Executable attribute, which is a relative path to the .exe contained in the package. Package-relative paths solve one common problem with registering COM servers declaratively: in a .REG file, you don’t know where your executable is located. Often in a package, all the files are placed in the root of the package. The Class registration element is within the ExeServer element. You can specify one or more classes for an ExeServer.

The next step is TypeLib and interface registration. In this example, the TypeLib is part of the main executable, and the interface uses the standard marshaler (oleaut32.dll) for its ProxyStub, so the registration is as follows:

[HKEY_CLASSES_ROOT\Interface\{0BDD0E81-0DD7-11CF-BBA8-444553540000}]

@=”IDualAClick”

[HKEY_CLASSES_ROOT\Interface\{0BDD0E81-0DD7-11CF-BBA8-444553540000}\ProxyStubClsid32]

@=”{00020424-0000-0000-C000-000000000046}”

[HKEY_CLASSES_ROOT\Interface\{0BDD0E81-0DD7-11CF-BBA8-444553540000}\TypeLib]

@=”{4B115284-32F0-11CF-AC85-444553540000}”

“Version”=”1.0″


;TypeLib registration

[HKEY_CLASSES_ROOT\TypeLib\{4B115284-32F0-11CF-AC85-444553540000}]

[HKEY_CLASSES_ROOT\TypeLib\{4B115284-32F0-11CF-AC85-444553540000}\1.0]

@=”ACDual”

[HKEY_CLASSES_ROOT\TypeLib\{4B115284-32F0-11CF-AC85-444553540000}\1.0\0]

[HKEY_CLASSES_ROOT\TypeLib\{4B115284-32F0-11CF-AC85-444553540000}\1.0\0\win32]

@=” C:\\VCSamples\\MFC\\ole\\acdual\\Release\\AutoClik.TLB”

[HKEY_CLASSES_ROOT\TypeLib\{4B115284-32F0-11CF-AC85-444553540000}\1.0\FLAGS]

@=”0″

[HKEY_CLASSES_ROOT\TypeLib\{4B115284-32F0-11CF-AC85-444553540000}\1.0\HELPDIR]

@=””

In translating this into the package manifest, the windows.comInterface extension supports one or more TypeLib, ProxyStub and interface registrations. Typically, it is placed under the Application element so it is easier to associate with the class registrations for readability, but it may also reside under the Package element. Also, note that we did not have to remember the CLSID of the universal marshaler (the key where ProxyStubClsid32 = {00020424-0000-0000-C000-000000000046}). This is simply a flag: UseUniversalMarshaler=”true”.

Now you can initialize and use the server from any language that supports COM and dual interface OLE automation servers.

Example #2: OLE support

In this next example, we will package an existing OLE document server to demonstrate the capabilities of the Desktop Bridge and Packaged COM. The example we will use is the MFC Scribble sample app, which provides an insertable document type called Scribb Document. Scribble is a simple server that allows an OLE container, such as WordPad, to insert a Scribb Document.

Fig 2. WordPad hosting an embedded Scribb Document

Store Link: https://www.microsoft.com/store/apps/9n4xcm905zkj

GitHub Link: https://github.com/Microsoft/DesktopBridgeToUWP-Samples/tree/master/Samples/PackagedOleDocument

Registry versus AppxManifest.xml

There are many keys to specify various OLE attributes. Again, the magic here is that the platform has been updated to work with Packaged COM, and all you have to do is translate those keys into your manifest. In this example, the entries for Scribble include the ProgID, its file type associations and the CLSID with entries.

;SCRIBBLE.REG

;

;FileType Association using older DDEExec command to launch the app

[HKEY_CLASSES_ROOT\.SCB]

@=”Scribble.Document”

[HKEY_CLASSES_ROOT\Scribble.Document\shell\open\command]

@=”SCRIBBLE.EXE %1”


;ProgId

[HKEY_CLASSES_ROOT\Scribble.Document]

@= Scribb Document

[HKEY_CLASSES_ROOT\Scribble.Document\Insertable]

@=””

[HKEY_CLASSES_ROOT\Scribble.Document\CLSID]

@= “{7559FD90-9B93-11CE-B0F0-00AA006C28B3}}”


;ClsId with OLE entries

[HKEY_CLASSES_ROOT\CLSID\{7559FD90-9B93-11CE-B0F0-00AA006C28B3}]

@=”Scribb Document”

[HKEY_CLASSES_ROOT\CLSID\{7559FD90-9B93-11CE-B0F0-00AA006C28B3}\AuxUserType]

[HKEY_CLASSES_ROOT\CLSID\{7559FD90-9B93-11CE-B0F0-00AA006C28B3}\AuxUserType\2]

@=”Scribb”

[HKEY_CLASSES_ROOT\CLSID\{7559FD90-9B93-11CE-B0F0-00AA006C28B3}\AuxUserType\3]

@=”Scribble”

[HKEY_CLASSES_ROOT\CLSID\{7559FD90-9B93-11CE-B0F0-00AA006C28B3}\DefaultIcon]

@=”\”C:\\VC2015Samples\\scribble\\Release\\Scribble.exe\”,1″

[HKEY_CLASSES_ROOT\CLSID\{7559FD90-9B93-11CE-B0F0-00AA006C28B3}\InprocHandler32]

@=”ole32.dll”

[HKEY_CLASSES_ROOT\CLSID\{7559FD90-9B93-11CE-B0F0-00AA006C28B3}\Insertable]

@=””

[HKEY_CLASSES_ROOT\CLSID\{7559FD90-9B93-11CE-B0F0-00AA006C28B3}\LocalServer32]

@=”\”C:\\VC2015Samples\\scribble\\Release\\Scribble.exe\””

[HKEY_CLASSES_ROOT\CLSID\{7559FD90-9B93-11CE-B0F0-00AA006C28B3}\MiscStatus]

@=”32″

[HKEY_CLASSES_ROOT\CLSID\{7559FD90-9B93-11CE-B0F0-00AA006C28B3}\ProgID]

@=”Scribble.Document”

[HKEY_CLASSES_ROOT\CLSID\{7559FD90-9B93-11CE-B0F0-00AA006C28B3}\Verb]

[HKEY_CLASSES_ROOT\CLSID\{7559FD90-9B93-11CE-B0F0-00AA006C28B3}\Verb\0]

@=”&Edit,0,2″

[HKEY_CLASSES_ROOT\CLSID\{7559FD90-9B93-11CE-B0F0-00AA006C28B3}\Verb\1]

@=”&Open,0,2″

First, let’s discuss the file type association. This is an extension that was supported in the first release of the Desktop Bridge extensions. Note that specifying the file type association here automatically adds support for the shell open command.

Next, let’s take a closer look at the ProgID and CLSID entries. In this case, the simple example only has a ProgID and no VersionIndependentProgID.

Most of the excitement in this example is underneath the CLSID where all the OLE keys live. The registry keys typically map to attributes of the class, such as:

  • Insertable key under either the ProgID or CLSID, mapping to the InsertableObject=”true” attribute
  • If the InprocHandler32 key is Ole32.dll, use the EnableOleDefaultHandler=”true” attribute
  • AuxUserType\2, mapping to ShortDisplayName
  • AuxUserType\3, mapping to the Application DisplayName
  • In cases where there were multiple values in a key, such as the OLE verbs, we’ve split those out into separate attributes. Here’s what the full manifest looks like:
.scb

Additional support

The two examples above covered the most common cases of a COM server and an OLE document support. Packaged COM also supports additional servers like Surrogates and TreatAs classes. For more information, please refer to the element hierarchy in the Windows 10 app package manifest on MSDN: https://docs.microsoft.com/uwp/schemas/appxpackage/uapmanifestschema/root-elements

Conclusion

With UWP and Windows 10, applications can take advantage of several exciting new features while leveraging existing code investments in areas such as COM. With the Desktop Bridge platform and tooling enhancements, existing PC software can now be part of the UWP ecosystem and take advantage of the same set of new platform features and operating system capabilities.

For more information on the Desktop Bridge, please visit the Windows Dev Center.

Ready to submit your app to the Windows Store? Let us know!

The post COM Server and OLE Document support for the Desktop Bridge appeared first on Building Apps for Windows.

This Week on Windows: The Windows 10 Creators Update and more

$
0
0

We hope you enjoyed our special edition of This Week on Windows, where we’re talking about what’s new with the Windows 10 Creators Update! Head over here to learn more about the all-new Minecraft Marketplace, check out the app you can use to see everything that’s new with Windows– or keep reading to catch up on this week’s news.

In case you missed it:

Here’s what’s new in the Windows Store:

Beam Theme Week

Beam Week on Xbox Wire

The five days of festivities and themed streaming to celebrate Beam on Xbox One officially wrapped up last week. But, lucky for us, Beam broadcasting through the Game bar just launched on Windows 10 as part of the Creators Update! As part of Beam Theme Week, Xbox Wire became the place for Beam daily posts about what makes the Beam community so special, the ins-and-outs of interactivity, how to become a streamer, and more. Now that Beam broadcasting is available through the Game bar, here’s a refresher on everything Beam covered last week:

Forza Horizon 3 Porsche Car Pack

Down Under’s premiere road race just got a lot more thrilling. In Forza Horizon 3, home to Australia’s Horizon Festival, the back roads are filled with legendary and amazing vehicles from all over the world. Now, a new Porsche Car Pack ($6.99) joins the excitement, letting players experience prime examples of the breadth and depth of Porsche automotive history.

Minecraft Chinese Mythology Mash-Up Pack

Minecraft Chinese Mythology Pack

The block-by-block building adventures of Minecraft: Windows 10 Edition ($9.99 Sale Price) take an exotic turn with the game’s new Chinese Mythology Mash-Up Pack ($5.99). Journey through epic terrain and find enlightenment in the land of dragons with this mash-up pack inspired by the myths and legends of China.

Have a great weekend!

The post This Week on Windows: The Windows 10 Creators Update and more appeared first on Windows Experience Blog.

Episode 126 on Outlook extensibility with Andrew Salamatov—Office 365 Developer Podcast

$
0
0

In Episode 126 of the Office 365 Developer Podcast, Richard diZerega and Andrew Coates catch up with Andrew Salamatov on Outlook extensibility.

Download the podcast.

Weekly updates

Show notes

Got questions or comments about the show? Join the O365 Dev Podcast on the Office 365 Technical Network. The podcast RSS is available on iTunes or search for it at “Office 365 Developer Podcast” or add directly with the RSS feeds.feedburner.com/Office365DeveloperPodcast.

About Andrew Salamatov

Andrew is a senior program manager at Microsoft, having worked there for six years. At Microsoft, Andrew worked on the Exchange team his entire career. Starting on Exchange Web Services, Andrew designed notifications protocol and throttling. Later, he moved on to working on mail apps.

About the hosts

Richard is a software engineer in Microsoft’s Developer Experience (DX) group, where he helps developers and software vendors maximize their use of Microsoft Cloud services in Office 365 and Azure. Richard has spent a good portion of the last decade architecting Office-centric solutions, many that span Microsoft’s diverse technology portfolio. He is a passionate technology evangelist and a frequent speaker at worldwide conferences, trainings and events. Richard is highly active in the Office 365 community, a popular blogger at aka.ms/richdizz and can be found on Twitter at @richdizz. Richard is born, raised and based in Dallas, Texas, but works on a worldwide team based in Redmond, Washington. Richard is an avid builder of things (BoT), musician and lightning-fast runner.

A Civil Engineer by training and a software developer by profession, Andrew Coates has been a Developer Evangelist at Microsoft since early 2004, teaching, learning and sharing coding techniques. During that time, he’s focused on .Net development on the desktop, in the cloud, on the web, on mobile devices and most recently for Office. Andrew has a number of apps in various stores and generally has far too much fun doing his job to honestly be able to call it work. Andrew lives in Sydney, Australia, with his wife and two almost-grown-up children.

Useful links

The post Episode 126 on Outlook extensibility with Andrew Salamatov—Office 365 Developer Podcast appeared first on Office Blogs.


Crossplatform Tools for SQL Server opened for community localization

$
0
0

This post was authored by Mona Nasr and Andy Gonzalez, Program Manager in C+E APEX Global Services

In February 2017, we announced that the localization of Crossplatform Tools for SQL Server (mssql for Visual Studio Code and SQL Tools Service) is open for community contributions on GitHub. We got great response from our community and would now like to thank the community members who collaborated in the international versions of SQL Tools API Service and Visual Studio Code SQL Server Extension.

This was a good first step to connect with and involve our communities in our goal to be more open and collaborative.

Community has completed the translations for VScode SQL Server extension for six languages: Brazilian, French, Japanese, Italian, Russian, and Spanish.

We still need help with other languages. If you know anyone with language expertise, refer them to the Team Page.

Your contributions are valuable and will help us improve the product in your languages. We hope to continue working with the community in future projects.

Project Translators:

LanguageCommunity members
Brazilian-PortugueseBruno Sonnino, Juan Pablo Belli, Jhonathan de Souza Soares, Marcondes Alexandre, Rodrigo Romano, Rodrigo Crespi, Marcelo Fernandes, Roberto Fonseca
Chinese (Traditional, Simplified)Alan Tsai, Geng Liu, Lynne Dong, Ji Zhao健 邹,
FrenchAntoine Griffard
GermanJens Suessmeyer, Simon B, Markus Weber, Thomas Hütter, Goran Stevanovic
ItalianPiero Azi
JapaneseRio Fujita, Takahito Yamatoya, Miho Yamamoto, Masashi Onodera, Yasuhiko Tokunaga
KoreanEvelyn Kim
RussianAnatoli Dubko, Aleksey Nemiro
SpanishJosué Martínez Buenrrostro, Juan Pablo Belli, Diego Melgarejo San Martin, David Triana, Mariano Rodriguez, Christian Palomares Peralta

Project Contributors:

LanguageCommunity members
Brazilian-PortugueseBruno Sonnino, Marcondes Alexandre, Rodrigo Romano, Rodrigo Crespi, Luan Moreno Medeiros Maciel, Jhonathan Soares, Marcelo Fernandes, Roberto Fonseca, Dennis Hernández, Caio Proiete, Alexandro Prado
Chinese (Traditional, Simplified)Alan Tsai, Geng Liu, Ji Zhao, 健 邹, Huang Junwei, Wei-Ting Shih, Lynne Dong, Ji Zhao, Y-Chi Lu, Weng Titan, KuoChen Lien, Kevin L. Tan
FrenchAntoine Griffard, Lucas Girard
GermanJens Suessmeyer, Simon B, Thomas Hütter, Martin Pöckl, Wolfgang Strasser, Markus Weber, Erich Gamma, Nico Erfurth, Ralf Krzyzaniak
ItalianPiero Azi, Sergio Govoni
JapaneseRio Fujita, Takahito Yamatoya, Miho Yamamoto, Takayoshi Tanaka, Kamegawa Kazushi, Masashi Onodera, Yasuhiko Tokunaga, Kentaro Aoki, Igarashi Yuki, 徳永 康彦
KoreanEvelyn Kim, Rachel Yerin Kim, Taeyoung Im, SUNG IL CHO, Hongsuk Kim
RussianAnatoli Dubko, Aleksey Nemiro, Anton Afonin, Anton Maznev, Илья Зверев
SpanishJosué Martínez Buenrrostro, Juan Pablo Belli, Diego Melgarejo San Martin, David Triana, Mariano Rodriguez, Christian Palomares Peralta, Jhonathan de Souza Soares

For more information about communities working with the Microsoft product teams, see https://aka.ms/crossplattoolsforsqlserverloccontributors.

Streamlined User Management

$
0
0

Effective user management helps administrators ensure they are paying for the right resources and enabling the right access in their projects. We’ve repeatedly heard in support calls and from our customers that they want capabilities to simplify this process in Visual Studio Team Services. I’m excited to announce that we have released a preview of our new account-level user hub experience, which begins to address these issues. If you are a Project Collection Administrator, you can now navigate to the new Users page by turning on “Streamlined User Management” under “Preview features”.

previewfeatures

Here are some of the changes that will light up when you turn on the feature.

Inviting people to the account in one easy step

Administrators can now add users to an account, with the proper extensions, access level, and group memberships at the same time, enabling their users to hit the ground running. You can also invite up to 50 users at once through the new invitation experience.

accountlvlinvite

User management with all the information where you need it

The Users page has been re-designed to show you more information to help you understand users in your account at a glance. The table of users also now includes a new column called “Extensions” that lists the extensions each user has access to.

acctlvluserhub

Detailed view of individual users

Additionally, you can view and change the access level, extensions, and group memberships that a specific user has access to through the context menu provided for each selected user – a one-stop shop to understand and adjust everything a user has access to.

detailsview

Feedback

Try it out on your account and tell us what you think by posting on Developer Community or sending us a smile. We look forward to hearing your feedback!

Thanks,

Ali Tai

VSTS & TFS Program Manager

Setting up a Shiny Development Environment within Linux on Windows 10

$
0
0

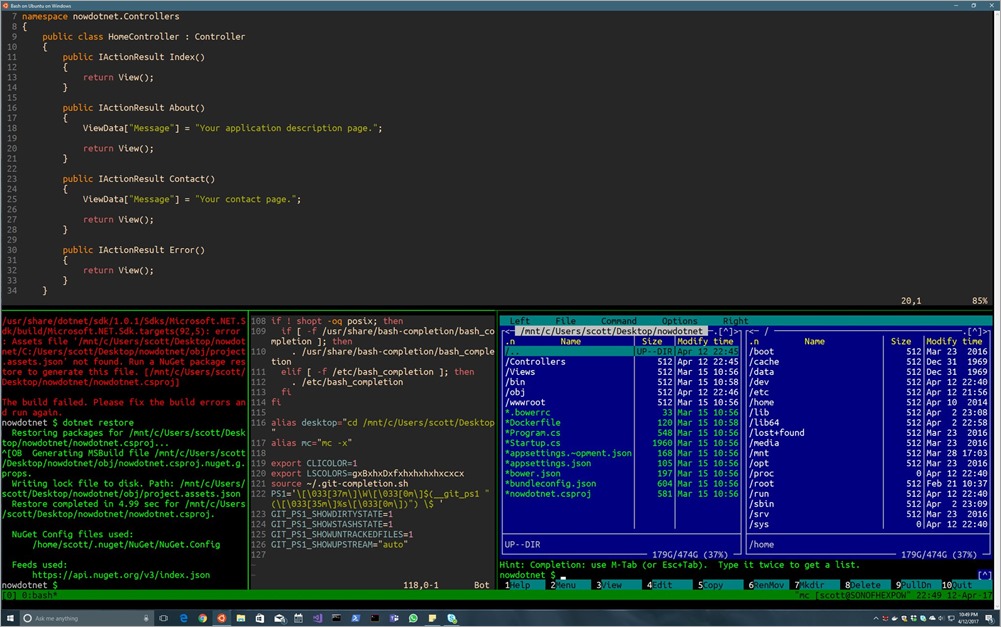
While I was getting Ruby on Rails to work nicely under Ubuntu on Windows 10 I took the opportunity to set up my *nix bash environment, which was largely using defaults. Yes, I know I can use zsh or fish or other shells. Yes, I know I can use emacs and screen, but I am using Vim and tmux. Fight me. Anyway, once my post was done, I starting messing around with open source .NET Core on Linux (it runs on Windows, Mac, and Linux, but here I'm running on Linux on Windows. #Inception) and tweeted a pic of my desktop.

By the way, I feel totally vindicated by all the interest in "text mode" given my 2004 blog post "Windows is completely missing the TextMode boat." ;)'

Also, for those of you who are DEEPLY NOT INTERESTED in the command line, that's cool. You can stop reading now. Totally OK. I also use Visual Studio AND Visual Studio Code. Sometimes I click and mouse and sometimes I tap and type. There is room for us all.

WHAT IS ALL THIS LINUX ON WINDOWS STUFF? Here's a FAQ on the Bash/Windows Subsystem for Linux/Ubuntu on Windows/Snowball in Hell and some detailed Release Notes. Yes, it's real, and it's spectacular. Can't read that much text? Here's a video I did on Ubuntu on Windows 10.

A number of people asked me how they could set up their WSL (Windows Subsystem for Linux) installs to be something like this, so here's what I did. Note that will I've been using *nix on and off for 20+ years, I am by no means an expert. I am, and have been, Permanently Intermediate in my skills. I do not dream in RegEx, and I am offended that others can bust out an awk script without googling.

C9RT5_bUwAALJ-H

So there's a few things going on in this screenshot.

  • Running .NET Core on Linux (on Windows 10)
  • Cool VIM theme with >256 colors
  • Norton Midnight Commander in the corner (thanks Miguel)
  • Desqview-esque tmux splitter (with mouse support)
  • Some hotkey remapping, git prompt, completion
  • Ubuntu Mono font
  • Nice directory colors (DIRCOLORS/LS_COLORS)

Let's break them down one at a time. And, again, your mileage may vary, no warranty express or implied, any of this may destroy your world, you read this on a blog. Linux is infinitely configurable and the only constant is that my configuration rocks and yours sucks. Until I see something in yours that I can steal.

Running .NET Core on Linux (on Windows 10)

Since Linux on Windows 10 is (today) Ubuntu, you can install .NET Core within it just like any Linux. Here's the Ubuntu instructions for .NET Core's SDK. You may have Ubuntu 14.04 or 16.04 (you can upgrade your Linux on Windows if you like). Make sure you know what you're running by doing a:

~ $ lsb_release -a
No LSB modules are available.
Distributor ID: Ubuntu
Description: Ubuntu 16.04.2 LTS
Release: 16.04
Codename: xenial
~ $

If you're not on 16.04 you can easily remove and reinstall the whole subsystem with these commands at cmd.exe (note the /full is serious and torches the Linux filesystem):

> lxrun /uninstall /full
> lxrun /install

Or if you want you can run this within bash (will take longer but maintain settings):

sudo do-release-upgrade

Know what Ubuntu your Windows 10 has when you install .NET Core within it. The other thing to remember is that now you have two .NET Cores, one Windows and one Ubuntu, on the same (kinda) machine. Since the file systems are separated it's not a big deal. I do my development work within Ubuntu on /mnt/d/github (which is a Windows drive). It's OK for the Linux subsystem to edit files in Linux or Windows, but don't "reach into" the Linux file system from Windows.

Cool Vim theme with >256 colors

That Vim theme is gruvbox and I installed it like this. Thanks to Rich Turner for turning me on to this theme.

$ cd ~/
$ mkdir .vim
$ cd .vim
$ mkdir colors
$ cd colors
$ curl -O https://raw.githubusercontent.com/morhetz/gruvbox/master/colors/gruvbox.vim
$ cd ~/
$ vim .vimrc

Paste the following (hit ‘i’ for insert and then right click/paste)

set number
syntax enable
set background=dark
colorscheme gruvbox
set mouse=a

if &term =~ '256color'
" disable Background Color Erase (BCE) so that color schemes
" render properly when inside 256-color tmux and GNU screen.
" see also http://snk.tuxfamily.org/log/vim-256color-bce.html
set t_ut=
endif

Then save and exit with Esc, :wq (write and quit). There's a ton of themes out there, so try some for yourself!

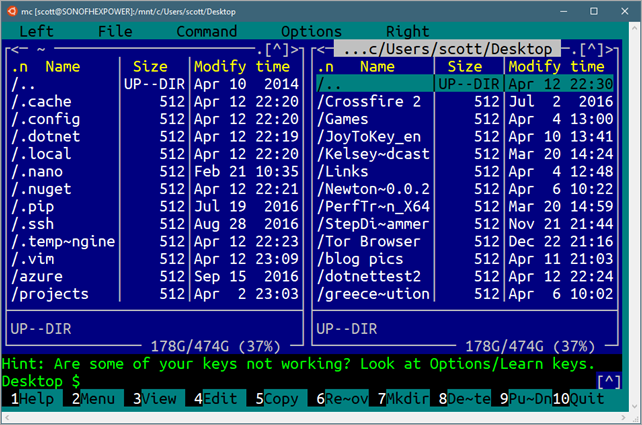
Norton Midnight Commander in the corner (thanks Miguel)

Midnight Commander is a wonderful Norton Commander clone that Miguel de Icaza started, that's licensed as part of GNU. I installed it via apt, as I would any Ubuntu software.

$ sudo apt-get install mc

There's mouse support within the Windows conhost (console host) that bash runs within, so you'll even get mouse support within Midnight Commander!

Midnight Commander

Great stuff.

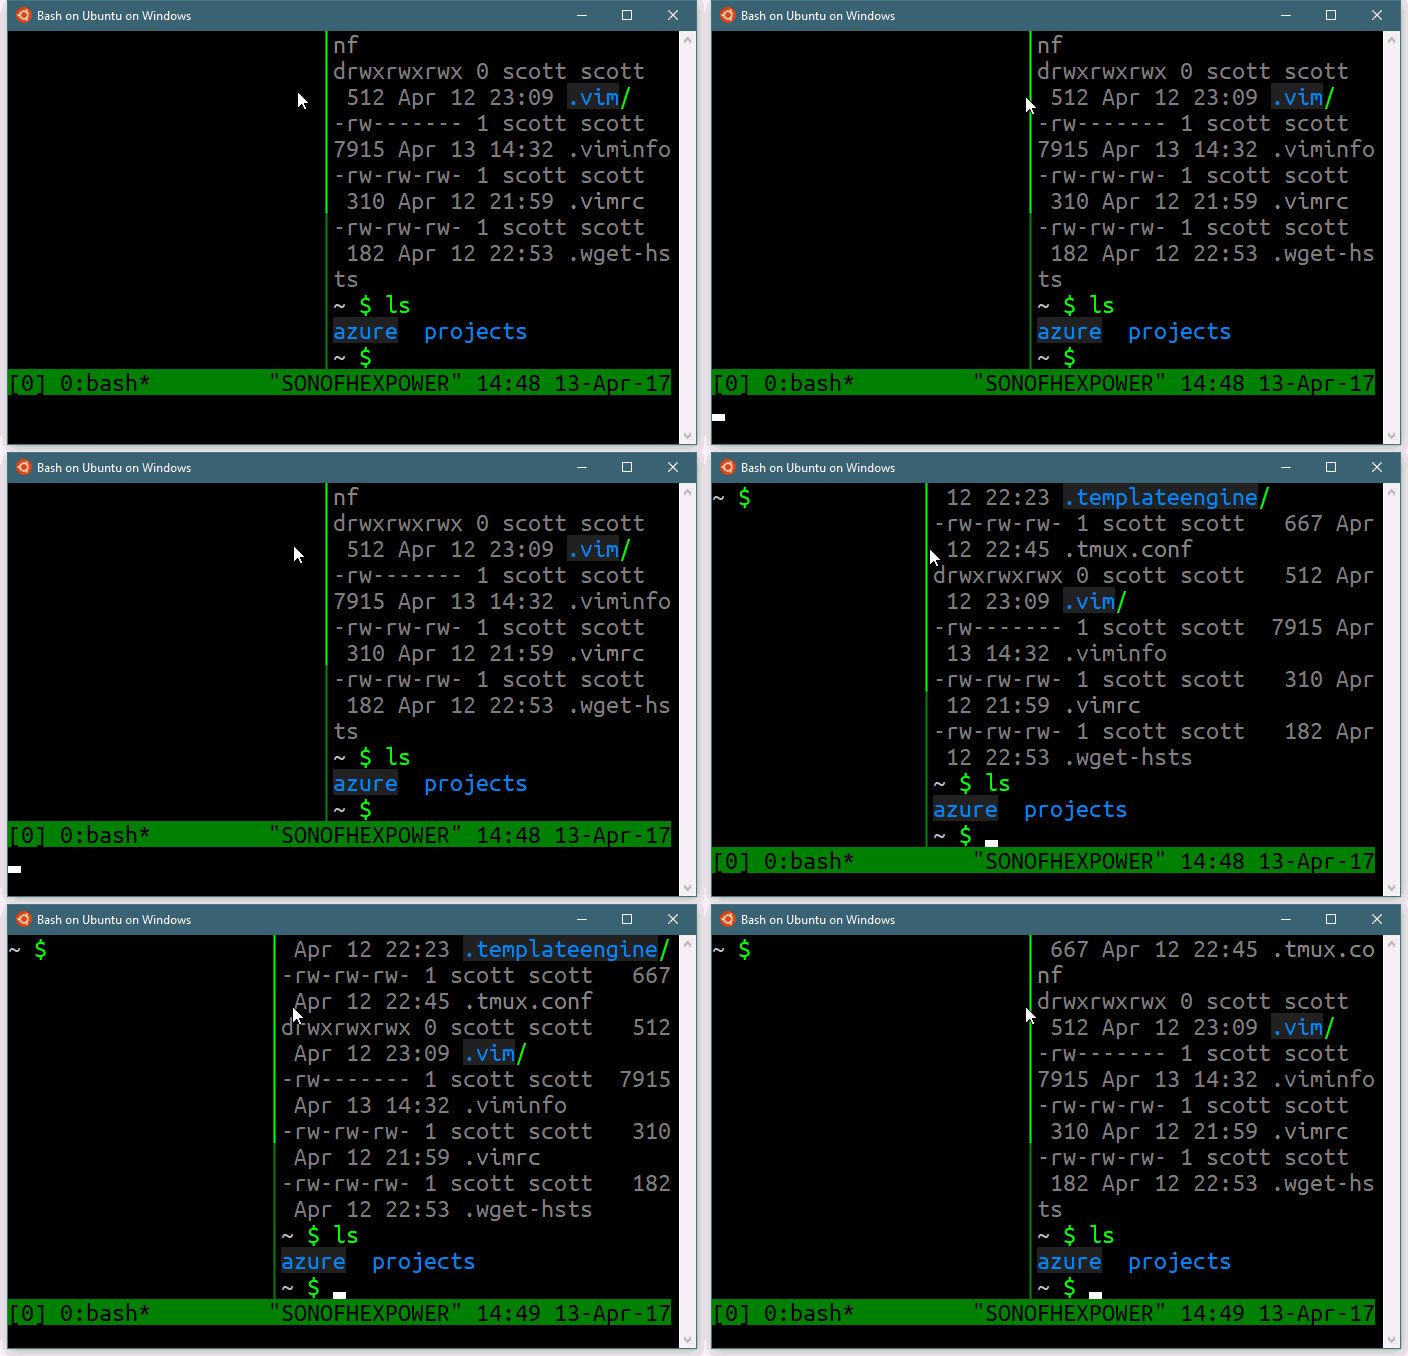
Desqview-esque tmux splitter (with mouse support)

Tmux is a terminal multiplexer. It's a text-mode windowing environment within which you can run multiple programs. Even better, you can "detach" from a running session and reattached from elsewhere. Because of this, folks love using tmux on servers where they can ssh in, set up an environment, detach, and reattach from elsewhere.

NOTE: The Windows Subsystem for Linux shuts down all background processes when the last console exits. So you can detach and attach tmux sessions happily, but just make sure you don't close every console on your machine.

Here's a nice animated gif of me moving the splitter on tmux on Windows. YES I KNOW YOU CAN USE THE KEYBOARD BUT THIS GIF IS COOL.

Some hotkey remapping, git prompt, completion

I am still learning tmux but here's my .tmux.conf. I've made a few common changes to make the hotkey creation of windows easier.

#remap prefix from 'C-b' to 'C-a'
unbind C-b
set-option -g prefix C-a
bind-key C-a send-prefix

# split panes using | and -
bind | split-window -h
bind _ split-window -v
unbind '"'
unbind %
bind k confirm kill-window
bind K confirm kill-server
bind < resize-pane -L 1
bind > resize-pane -R 1
bind - resize-pane -D 1
bind + resize-pane -U 1
bind r source-file ~/.tmux.conf

# switch panes using Alt-arrow without prefix
bind -n M-Left select-pane -L
bind -n M-Right select-pane -R
bind -n M-Up select-pane -U
bind -n M-Down select-pane -D

# Enable mouse control (clickable windows, panes, resizable panes)
set -g mouse on
set -g default-terminal "screen-256color"

I'm using the default Ubuntu .bashrc that includes a check for dircolors (more on this below) but I added this for git-completion.sh and a git prompt, as well as these two alias. I like being able to type "desktop" to jump to my Windows Desktop. And the -x on Midnight Commander helps the mouse support.

alias desktop="cd /mnt/c/Users/scott/Desktop"
alias mc="mc -x"
export CLICOLOR=1
source ~/.git-completion.sh
PS1='\[\033[37m\]\W\[\033[0m\]$(__git_ps1 " (\[\033[35m\]%s\[\033[0m\])") \$ '
GIT_PS1_SHOWDIRTYSTATE=1
GIT_PS1_SHOWSTASHSTATE=1
GIT_PS1_SHOWUNTRACKEDFILES=1
GIT_PS1_SHOWUPSTREAM="auto"

Git Completion can be installed with:

sudo apt-get install git bash-completion

Ubuntu Mono font

I really like the Ubuntu Mono font, and I like the way it looks when running Ubuntu under Windows. You can download the Ubuntu Font Family free.

Ubuntu Mono

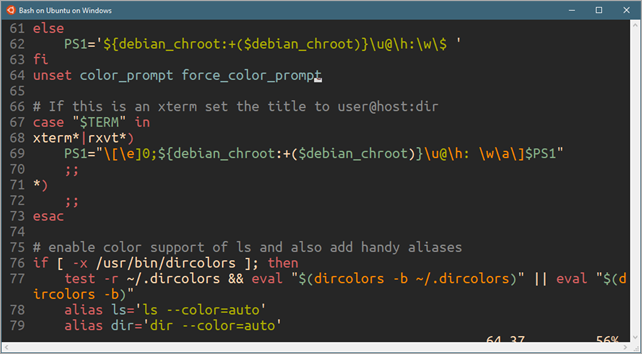
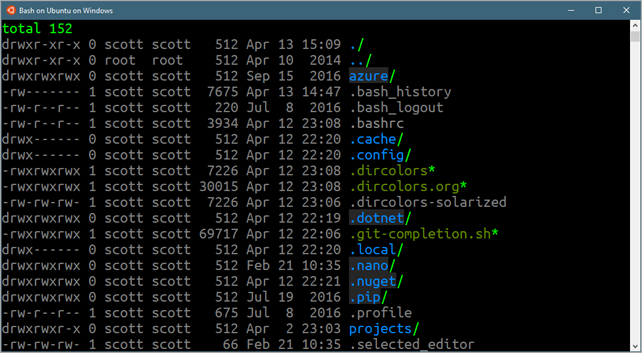
Nice directory colors (DIRCOLORS/LS_COLORS)'

If you have a black command prompt background, then default colors for directories will be dark blue on black, which sucks. Fortunately you can get .dircolors files from all over the wep, or set the LS_COLORS (make sure to search for LS_COLORS for Linux, not the other, different LSCOLORS on Mac) environment variable.

I ended up with "dircolors-solarized" from here, downloaded it with wget or curl and put it in ~. Then confirm this is in your .bashrc (it likely is already)

# enable color support of ls and also add handy aliases
if [ -x /usr/bin/dircolors ]; then
test -r ~/.dircolors && eval "$(dircolors -b ~/.dircolors)" || eval "$(dircolors -b)"
alias ls='ls --color=auto'
alias dir='dir --color=auto'
#alias vdir='vdir --color=auto'

alias grep='grep --color=auto'
alias fgrep='fgrep --color=auto'
alias egrep='egrep --color=auto'
fi

Make a big difference for me, and as I mention, it's totally, gloriously, maddeningly configurable.

Nice dircolors

Leave YOUR Linux on Windows tips in the comments!


Sponsor: Did you know VSTS can integrate closely with Octopus Deploy? Watch Damian Brady and Brian A. Randell as they show you how to automate deployments from VSTS to Octopus Deploy, and demo the new VSTS Octopus Deploy dashboard widget. Watch now


© 2017 Scott Hanselman. All rights reserved.
     

Community Blog Highlights

$
0
0
Have you visited the Power BI Community blog lately? We want to hear what’s got you thinking about Power BI and Business Intelligence! Blog posts can be anything from opinion pieces on the latest industry trends, to helpful tips and how-tos for your fellow Power BI users, to even “trip reports” from your local User Group meeting or Microsoft event. Check out these great posts from last month.

SNAC lifecycle explained

$
0
0

SNAC, or SQL Server Native Client, is a term that has been used interchangeably to refer to ODBC and OLE DB drivers for SQL Server. In essence, current versions are tied to SQL Server support lifecycle itself. Currently Microsoft provides support for a few different versions from a lifecycle standpoint:

  • SNAC 11 is a single dynamic-link library (DLL) containing both the SQL OLE DB provider and SQL ODBC driver for Windows. It contains run-time support for applications using native-code APIs (ODBC, OLE DB and ADO) to connect to Microsoft SQL Server 2005, 2008, 2008 R2, and SQL Server 2012. A separate SQL ODBC-only driver is available for Linux.
    • Note that SNAC 11 does not support features released with SQL Server 2014 and SQL Server 2016 that were not available as part of SQL Server 2012, such as Transparent Network IP Resolution, Always Encrypted, Azure AD Authentication, Bulk Copy and Table Value Parameters.
    • Also note that the previously announced OLE DB deprecation does not affect linked servers functionality.
  • SNAC 12.x and 13.x for SQL Server are single dynamic-link libraries (DLL) containing run-time support for applications using SQL ODBC-only native-code APIs to connect to Microsoft SQL Server 2008, SQL Server 2008 R2, SQL Server 2012, SQL Server 2014, SQL Server 2016, Analytics Platform System, Azure SQL Database and Azure SQL Data Warehouse. Depending on the specific build, these are available for Windows and Linux.

The table below outlines the several supported versions and respective lifecycles:

SQL Server VersionSNAC InstalledSNAC Build NumberEnd of Mainstream *End of Support *ODBCOLE DB **Download Link
2005 to 2012SNAC 1111.0.x7/11/20177/12/2022YY Latest Servicing update for SQL Server 2012 Native Client
ODBC Driver 11 for SQL Server – Red Hat Linux
2005 to 2014SNAC 1112.0.x7/9/20197/9/2024YN ODBC Driver 11 for SQL Server – Windows only
2008 to 2016SNAC 1313.0.x
13.1.x
7/13/20217/14/2026YNODBC Driver 13 for SQL Server – Windows + Linux
ODBC Driver 13.1 for SQL Server – Windows + Linux

* Aligned with SQL Server support lifecycle
** OLE DB available on Windows only

Further details available in Support Policies for SQL Server Native Client and System Requirements, Installation, and Driver Files.

Microsoft also made available a technical article about Converting SQL Server Applications from OLE DB to ODBC, as well as A Quick Guide for OLE DB to ODBC Conversion.

Announcing Windows 10 Insider Preview Build 16176 for PC + Build 15204 for Mobile

$
0
0

Hello Windows Insiders!

Today we are excited to be releasing Windows 10 Insider Preview Build 16176 for PC to Windows Insiders in the Fast ring. We’re continuing work to refine OneCore with some code refactoring so that teams can start checking in new code. So, you still won’t see any noticeable changes or new features in new builds just yet.

We are also releasing Windows 10 Mobile Insider Preview Build 15204 to Insiders in the Fast ring. As we release new builds from our Development Branch for PC, we will also be doing the same for Windows 10 Mobile just like we have been in the past. However, Windows Insiders will likely notice some minor differences. The biggest difference being that the build number and branch won’t match the builds we will be releasing for PC. This is a result of more work we’re doing to converge code into OneCore – the heart of Windows across PC, tablet, phone, IoT, HoloLens, Xbox and more as we continue to develop new improvements for Windows 10 Mobile and our enterprise customers.

Starting with the Windows 10 Creators Update, these are the Windows 10 Mobile devices we will officially support in the Windows Insider Program going forward:

  • HP Elite x3
  • Microsoft Lumia 550
  • Microsoft Lumia 640/640XL
  • Microsoft Lumia 650
  • Microsoft Lumia 950/950 XL
  • Alcatel IDOL 4S
  • Alcatel OneTouch Fierce XL
  • SoftBank 503LV
  • VAIO Phone Biz
  • MouseComputer MADOSMA Q601
  • Trinity NuAns NEO

Devices not on this list will not officially receive the Windows 10 Creators Update nor will they receive any future builds from our Development Branch that we release as part of the Windows Insider Program. However, Windows Insiders who have devices not on this list can still keep these devices on the Windows 10 Creators Update at their own risk knowing that it’s unsupported.

We recognize that many Insiders will be disappointed to see their device is no longer supported. We looked at feedback from our Windows Insiders and realized that we were not providing the best possible experience for our customers on many older devices. That helped us determine which devices we support for the Windows 10 Creators Update. We are continually listening to your feedback to provide the best experience for ALL of our customers.

For developers – you will need to set the minimum platform version in Visual Studio to be the Windows 10 Creators Update.

What’s New in Build 16176 For PC

Windows Subsystem for Linux Gains Serial Device Support: Windows COM ports can now be accessed directly from a WSL process!

Windows COM ports can now be accessed directly from a WSL process

More information can be found on the WSL Blog.  Additional features and fixes are posted on the WSL Release Notes page – keep the feedback coming!

Changes, improvements, and fixes for PC

  • You can now hold down the power button on your device for 7 seconds to trigger a bugcheck. This will only work on newer devices that don’t uses legacy ACPI power buttons.
  • Narrator will work again on this build.
  • We fixed the issue causing some apps and games to crash due to a misconfiguration of advertising ID that happened in a prior build.
  • We fixed an issue resulting in the Start menu and Action Center having a noticeable framerate drop in their animations on certain devices if transparency was enabled and there were open UWP apps.
  • We fixed an issue from the previous build where the Action Center could get into a state where dismissing one notification unexpectedly dismissed multiple.
  • We fixed an issue where the Clock and Calendar flyout was unexpectedly missing the agenda integration for some Insiders.
  • We fixed an issue from the previous build (Build 16170) resulting in Surface Books unexpectedly doing a disk check after waking from sleep due to it bugchecking during sleep.
  • We fixed an issue from the previous build resulting in Win32 app text sometimes not rendering, for example in File Explorer, until logging out and back in.
  • We fixed an issue where the Extensions Process was suspended inappropriately during Connected Standby, resulting in Microsoft Edge becoming unresponsive on wake if any extensions had been installed.

Known issues for PC

  • Apps that use the Desktop Bridge (“Centennial”) from the Store such as Slack and Evernote will cause your PC to bugcheck (GSOD) when launched with a “kmode exception not handled” in ntfs.sys error.
  • Some Insiders have reported seeing this error “Some updates were cancelled. We’ll keep trying in case new updates become available” in Windows Update. See this forum post for more details.
  • Double-clicking on the Windows Defender icon in the notification area does not open Windows Defender. Right-clicking on the icon and choosing open will open Windows Defender.
  • Surface 3 devices fail to update to new builds if a SD memory card is inserted. The updated drivers for the Surface 3 that fix this issue have not yet been published to Windows Update.
  • Pressing F12 to open the Developer Tools in Microsoft Edge while F12 is open and focused may not return focus to the tab F12 is opened against, and vice-versa.
  • exe will crash and restart if you tap any of the apps listed in the Windows Ink Workspace’s Recent Apps section.

Changes, improvements, and fixes for Mobile

  • We have added a new privacy page to the Windows 10 Mobile OOBE experience that allows you to quickly and effectively make common privacy changes while setting up the device. You can read more about our Windows 10 privacy journey here.
  • We fixed the issue where the keyboard would sometimes not appear when a text input field is selected in Microsoft Edge.

Known issues for Mobile

  • For Insiders who have upgraded from a prior 150xx build to this build, the “Add Bluetooth or other devices” Settings page and the Connect UX page may fail to open.
  • Some users are reporting that pages are constantly reloading or refreshing, especially while they are in the middle of scrolling them in Microsoft Edge. We’re investigating.
  • There is an issue with Microsoft Edge where you might get into a bad state after opening a new Microsoft Edge windows and screen off with the JIT process suspended.
  • Continuum will stop working when HP Elite X3 case is closed.
  • Continuum hangs or renders incorrectly after disconnecting on devices like the Lumia 950.
  • The device screen might stay black when disconnecting from a Continuum dock after screen has timed out normally.

Happy Easter to those of you who are celebrating, have a great weekend ALL of you, and keep hustling team,
Dona <3

The post Announcing Windows 10 Insider Preview Build 16176 for PC + Build 15204 for Mobile appeared first on Windows Experience Blog.

How to increase DPM 2016 replica when using Modern Backup Storage (MBS)

$
0
0

There may be circumstances where the replica volume for a protected data source is under allocated or a very large increase of protected data results in synchronization or recovery point job failures due to inadequate space on the replica.

Some common examples of where this might occur are explained below.

  • Bare Metal Restore (BMR) protection.  In DPM, BMR protection covers protection for operating system files (System State) and critical volumes (excluding user data). DPM does not calculate the size of BMR data source, but assumes 20 GB for all servers. At the time of protection this cannot be changed in the disk allocation page when using Modern Backup Storage (MBS).

Admins can change the default replica size as per the size of BMR backups expected in their environments.   This is a global setting and effects all future BMR replica allocation size.

Size of BMR backup can be roughly calculated sum of used space on all critical volumes.

Critical volumes = Boot Volume + System Volume + Volume hosting system state data such as AD DIT/log volumes.

To help calculate the size of a BMR for a protected server, run the following command on that server then total up the used space for the volume(s) listed.

C:\>wbadmin.exe start backup -allcritical -backuptarget:\\server\bmrshare

This should show you the list of volumes included in the BMR backup and ask “Do you want to start the backup operation?. – Type N to exit then total all the used space on the volumes listed minus the page file size if one is hosted on a critical volume.  Alternately you can Type Y and let the BMR backup continue and once finished check the size of the WindowsImageBackup folder  on the target share.

To change the default replica size for ALL future BMR protection use the following registry key:

HKLM\Software\Microsoft\Microsoft Data Protection Manager\Configuration
 REG_DWORD: ReplicaSizeInGBForSystemProtectionWithBMR

However, if you only need to increase the replica for a subset of servers or are having problems getting a good initial replica for one, you can use the information in this article to manually increase the specific replica volume(s).

  • Exchange Protection. There may be a time when you want to migrate users between mailbox databases or between exchange servers.  During migration, there will be a large increase in the number of exchange logs created and an increase in the size of the destination mailbox database(s).  These large increases in a short period of time can result in DPM backup failures if the replica cannot be grown large enough in time to accommodate the influx of new data.
  • Hyper-V Protection. Some customers run hosting environments and deploy rather generic virtual machines then protect them with DPM.  Sometime in the future the owners of those VM’s deploy applications that create data (like exchange) or load new data into the guests.  This large increase in the VM size can cause ongoing DPM backup failures if the replica cannot be grown large enough in time.
  • File Server protection. DPM Supports protecting Windows dedup volumes.  DPM will store the protected file data in a dedup state when the entire volume is protected.  If at a later time you decide to only protect a subset of data – or if you stop dedup on the protected server, DPM will start protecting the volume in a non-dedup state.  This will require much more space on the DPM replica to hold the file data in its native non-dedup form.

Below is an example of a failed recovery point job for a VM due to an undersized replica.

Type:     Recovery point

Status:  Failed

Description:        DPM is out of disk space for the replica. (ID 58 Details: There is not enough space on the disk (0x80070070))

More information

End time:             3/22/2017 12:04:21 PM

Start time:           3/22/2017 11:30:01 AM

Time elapsed:    00:34:20

Data transferred:             22,260.38 MB

Cluster node      -

Recovery Point Type       Express Full

Source details:   DPM2016-GA

Protection group:             Hyper-V

As in previous versions, DPM 2016 has replica auto-grow feature for modern backup storage (MBS) to help increase the replica sizes as the data sources grows.  Under normal use conditions this feature works perfectly fine.  If a job fails due to out of disk space, it will automatically grow the replica volume and schedule a new synchronization or recovery point job to run one hour in the future.  However, if the amount of new data is much larger than the size of the replica after auto-grow, the jobs will continue to fail even as the auto-grow continues to increase the replica size.  After two failures, auto-rerun is no longer triggered by default. In DPM 2012 R2 you had the ability to manually grow the replica volume as large as you wanted by using the “modify disk allocation” wizard, however in the DPM 2016 you do not have the ability to manually grow the replica volume using the same wizard.  This can cause delays in getting good backups again to meet your SLA.   If you know the new size of the protected data or want to grow the replica volume for future data growth in order to prevent future backup failures, you can grow the replica manually outside of DPM.

Manually Extending a Replica volume on MBS

DPM 2016 Update Rollup 1 added support for using the DPM PowerShell cmdlet Edit-DPMDiskAllocation to extend a DPM Replica volume hosted on Microsoft Modern Storage.

The below DPM PowerShell script helps simplify the process of manually extending a replica volume regardless if it is located on legacy LDM disk based or Modern Backup Storage (MBS) volumes.

Sample Screenshot:

60140-1

DPM PowerShell script

Copy below and save as ResizeReplica.ps1 then run it from the DPM PowerShell console.


#Resized Replica Volume located on DPM 2016 +UR1 Modern Backup Storage.

$version="V1.0"

$ErrorActionPreference = "silentlycontinue"


[uint64] $GB=1048576000 #Multiple of 10MB

$logfile="ResizeReplica.LOG"

$confirmpreference = "None"


function Show_help

{

cls

write-host "Version: $version" -foregroundcolor cyan

write-host "Script Usage" -foregroundcolor green

write-host "A: Script lists all protected data sources plus current Replica size." -foregroundcolor green
write-host "B: User Selects data source to resize replica for." -foregroundcolor green

write-host "C: User enters new Replica Size in GB." -foregroundcolor green

write-host "Appending inputs and results to log file $logfile`n" -foregroundcolor white

}

"" >>$logfile

"**********************************" >> $logfile

"Version $version" >> $logfile

get-date >> $logfile

show_help

$C=Read-Host "`nThis script is only intended to be ran on DPM 2016 + UR1 or later - Press C to continue. "

write-host $line -foregroundcolor white
$line = "This script is only intended to be ran on DPM 2016 + UR1 or later - Press C to continue."

$line = $line + $C

$line >> $logfile

if ($C -NotMatch "C")

{

write-host "Exiting...."

Exit 0

}

write-host "User Accepts all responsibilities by entering a data source" -foregroundcolor white -backgroundcolor blue


$DPM = Connect-dpmserver -Dpmservername (&hostname)

$DPMservername = (&hostname)

"Selected DPM server = $DPMservername" >> $logfile

write-host "`nRetrieving list of data sources on $Dpmservername`n" -foregroundcolor green

$pglist = @(Get-ProtectionGroup $DPMservername) # Created PGlist as array in case we have a single protection group.

$ds=@()
$count = 0

$dscount = 0

foreach ($count in 0..($pglist.count - 1))

{

$ds += @(get-datasource $pglist[$count]) # Created DS as array in case we have a single protection group.

}

if ( Get-Datasource $DPMservername -inactive) {$ds += Get-Datasource $DPMservername -inactive}


$i=0

write-host "Index Protection Group     Computer             Path                                     Replica-Size Bytes"

write-host "-----------------------------------------------------------------------------------------------------------"

foreach ($l in $ds)

{

"[{0,3}] {1,-20} {2,-20} {3,-40} {4}" -f $i, $l.ProtectionGroupName, $l.psinfo.netbiosname, $l.logicalpath, $l.replicasize

$i++
}

$DSname=read-host "`nEnter a data source index number from the list above."

write-host ""

if (!$DSname)

{

write-host "No datasource selected, exiting.`n" -foregroundcolor yellow

"Aborted on no Datasource index selected" >> $logfile

exit 0

}

$DSselected=$ds[$DSname]

if (!$DSselected)

{

write-host "No valid datasource selected, exiting. `n" -foregroundcolor yellow

"Aborted on invalid Datasource index number" >> $logfile

exit 0
}


if ($DSselected.Replicasize -gt 0)

{

$Replicasize=[math]::round($DSselected.Replicasize/$GB,1)

$line=("Current Replica Size = {0} GB for selected data source: $DSselected.name" -f $Replicasize)

$line >> $logfile

write-host $line`n -foregroundcolor white

}


[uint64] $NewReplicaGB=read-host "Enter new Replica size in GB"

if ($Replicasize -ge $NewReplicaGB)
{

write-host New Replica size must be greater than current size of $Replicasize GB - Exiting.

$line =("New Replica size must be greater than current size - Exiting")

$line >> $logfile

exit 0

}

$line=("Processing Replica Resize Request of {0} GB.  Please wait..." -f $NewReplicaGB)

$line >> $logfile

write-host $line`n -foregroundcolor white


# execute the resize

Edit-DPMDiskAllocation -DataSource $DSSelected -ReplicaSize ($NewReplicaGB*$GB)


$line = "Resize Process Done ! "

write-host $line

$datetime = get-date

$line = $line + $datetime

$line >> $logfile

$line=”Do you want to View $logfile file Y/N ? ”

write-host $line -foregroundcolor white

$Y=read-host

$line = $line + $Y

$line >> $logfile

if ($Y -ieq “Y”)

{

Notepad $logfile

}


ICYMI – Your weekly TL;DR

$
0
0

Building a new app this weekend? Check out last week’s Windows Developer updates before you dive in.

COM Server and OLE Document support for the Desktop Bridge

The Windows 10 Creators Update adds out-of-process (OOP) COM and OLE support for apps on the Desktop Bridge – a.k.a Packaged COM. Read more here to find out how it works.

Visual Studio 2017 – Now Ready for Your Windows Application Development Needs

Visual Studio 2017 is the most powerful Universal Windows Platform development environment. It brings unparalleled productivity improvements, a streamlined acquisition experience and enhanced debugging tools for UWP devs. Check it out.

Monetizing your app: Advertisement placement

App developers are free to place their ads in any part of their apps and many have done so to blend the ad experience into their app. We have seen that devs who take the time to do this get the best performance for their ads and earn more revenue. Want to learn how they do it?

The new Djay Pro App for Windows

Download Visual Studio to get started.

The Windows team would love to hear your feedback. Please keep the feedback coming using our Windows Developer UserVoice site. If you have a direct bug, please use the Windows Feedback tool built directly into Windows 10.

The post ICYMI – Your weekly TL;DR appeared first on Building Apps for Windows.

Bring your existing Qt projects to Visual Studio

$
0
0

Qt framework is an ever growing cross-platform C++ framework, ideal for building desktop, mobile, and even embedded solutions. While you can use CMake to target Qt (if you do, you should read more about the Visual Studio support for CMake), Qt also provides its own Qt-optimized build system called qmake.

If your project is using qmake, this article covers the high-level steps to follow to import your projects into Visual Studio. You can read about other C++ project types in the guide for Bringing your C++ code to Visual Studio.

bringcode-qt

Step 1. Install the QT Visual Studio Extension. From the Marketplace, install the Qt Visual Studio Tools extension.

Step 2. Import your .pro projects into Visual Studio. To do that, select the Qt VS Tools>Open Qt Project File (.pro) to let the extension create a VS solution and project from your existing Qt .pro file. More information on this is available in the Qt docs covering Qt project management in Visual Studio.

What’s next

If you’re new to Visual Studio, learn more by reading the Getting Started with Visual Studio for C and C++ Developer topic (Coming soon!) and the rest of the posts in this Getting Started series aimed at C++ users that are new to Visual Studio. Download Visual Studio 2017 today, try it out and share your feedback.

Bring your existing C++ Linux projects to Visual Studio

$
0
0

Visual Studio supports targeting Linux out of the box – you can edit, remote build and remote debug to a Linux machine (whether that’s a remote machine, a VM running locally or in the cloud, or WSL in Windows 10).

This article covers the high-level steps to bring your existing Linux projects to Visual Studio. You can read about other C++ project types in the guide for Bringing your C++ code to Visual Studio.

Step 1. Install: Just make sure that you select the C++ Linux workload as part of the VS installation.

bringcode-linux-install

Step 2. Generate VS project: The next step is to create a VS Linux makefile project

$ ./genvcxproj.sh ~/repos/preciouscode/ preciouscode.vcxproj Z:

Step 3. Configure VS project properties: You will need to specify in Project Properties (right click on project in Solution Explorer) > Remote Build > Build Command Line the exact command you use on your Linux machine to build the sources. In addition, you will want to specify the additional include path that VS IntelliSense can use to properly aid when editing the code.

bringcode-linux-propertypages

After these steps, you will be able to edit and browse your C++ code, build and debug remotely.

bringcode-linux-debug

What’s next

Follow the links to learn more about Visual C++ for Linux development and Targeting the Windows Subsystem for Linux from Visual Studio.

If you’re new to Visual Studio, learn more by reading the Getting Started with Visual Studio for C and C++ Developer topic (Coming soon!) and the rest of the posts in this Getting Started series aimed at C++ users that are new to Visual Studio. Download Visual Studio 2017 today, try it out and share your feedback.

Bring your existing Android Eclipse projects to Visual Studio

$
0
0

You can use Visual Studio to develop your C++ projects targeting Android. To learn more about this support read the Visual C++ for Cross-Platform Mobile development section on MSDN.

If you’re currently using Eclipse and considering moving to Visual Studio, you can do that via our Eclipse Android Project Import Wizard. You can read about other C++ project types in the guide for Bringing your C++ code to Visual Studio.

Step 1. Install Android Support: Make sure that during VS installation, you select the “Mobile development with C++” workload. By default, it already includes all the prerequisites needed to build C++ Android projects.

bringcode-md-install

Step 2. Install the Eclipse Import Wizard extension: From the Marketplace, install the Java Language Service for Android and Eclipse Android Project Import extension.

Step 3. Run the import wizard: Launch the wizard from File>New>Android Projects from Eclipse and follow the instructions

bringcode-md-eclipse-wizard

When the wizard completes, you will have projects for both the C++ parts and the Java parts of your Android Eclipse project. You can develop your Android project by editing, building and debugging both C++ and Java code.

bringcode-md-slnexplorerbringcode-md-debug

What’s next

If you’re new to Visual Studio, learn more by reading the Getting Started with Visual Studio for C and C++ Developer topic (Coming soon!) and the rest of the posts in this Getting Started series aimed at C++ users that are new to Visual Studio. Download Visual Studio 2017 today, try it out and share your feedback.

Migrate your existing iOS XCode projects to Visual Studio

$
0
0

If you’re targeting iOS and writing a lot of C++ code, you should consider importing your XCode projects inside Visual Studio. Visual Studio not only provides an easy way to import these projects, but also allows opening these projects back in XCode if you need to make non-C++ related edits (e.g. storyboarding, UI design).

This article covers the high-level steps needed to import your existing iOS XCode projects into Visual Studio. You can read about other C++ project types in the guide for Bringing your C++ code to Visual Studio.

Step 1. Install iOS support: Make sure that during VS installation, you select the “Mobile development with C++” workload. In the customization pane, make sure you select the “C++ iOS development tools” option as well.

bringcode-ios-install

bringcode-ios-install-options

Step 2. Install the remote Mac tools and connect from VS: Install vcremote on the Mac machine following the instructions in “Install and Configure Tools to Build iOS projects”. Then, in VS, from Tools>Options>Cross Platform>C++> iOS, pair VS with your Mac machine

bringcode-ios-options

Step 3. Launch the XCode import wizard. Go to File>New>Import>Import from XCode and follow the steps of the wizard. To learn more about the wizard, read “Import a XCode project” in MSDN

bringcode-ios-import

Each XCode target will create a new Visual Studio project and your iOS source code will be available for further editing, building and debugging.

bringcode-ios-debug

Step 4 (optional). Open Visual Studio project in XCode: When you need to make non-C++ changes to your iOS projects (e.g. storyboard editing), Visual Studio can automatically open your projects inside XCode running on your Mac. Once you’re done making changes, you can ask VS to copy these changes back to the Windows machine. Follow this link to learn more about syncing changes between XCode and Visual Studio.

bringcode-ios-xcode

What’s next

To learn more about the iOS support in Visual Studio read “Developing cross-platform iOS applications using Visual Studio”.

If you’re new to Visual Studio, learn more by reading the Getting Started with Visual Studio for C and C++ Developer topic (Coming soon!) and the rest of the posts in this Getting Started series aimed at C++ users that are new to Visual Studio. Download Visual Studio 2017 today, try it out and share your feedback.

Viewing all 13502 articles
Browse latest View live


<script src="https://jsc.adskeeper.com/r/s/rssing.com.1596347.js" async> </script>