Quantcast
Channel: TechNet Technology News
Viewing all 13502 articles
Browse latest View live

Gartner positions Microsoft as a leader in the Magic Quadrant for Operational Database Management Systems

$
0
0

Microsoft is placed furthest in vision and highest for ability to execute within the Leaders Quadrant.

By T.K. “Ranga” Rengarajan

With the release of SQL Server 2014, the cornerstone of Microsoft’s data platform, we have continued to add more value to what customers are already buying.  Innovations like workload optimized in-memory technology, advanced security, high availability for mission critical workloads are built-in instead of requiring expensive add-ons. We have long maintained that customers need choice and flexibility to navigate this mobile-first, cloud-first world and that Microsoft is uniquely equipped to deliver on that vision in both trusted environments on-premises and in the cloud.

Industry analysts have taken note of our efforts and we are excited to share Gartner has positioned Microsoft as a Leader, for the third year in a row, in the Magic Quadrant for Operational Database Management Systems. Microsoft is placed furthest in vision and highest for ability to execute within the Leaders Quadrant.

Given customers are trying to do more with data than ever before across a variety of data types, at large volumes, the complexity of managing and gaining meaningful insights from the data continues to grow.  One of the key design points in Microsoft data strategy is ensuring ease of use in addition to solving complex customer problems. For example, you can now manage both structured and unstructured data through the simplicity of T-SQL rather than requiring a mastery in Hadoop and MapReduce technologies. This is just one of many examples of how Microsoft values ease of use as a design point. 

Gartner also recognizes Microsoft as a leader in the Magic Quadrant for Business Intelligence and Analytics Platforms and placed Microsoft as a leader in the Magic Quadrant for Data Warehouse Database Management Systems – recognizing Microsoft’s completeness of vision and ability to execute in the data warehouse market.

Offering only one piece of the data puzzle isn’t enough to satisfy all the different scenarios in today’s environments and workloads. Our commitment is to make it easy for customers to capture and manage data and to transform and analyze that data for new insights.

Being named a leader in Operational DBMS, BI & Analytics Platforms, and DW DBMS Magic Quadrants is incredibly important to us: We believe it validates Microsoft is delivering a comprehensive platform that ensures every organization, every team and every individual is empowered to do more and achieve more because of the data at their fingertips.

You can download a trial of SQL Server 2014 or SQL Server 2014 today on premises, or get up and running in minutes in the cloud. For more details on Microsoft Azure’s data and analytics services, as well as a free trial, visit http://azure.microsoft.com/en-us/

*The above graphic was published by Gartner, Inc. as part of a larger research document and should be evaluated in the context of the entire document. The Gartner document is available upon request. Gartner does not endorse any vendor, product or service depicted in its research publications, and does not advise technology users to select only those vendors with the highest ratings. Gartner research publications consist of the opinions of Gartner’s research organization and should not be construed as statements of fact. Gartner disclaims all warranties, expressed or implied, with respect to this research, including any warranties of merchantability or fitness for a particular purpose.


Machine Learning Forms the Core of Data Science

$
0
0

This guest post is by the faculty of our Data Science MOOC, Dr. Stephen Elston, Managing Director at Quantia Analytics & Professor Cynthia Rudin from M.I.T.

Machine learning forms the core of data science and predictive analytics. Creating good ML models is a complex but satisfying undertaking. Aspiring data scientists can improve their ML knowledge and skills with this edX course. In the course, we help you build ML skills by investigating several comprehensive examples. It’s still not too late to sign up.

The faculty are available for a live office hour on Oct 19th to answer all your questions – register here.

Creating good ML models is a multi-faceted process, one that involves several steps, including:

  • Understanding the problem space. To have impact, ML models must deliver useful and actionable results. As a data scientist, you must develop an understanding of which results will be useful to your customers.

  • Prepare the data for analysis. We discussed this process in a previous blog post.

  • Explore and understand the structure of the data. This too was discussed in a previous blog post.

  • Find a set of features. Good feature engineering is essential to creating accurate ML models that generalize well. Feature engineering requires both an understanding of the structure of the data and the domain. Improving feature engineering often produces greater improvements in model performance than changes in parameters or even the exact choice of model.

  • Select a model. The nature of the problem and the structure of the data are the primary considerations in model selection.

  • Evaluate the performance of the model. Careful and systematic evaluation of model performance suggests ideas for improvement.

  • Cross validate the model. Once you have a promising model you should perform cross validation on the model. Cross validation helps to ensure that your model will generalize.

  • Publish the model and present results in an actionable manner. To add value, ML model results must be presented in a manner that users can understand and use.

These steps are preformed iteratively. The results of each step suggest improvements in previous steps. There is no linear path through this process.

Let’s look at a simplified example. The figure below shows the workflow of a ML model applied to a building energy efficiency data set. This workflow is created using the drag and drop tools available in the Microsoft Azure ML Studio.

You can find this dataset as a sample in Azure ML Studio, or it can be downloaded from the UCI Machine Learning Repository. These data are discussed in the paper by A. Tsanas, A. Xifara: 'Accurate quantitative estimation of energy performance of residential buildings using statistical machine learning tools', Energy and Buildings, Vol. 49, pp. 560-567, 2012.

These data contain eight physical characteristics of 768 simulated buildings. These features are used to predict the buildings’ heating load and cooling load, measures of energy efficiency. We will construct an ML model to predict a building’s heating load. The ability to predict a building’s energy efficiency is valuable in a number of circumstances. For example, architects may need to compare the energy efficiency of several building designs before selecting a final approach.

The first five modules in this workflow prepare the data for visualization and analysis. We discussed the preparation and visualization of these data in previous posts (see links above). Following the normalization of the numeric features, we use a Project Columns module to select the label and feature columns for computing the ML model.

The data are split into training and testing subsets. The testing subset is used to test or score the model, to measure the model’s performance. Note that, ideally, we should split this data three ways, to produce a training, testing and validation data set. The validation set is held back until we are ready to perform a final cross validation.

A decision forest regression model is defined, trained and scored. The scored labels are used to evaluate the model. A number of performance metrics are computed using the Evaluate Model module. The results produced by this module are shown in the figure below.

These results look promising. In particular, the Relative Absolute Error and the Relative Squared Error are fairly small. These values indicate the model residuals (errors) are relatively small compared to the values of the original label.

Having good performance metrics is certainly promising, but these aggregate metrics can hide many modeling problems. Graphical methods are ideal to explore model performance in depth. The figure below shows one such plot.

This plot shows the model residuals vs. the building heating load. Ideally, these residuals or errors should be independent of the variable being predicted. The plotted values have been conditioned by the overall height feature. Such conditioned plots help us identify subtle structure in the model residuals.

There is little systematic structure in the residuals. The distribution of the residuals is generally similar across the range of heating load values. This lack of structure is because of consistent model performance.

However, our eyes are drawn to a number of outliers in these residuals. Outliers are prominent in the upper and lower left quadrants of this plot, above about 1.0 and below about -0.8 for heating loads below 20. Notice that some of the outliers are for each of the two possible values of the overall height feature.

One possibility is that some of these outliers represent mis-coded data. Could the values of overall height have been reversed? Could there simply be erroneous values of heating load or of one of the other features? Only a careful evaluation, often using other plots, can tell. Once the data are corrected, a new model can be computed and evaluated. This iterative process shows how good ML models are created.

This plot was created using the ggplot2 package with the following R code running in an Azure ML Execute R Script module:

frame1 <- maml.mapInputPort(1)

## Compute the model residuals
frame1$Resids <- frame1$HeatingLoad - frame1$ScoredLable

## Plot of residuals vs HeatingLoad.
library(ggplot2)
ggplot(frame1, aes(x = HeatingLoad, y = Resids , 
                   by = OverallHeight)) +
    geom_point(aes(color = OverallHeight)) +
    xlab("Heating Load") + ylab("Residuals") +
    ggtitle("Residuals vs Heating Load") +
    theme(text = element_text(size=20))

Alternatively, we could have generated a similar plot using Python tools in an Execute Python Script Module in Azure ML:

def azureml_main(frame1): 
    import matplotlib
    matplotlib.use('agg')  # Set graphics backend
    import matplotlib.pyplot as plt

## Compute the residuals
    frame1['Resids'] = frame1['Heating Load'] - frame1['Scored Labels']     

## Create data frames by Overall Height   
    temp1 = frame1.ix[frame1['Overall Height'] < 0.5]    
    temp2 = frame1.ix[frame1['Overall Height'] > 0.5]      

## Create a scatter plot of residuals vs Heating Load.
    fig = plt.figure(figsize=(9, 9))
    ax = fig.gca()
    temp1.plot(kind = 'scatter', x = 'Heating Load',  y = 'Resids', 
               c = 'DarkBlue', alpha = 0.3, ax = ax)
    temp2.plot(kind = 'scatter', x = 'Heating Load', y = 'Resids', 
               c = 'Red', alpha = 0.3, ax = ax)
    plt.show()
    fig.savefig('Resids.png')

Developing the knowledge and skills to apply ML is essential to becoming a data scientist. Learning how to apply and evaluate the performance of ML models is a multi-faceted subject – we hope you enjoy the process. 

Stephen & Cynthia

Shape the future of Power BI: now recruiting for our first user panel

$
0
0

Seeking out and acting on user feedback is a core part of our design and development process here at Power BI. We’re constantly digging in to what our users are saying in our community forums, in UserVoice, our in-product feedback links, and on social media. Collaboration with our users is an indispensable part of building great products that help people do and achieve more. It’s part and parcel of creating products that people love.

Today, we’re excited to kick off recruiting for our inaugural Power BI User Panel*. Through this opportunity, a select group of users will interact closely with our Research, Design, and Product teams over the next eight months in a series of research projects.  We’re interested in people with all kinds of different opinions, backgrounds, and experiences. So, whether you’ve used Power BI a little, a lot, or not at all; whether you think Power BI is great or could use improvement; whether you consume data or analyze it; we’d love to hear from you.

If you’d like to be considered for participation, please take a few minutes to fill out the survey below. The User Panel Interest Survey will close on Friday, October 23rd @ 3 p.m. PST. Please note that taking the survey does not guarantee being selected for the panel.

As always, we love hearing your feedback in our community forums, feedback links, UserVoice, and on social media—so keep it coming!

* General eligibility requirements for the panel:

  • Because we offer gratuity to panelists, participants must have a valid SSN or U.S. taxpayer identification number.
  • In keeping with gift and ethics rules, government employees are not eligible to participate.
  • Employees of Microsoft and its subsidiaries, and family members of Microsoft employees or employees of Microsoft subsidiaries are not eligible to participate.

See you at TechDays Stockholm!

$
0
0

Next week I am going to be at Techdays Stockholm.

I will be talking (both on stage and off stage) about Hyper-V, Windows Containers and a bunch of the cool technology in Windows 10 that makes it great for enterprises.  I even have some new demos to do - including this little snippet:

Fun stuff!

If you are planning to be at TechDays Stockholm, make sure you come by and chat to me.

Cheers,
Ben

New Windows 10 application usage in Dev Center

$
0
0

Recently, we released a new feature that provides app usage information to developers in Dev Center.

This feature is included in all new Windows 10 (UWP) package submissions and allows developers to view app usage statistics, including user sessions, active users, session length, page views, and custom events created specifically for an app (for example how many times users reach a certain level in the game). App developers are provided aggregated statistics only, and not any information about individual users or devices.
How to enable application usage

  1. Build a UWP package in Visual Studio 2015.
  2. Select “Show telemetry in the Windows Dev Center” checkbox (which adds the Visual Studio Application Insights SDK to your project).
    • All Windows 10 app submissions will include the telemetry SDK. If you don’t want to use this feature, please uncheck this box to disable app usage information
  3. Select “Enable richer analytics with Application Insights” if you have an Azure subscription and want to see the data and do deeper analysis in the Azure portal
    1_newProject
  4. Submit the packages to the Store. Data will show up after users download the updated package and start using the app.
  5. View the report in the “Analytics/Usage” page in Dev Center. The report will show:

You can read more information in the documentation.

Announcing Availability of ASP.NET 5 Beta8

$
0
0

ASP.NET 5 beta8 is now available both on NuGet and as a tooling update to Visual Studio 2015! This release greatly expands the supported surface area of .NET Core on OS X and Linux. You can now use networking, cryptography and globalization features cross-platform! This release also includes some nice improvements to ASP.NET 5, DNX and the Web tools. Let’s take a look at how we can get started with ASP.NET 5 beta8.

Installation

You can find instructions in our documentation for installing ASP.NET 5 beta8 on Windows, Mac and Linux.

New Features

Below is a summary of some of the new features in ASP.NET 5 beta8. For a full list of what is new in this release please refer to the beta8 release notes.

Changes to IIS Hosting Model

We’ve made a major update to the IIS hosting model for ASP.NET 5 in beta8. Up to and including beta7, ASP.NET 5 applications running in IIS have been hosted by a component named "Helios", contained in the Microsoft.AspNet.Server.IIS package. This component facilitated the bootstrapping of DNX and CLR using a hook in the existing System.Web hosting model. This hook replaced the runtime after the application had started (from IIS's point of view). This effectively made "Helios" a second DNX host, meaning it contained its own logic pertaining to locating, booting, and loading the runtime. It also meant a second set of logic to enable things like runtime servicing, as well as configuration of certain DNX-level settings.

Having two distinct hosting models for ASP.NET 5 introduced a number of complexities and inconsistencies that were difficult or impossible to resolve. To address this we're discontinuing the "Helios" IIS host. Hosting ASP.NET 5 applications in IIS will now be achieved using the IIS HttpPlatformHandler configured to forward through to the ASP.NET 5 Kestrel server. The HttpPlatformHandler is a native IIS module that needs to be installed by an administrator on the server running IIS (installers: x86, x64). It’s also already included with the beta8 Web tools update for local development on IIS Express. This native IIS module manages the launching of an external application host process (in this case dnx.exe) and the routing of requests from IIS to the hosted process.

Simplifying the model to a single hosting option (but the same scenarios still supported) means less things for developers to code for and test. Additional benefits of the new model include:

  • The IIS AppPool doesn't need to run any managed code (you can literally configure it to not load the CLR at all)
  • The existing ASP.NET Windows component does not need to be installed to run on Windows Servers
  • Existing ASP.NET 4.x modules can run in IIS alongside the HttpPlatformHandler since the ASP.NET 5 process is separate
  • You can set environment variables per process since HttpPlatformHandler supports it. It will make setting things like the ASP.NET 5 environment configuration possible on local IIS servers.
  • Unified error handling for startup errors across all servers
  • Code and behavior unification
    • Support for app.config when running on .NET Framework (full CLR) whether self-hosted or in IIS (no more web.config even for .NET Framework compatibility)
    • Unified servicing story
    • Unified boot-up story (no odd AspNetLoader.dll in the bin folder)

You’ll notice that the ASP.NET 5 project templates in Visual Studio have been updated to include the following web.config file in the wwwroot folder of your application:

This web.config file adds the HttpPlatformHandler to your application and configures the handler to forward requests to a DNX process. Visual Studio handles setting up the DNX_PATH environment variable to point to the appropriate DNX version for your application.

When you publish your application the process path in web.config is updated to point to the “web” command defined by your application. You can opt to use a different command instead using the --iis-command option when running dnu publish.

For more details on these changes to the IIS hosting model please see the corresponding announcement.

Localization

ASP.NET 5 now has built-in support for localization. The new localization support provides middleware for specifying the correct culture and UI culture on the thread based on the request and also mechanisms for accessing localized content based on the current culture.

You enable localization in your application by adding the request localization middleware to your request pipeline in your Startup class:

app.UseRequestLocalization(options)

The request localization middleware uses a set of configured IRequestCultureProvider implementations to determine the culture for the request. Built-in providers can determine the culture from the request using the Accept-Language header, a query string value, or from a cookie. You can also build and specify your own IRequestCultureProvider.

Once the request localization middleware determines the current culture it sets it on the thread. The IStringLocalizer service then provides access to localized content based on the current culture. You enable support for these localization services like this:

services.AddLocalization(options => options.ResourcesPath = "resources");

The ResourcePath specifies the path where the localized resources are located relative to the application root. You can use the IStringLocalizerFactory service to create an IStringLocalizer for a specific resource or simply request an IStringLocalizer directly.

The default implementations of these services is based on System.Resources.ResourceManager, which supports accessing localized content in satellite assemblies based on resx files. You can alternatively provide your own implementations for accessing localized content from different sources, like form a database.

You can see a full working sample of these localization features in the Localization repo.

Localization and MVC

MVC builds on the new localization support in ASP.NET 5 to enable localization in controllers and views. MVC introduces a few of additional services for localization built on the core localization services.

To enable the MVC specific localization features, you add the following when configuring the MVC services:

services
    .AddMvc().AddViewLocalization(options => options.ResourcesPath = "Resources");

The IHtmlLocalizer service (with accompanying IHtmlLocalizerFactory) adds support for getting localized HTML strings with property encoded arguments. You can use an IHtmlLocalizer from your controllers like this:

private IHtmlLocalizer SR;

private IHtmlLocalizer SR;

public HomeController(IHtmlLocalizer localizer)
{
    _localizer = localizer;
}

public ActionResult Index()
{
    ViewData.Message = SR["Localize me!"];
    return View();
}

The  IViewLocalizer is an IHtmlLocalizer service that looks for a resource based on the current view name. You can inject an IViewLocalizer into your view using the @inject directive, like this:

@inject IViewLocalizer SR

@SR["Localized header"]

MVC also provides a LanguageViewLocationExpander that enables the view engine to look for views that are suffixed with a specific culture. For example, you can have index.html and index.en-GB.cshtml. Which view is selected will be based on the current culture.

Error messages from validating data annotations can be localized by adding the following option when setting up the MVC services:

services
    .AddMvc()
    .AddViewLocalization(options => options.ResourcesPath = "Resources").AddDataAnnotationsLocalization();

Any validation error messages from data annotations will then be localized using the available IStringLocalizer service.

DNX Watch command

The dnx-watch command will run your application and then watch all of the project files for changes. When a file is changed the dnx-watch command restarts the application. This enables a rapid development workflow where you edit the code, save, and then refresh your browser to see the changes.

To install the dnx-watch command run the following:

dnu commands install Microsoft.Dnx.Watcher

You can then start the dnx-watch command from the same directory where your project.json is located. Any arguments passed to dnx-watch will get passed along to dnx:

C:\Users\danroth27\Documents\WatchTest\src\WatchTest>dnx-watch web
[DnxWatcher] info: Running dnx with the following arguments: --project "C:\Users\daroth\Documents\WatchTest\src\WatchTest\project.json" web
[DnxWatcher] info: dnx process id: 8348
Hosting environment: Production
Now listening on: http://localhost:5000
Application started. Press Ctrl+C to shut down.

Browse to your application to see the current content:


Modify your code and save the file:

public IActionResult About()
{ViewData["Message"] = "Watch this!";

    return View();
}

Refresh the browser to see the changes:

Better view precompilation

We’ve improved precompilation of MVC views in this release to work seamlessly with tag helpers. You can now use view precompilation even when using custom tag helpers in your views.

Specify target frameworks when publishing

When publishing an application, you can now specify the target framework that you want to publish for:

dnu publish –framework dnx451

This will trim the set of packages included in the published app to just the packages required for the specified target framework resulting in a smaller deployment payload.

Clear the HTTP response cache used for package restore

When restoring packages dnu will normally do HTTP response caching for any requests sent. You can now easily clear the HTTP response cache by running:

dnu clear-http-cache

Target .NET 2.0 and .NET 3.5

You can now target .NET 2.0 and .NET 3.5 in your DNX projects. Simply use the net20 and net35 target framework monikers in the frameworks node of your project.json file.

Running scripts before and after building and creating packages

One of the nice features of DNX is that it will handle building for multiple target frameworks (ex net46, dnxcore50, etc.) and multiple build configurations (ex Debug, Release). In project.json you can define command-line scripts that run before and after each build and package creation. Previously these scripts would only run once, but in this release the scripts will run before each build configuration and each target framework.

For example, if you have two build configurations (Debug and Release) and two target frameworks (net46 and dnxcore50) then the prebuild and postbuild scripts will run four times: once for each build configuration and once for each target framework. The prepack and postpack scripts will run twice: once for each build configuration.

In your prebuild and postbuild scripts you can use the %build.Configuration% and %build.TargetFramework% variable to get access to the current build configuration and target framework. The %build.Configuration% variable is also available in your prepack and postpack scripts.

Add additional files to a package

DNX generally handle generating NuGet packages for your projects for you, but sometimes you need to add additional files to the packages. You can now specify additional content files for your NuGet packages in project.json using the new packInclude property:

"packInclude": {
    "destination1/": "source1/**",
    "destination2/": "source2/**",
    "destination2/some_additional_file.txt": "source2a/somefile.txt",
    "destination3/": ["source3/a.txt", "source3/b.txt", "source4/c/**/*.ps1"]
}

The packInclude property specifies a set of destinations in the package and the source files that should be included at those destinations. You can use globing patterns when specifying source files to include or list individual files in an array. The destination can be a specific file name and path or it can be a directory. To specify a directory as the destination you include a trailing slash.

When you build your package all of the specified source files will get included in the package at the specified locations.

Explicitly target dependencies at packages or projects

When DNX resolves dependencies specified in project.json it will resolve dependencies as installed packages or as project references. This gives you the flexibility to swap out package dependencies as source code or vice versa. But sometimes you want to be explicit about the target type for the dependence. For example, you may want to make sure that you don’t accidentally resolve a dependency from a configured NuGet feed that should really just be a project reference.

You can now explicitly specify the target type for a dependency in project.json to ensure that the dependency only comes from a package or a project:

"dependencies": {
    "ClassLibrary1": { "version": "1.0.0-*", "target": "project" },
    "ClassLibrary2": { "version": "1.0.0-*", "target": "package" }
}

The target property for ClassLibrary1 indicates that it’s a project reference, not a package. Similarly, the target property for ClassLibrary2 indicates it’s a package, not a project. If the target property is not specified, then the target can be either a package or a project.

Dnvm uninstall

For those of you who have been keeping up with all the latest DNX release updates you probably have quite a few older versions of DNX hanging out on your machine. You can always go into your user profile and delete the folder for a specific DNX from the ~/.dnx/runtimes folder. But now there is an even easier way. The DNVM tool now supports uninstalling specific versions of DNX. Simply run dnvm uninstall to uninstall a specific DNX version from your machine and it will delete the corresponding runtime folder for you.

New Visual Studio 2015 Features for ASP.NET 5

Hiding files in Solution Explorer

In this release we have added the ability to hide files from the default view in Solution Explorer. To hide a file, in Solution Explorer you can use the new Hide from Solution Explorer context menu option. In the image below, you can see the context menu for a file that I’m going to hide from Solution Explorer.

After using Hide from Solution Explorer the item will no longer show up in Solution Explorer. This is facilitated by adding a new entry into the .xproj file. For the case above the new entry in the .xproj file is.

After the file is hidden from Solution Explorer you will not see it by default. If you need to interact with hidden files you can use the Show All Files button on Solution Explorer. You can see this being used in the screenshot below.

Info bar when restoring NuGet packages

One piece of feedback from users on the new ASP.NET 5 experience that we have received is that it’s not clear when NuGet packages are being restored. This is because Visual Studio 2015 will automatically restore NuGet packages as needed. For example, when you open a project, if NuGet packages are missing they will be restored. Similarly when you edit project.json to add a new dependency, that will kick off a NuGet restore. There are other times when Visual Studio starts a restore.

To make it more clear when a NuGet package restore operation is in progress we have introduced a new info bar for ASP.NET 5 projects. Now when a NuGet package restore is in progress you’ll see the following info bar in Solution Explorer.

The info bar at the top of Solution Explorer indicates that a restore is in progress and how many projects are participating in that. Directly from the info bar you can open the output of the restore operation with the Output link. You can also click on Settings so that you can configure the behavior of the info bar. In the settings page you can specify when the info bar should show up.

Show dependency errors in project.json and Solution Explorer

In previous releases if there were any issues with dependencies you would have to go to the output window, or Error List, to see errors and warnings about packages. With this release we have integrated showing dependency errors/warnings directly in project.json and Solution Explorer.

In the image below, I’ve modified the BrowserLink dependency to have an invalid version and also added a new entry to a dependency which doesn’t exist, SomeMissingPackage. In the image below you can see that both of those entries in project.json have squiggles indicating an issue.

When you hover over an entry in project.json you’ll see the corresponding error/warning message. For example, see the image below.

Dependency issue are also now indicated in Solution Explorer as well. In the image below you can see the view in Solution Explorer for the sample above.

In the previous image the icon for the BrowserLink and SomeMissinagePackage have a Warning icon. In addition to this, you can see dependency errors and warnings in the Error List.

Update NuGet package view in Solution Explorer

In Solution Explorer we have updated the view under the References node for ASP.NET 5 projects. In previous releases, we used the blue NuGet icon for every NuGet package. We also used a generic icon for a project-to-project reference. In the image below you can see the improved view.

In the image above there are a few changes. The icon for NuGet package references has been updated to one that fits better with the other icons in Solution Explorer.

The icon for a project-to-project icon has been updated so that it’s clear that it’s a project-to-project reference. Project-to-project references will always be shown at the top of the list.

As well as icon updates we also show Framework Assemblies at the bottom of the reference list. This shows the assemblies that are available coming from the framework.

Open source templates

Lastly, our Visual Studio project templates for ASP.NET 5 and DNX are now open source on GitHub! The Templates repo contains the templates used in Visual Studio for ASP.NET 5 and DNX based projects (ASP.NET 4.6 templates are still managed separately). You can now contribute to the template code and provide feedback via the public Templates issue tracker.

Summary

This release includes a variety of new runtime features and tooling enhancements. Please download and try out ASP.NET 5 beta8 today and let us know what you think on GitHub. We hope you enjoy it!

EF7 Beta 8 Available

$
0
0

Today we are making Entity Framework 7 Beta 8 available. EF7 will be the next major release of Entity Framework and is currently in pre-release.


EF7 may not be for you… yet

EF7 introduces some significant changes and improvements over EF6.x and therefore the pre-release phase of EF7 is much longer than other recent releases. If you are writing a production application then you should continue to use EF6.x.

Because of the fundamental changes in EF7 we do not recommend attempting to port an EF6.x application to EF7 at this stage. We will provide guidance on when this is recommended and how to do it closer to final release. EF6.x will continue to be a supported release for some time.


Getting started with Beta 8

We have made a modest start on documentation for EF7, you can view the current documentation at http://ef.readthedocs.org.

Supported platforms

You can use Beta 8 in the following types of applications.

Supported databases

The following database providers are available on NuGet.org and support Beta 8. See our providers page for more information and links to getting started.

We’d like to thank Shay Rojansky and Erik Ejlskov Jensen for their collaboration to provide the Npgsql and SQL Compact providers and drive improvements in the core EF7 code base.


What’s implemented in Beta 8

Beta 8 has mostly been about improving the features already implemented in previous betas to make them more usable and stable.

  • Basic modeling including built-in conventions, table/column mapping, and relationships
    • Fluent API (a.k.a ModelBuilder/OnConfiguring API) for configuring your model
    • Data Annotations for configuring your model
  • Change tracking
  • LINQ queries
  • Table based Insert/Update/Delete (including batching)
  • Migrations and database creation/deletion
  • Transactions (including automatic transactions during SaveChanges and explicit transaction APIs)
  • Identity and Sequence patterns for database generated key values
  • Raw SQL queries (via DbSet.FromSql)
  • An early preview of reverse engineering a model from a database
  • Logging
  • Alternate keys including the ability to use them as keys in a relationship


What are we working on now?

The following features are currently being implemented

  • Cascade delete support
  • TPH inheritance pattern
  • .NET Native support

Aside from the in-flight features listed above, our efforts from now until our initial release will be on cross-cutting quality concerns.

  • Bug fixing
  • Performance tuning
  • API reviews
  • Documentation
  • etc.


What about EF6.x?

Given that we have said EF6.x will continue to be a supported release, and that we will continue with bug fixes and small improvements to the code base, you may be asking why there hasn’t been much activity on the EF6.x CodePlex project for the last 6 months.

For the lead up to initial release of EF7 we are having our team focus almost solely on the EF7 project, but once we get EF7 stabilized and ready for release we will be transitioning back to dedicating some time to work on EF6.x. Our initial focus will be to get a pre-release of EF6.2 available. This will start with processing the outstanding pull requests and fixing the bugs we have already allocated to the EF6.2 release. We anticipate having the first preview of EF6.2 available shortly after EF7 reaches RTM.

NASCAR App for Windows 10 is Here

$
0
0

One of the most impressive aspects of NASCAR is the motorsport’s loyal, engaged fan base. Anyone who has ever been to a race has seen just how engaged the fans are, often spending the entire weekend at the track to watch every aspect of the race and trying to keep abreast of all the activities of their favorite drivers.  And, of course, the same goes for race fans who want to keep track of the sport while away from the track.

Building upon the NASCAR partnership we announced earlier this year we’re excited to announce that Windows 10 customers can now follow the excitement of the 2015 Chase for the NASCAR Sprint Cup with the Official App of NASCAR!

NASCAR for Windows 10 provides a comprehensive user experience in a customizable format. Follow your favorite driver with targeted news, video and social content. Get access to the live leaderboard, in-car cameras and driver audio during live races. Follow the Chase with up-to-date standings and an interactive Chase Grid. And one-touch navigation allows you purchase tickets or check your fantasy lineup using Windows 10’s unique split-screen, multi-tasking capabilities.

NASCAR image 1

NASCAR image 2

Free features NASCAR fans will enjoy:

  • Interactive Chase Grid
  • Live leaderboards for all NASCAR Series (limited)
  • Lap by Lap commentary
  • Extensive Driver data, news and social media feeds
  • Real time news and video
  • Complete Schedule and Full Driver Standings
  • Customizable Notifications

Users can also enjoy these premium live features with a subscription:

  • Premium Live Leaderboard – Track your favorite drivers on a customized leaderboard with all new data points
  • Live Driver Audio – Listen to the in-race strategy between Drivers, Crew Chiefs and spotters
  • Live In-Car Cameras – Watch Live in-car cameras for the entire 2015 NASCAR Sprint Cup Series season
  • Live Broadcast Radio & Officials Radio – Listen to the official NASCAR Radio Broadcast for each race of the season and listen to the NASCAR Officials Radio for all Sprint Cup Series races

NASCAR image 3

Of course, you’ll need Windows 10 to be able to get the app. The good news is that you can join over 110 million devices that have already upgraded by taking advantage of the Windows 10 FREE upgrade for qualified Windows 7 and Windows 8 devices. Make sure to check out details if you haven’t yet upgraded your device.

And, for those of you planning to be in Talladega for one of the biggest races of the season the weekend of November 17-18, stop by our Windows 10 booth to see some great products, get your picture with Dale Jr’s #88 Windows 10 car, and learn more about Windows 10 and the NASCAR app!

Upgrade to Windows 10 and download NASCAR for Windows 10 today.


Building sites and web apps for every device (guest series for npm)

$
0
0

We have talked often about our focus on building a browser that is interoperable with the modern web, and we’re excited to see great results as Windows 10 rolls out – now used on over 110 million devices.

An interoperable web also depends on developers, so npm recently invited us to talk about some of the ways you can leverage the tools available on npm to make sure your sites and web apps are not only compatible with today’s modern browsers, but accessible across all browsers, devices, and platforms.

We are excited to contribute a series of posts on The npm Blog, starting with today’s post by Jeff Burtoft, “Build for Devices.” Check it out for some great tips on building hosted and packaged web apps using modern web platforms on today’s diverse device landscape, using the tools available on npm.

Over the coming weeks, we will be contributing more posts covering browser compatibility, responsive design, and more—stay tuned, and let us know what you think @MSEdgeDev on Twitter or in the comments below!

– Alex Lu, Program Manager, Microsoft Edge

Setting up Port Mirroring to Capture Mirrored Traffic on a Hyper-V Virtual Machine

$
0
0
Hi folks Gopal here again from the Microsoft Networking Escalation team. The article below provides steps on how a Hyper-V virtual machine running on Windows Server 2012/2012 R2 can be used to capture mirrored traffic that is hitting the Hyper-V host...(read more)

Released: System Center Management Pack for SQL Server and Replication (6.6.2.0)

$
0
0
We are happy to announce that a new version of SQL Server and Replication Management Packs has been released! Only the English version is available at this time. Localized management packs for this version will be made available at a later time. Downloads...(read more)

/Debug:FASTLINK for VS2015 Update 1

$
0
0
We have made some changes with respect to /DEBUG:FASTLINK starting with Visual Studio 2015 Update 1 CTP. /DEBUG:FASTLINK is aimed at improving link times for the incremental developer loop inside Visual Studio and for medium to large size projects provides...(read more)

How to convert Windows 10 Pro to Windows 10 Enterprise using ICD

$
0
0

Windows 10 makes life easier and brings a lot of benefits in the enterprise world. Converting Windows 10 without an ISO image or DVD is one such benefit. My name is Amrik and in this blog, we’ll take an example of upgrading Windows 10 Professional edition to Windows 10 Enterprise edition.

Let’s consider a scenario wherein you purchase a few computers. These computers come pre-installed with Windows 10 Pro and you would like to convert it to Windows 10 Enterprise.

The simpler way is to use DISM servicing option:

Dism /online /Set-Edition:Enterprise /AcceptEula /ProductKey:12345-67890-12345-67890-12345

For more information on DISM Servicing, please review:

https://technet.microsoft.com/en-us/library/hh825157.aspx

The above may be a good option if you have single or few computers. But, what if you’ve got hundreds of computers to convert.

To make your life easier, you may want to use the Windows Imaging and Configuration Designer (ICD). You can get the Windows ICD as part of the Windows 10 Assessment and Deployment Kit (ADK), which is available for download here.

With the help of ICD, admins can create a provisioning packages (.ppkg) which can help configuring Wi-Fi networks, adding certificates, connecting to Active Directory, enrolling a device in Mobile Device Management aka MDM, and even updating Windows 10 Editions - all without the need to format the drive and reinstall Windows.

Install Windows ICD from The Windows 10 ADK

The Windows ICD relies on some other tools in the ADK kit, so you need to select the options to install the following:

  • Deployment Tools,
  • Windows Preinstallation Environment (Windows PE)
  • Imaging and Configuration Designer (ICD),

Before proceeding any further, let’s ensure you understand the prerequisite:

  • You have the required licenses to install Windows 10 Enterprise.

The below steps require KMS license keys. You cannot use MAK license keys to convert. Since you are using KMS keys to do the convert, you need to have a KMS host capable of activating Windows 10 computers or you will need to change to a MAK key after the upgrade is complete.

Follow below steps to convert:

image

Click on File menu and select New Project.

It will ask to enter the following details. You may name the package as per your convenience and save it to a different location if you would like to.

image

Navigate to the path Runtime Settings –> EditionUpgrade –>UpgradeEditionWithProductKey

image

Once you enter the product key (Use the KMS client key for Windows 10 Enterprise available here.)

Click on File –> Save.

Click on Export –> Provisioning Package.

The above step will build the provisioning package.

image

In the screenshot below, if anyone wants to keep a password or a certificate, then he may set it up.

image

Select any location to save the provisioning package.

image

Once complete, it will give the summary of all the choices selected. Now, we just need to click the button BUILD.

image

image

Navigating to the above folder will open the location below and note the .ppkg file has been created which we will use to upgrade Windows 10 Professional.

image

We now need to connect the Windows 10 Professional machine to the above share and run the .ppkg file.

Here is the screenshot before I ran the package which shows that the machine is installed with Windows 10 Professional version:

image

Run the file “Upgrade_Win10Pro_To_Win10Ent.ppkg” to complete the upgrade process.

image

After double clicking the .ppkg file, we will get the warning or a prompt similar to UAC below:

image

Just select “Yes, add it” and proceed. After this we need to wait and the system is getting prepared for upgrade.

image

image

After the upgrade is complete, the machine will reboot and the OS is going to be Windows 10 Enterprise and we get the below screen as confirmation:

image

And this is where we confirm that the upgrade is successful:

image

The .ppkg file can be sent to the user through an email. The package can be on located on an internal share and run from there or copied to a USB drive and used on that drive.

A couple of ways to automate the above process:

  • Use MDT by adding the option to Install Applications under Add –> General tab.
  • Use SCCM by following steps mentioned in the blog below:

Apply a provisioning package from a SCCM Task Sequence
http://blogs.msdn.com/b/beanexpert/archive/2015/09/29/apply-a-provisioning-package-from-a-sccm-task-sequence.aspx

Amrik Kalsi
Senior Support Engineer

[Webinar] - Fall 2015 Power BI webinar season

$
0
0


These are exciting times for Power BI and we have been sharing updates with you at a rapid pace these past few months. Between our weekly service updates and Content Pack releases plus our monthly Power BI Desktop updates, it is hard to catch up with all things Power BI.

That is why starting next week we'll have the Power BI webinar season! This is a list of all webinars coming your way during this time. Mark your calendars and if you're not able to attend, watch them on demand on your own time.

Enjoy!

Webinar

Date/Time

Registration


How to Connect Microsoft Power BI to Hive with the Simba ODBC Driver


Wed 10/21/15 | 10:00 AM -11:00 AM PT


Power BI Tips and Tricks for Data Visualization


Thu 10/22/15 | 10:00 AM -11:00 AM PT


appFigures Power BI Content Pack


Tue 10/27/15 | 10:00 AM -11:00 AM PT


Effective Collaboration for Reporting and BI Teams


Thu 10/29/15  10:00 AM -11:00 AM PT


Faster Data Blending and Advanced Analytics for Power BI with Alteryx


Tue 11/03/15 | 9:00 AM -10:00 AM PT


Microsoft Power BI Content Pack for Twilio Webinar


Thu 11/05/15 | 10:00 AM -11:00 AM PT


Microsoft Power BI Technical Overview


Tue 11/11/15 | 10:00 AM – 11:00 AM PT


Connect Marketo to Microsoft for Vibrant Analytics


Tue 11/17/15 | 10:00 AM -11:00 AM PT


Setting up Data Recovery Agent for Bitlocker

$
0
0

You might have already read on TechNet and one of the other AskCore Blogson how to setup Data Recovery Agent (DRA) for BitLocker. However, how do you request a certificate from internal Certificate Authority (AD CS) to enable Data Recovery Agent (DRA). Naziya Shaik and I have written detailed instructions here and hope it is helpful.

So what is a Data Recovery Agent?

Data recovery agents are individuals whose public key infrastructure (PKI) certificates have been used to create a BitLocker key protector, so those individuals can use their credentials to unlock BitLocker-protected drives. Data recovery agents can be used to recover BitLocker-protected operating system drives, fixed data drives, and removable data drives. However, when used to recover operating system drives, the operating system drive must be mounted on another computer as a data drive for the data recovery agent to be able to unlock the drive. Data recovery agents are added to the drive when it is encrypted and can be updated after encryption occurs.

Below are the steps needed.  From creating the certificate on the Certification Authority, to using it on Client machine.

The machines in use are:

1. Windows Server 2012 R2 DC and CA

2. Windows 10 Enterprise

If I go to Windows 10 and try to request a DRA certificate, we cannot see it as illustrated below:

image

In order for the client to see a DRA certificate, we need to copy the Key Recovery Agent template, add BitLocker Drive Encryption, and BitLocker Drive Recovery Agent from the application policies.

Here is how you do it.

1. On a CA, we created a duplicate of the Key Recovery Agent and named it BitLocker DRA.

image

2. Add the BitLocker Drive Encryption and BitLocker Data Recovery Agent by going into Properties -- >Extensions and edit Application Policies.

image

3. In the CA Management Console, go into Certificate Templates and add BitLocker DRAas the template to issue.

image

On a Windows 10 client, adding Certificate Manager to Microsoft Management Console:

1. Click Start, click Run, type mmc.exe, and then click OK.

2. In the File menu, click Add/Remove Snap-in.

3. In the Add/Remove Snap-in box, click Add.

4. In the Available Standalone Snap-ins list, click Certificates, and click Add.

5. Click My user account, and click Finish.

6. Then click OK.

Then under Certificates -- >Personal -- > Right click on Certificate -- >All Tasks -- >Request New Certificate

image

These are the Certificate Enrollment steps

image

Click Next andin our case, we have Active Directory Enrollment Policy

image

Click Nextand you will see the BitLocker DRA certificate which we created above.

image

Select BitLocker DRA and click Enroll.

This is what it looks like.

image

The next steps are pretty much the same as given in this Blog. We will need to export the certificate to be used across all the machines.

To accomplish this, right click on the certificate above and choose Export.

image

This will bring up the export wizard.

image

On the Export Private Key page, leave the default selection of No, do not export the private key.

image

On the Export File Format page, leave the default selection of DER encoded binary X.509 (.CER).

image

The next window is specifying the location and file name of the certificate you are exporting.  In my case below, I chose to save it to the desktop.

image

Click Finish to complete the wizard.

image

The next step will be to import that certificate into our BitLocker GPO to be able to use. In this, I have a GPO called BitLocker DRA.

Under Computer Configuration -- >Policies -- >Windows Settings -- >Security Settings -- >Public Key Policies -- > Right click BitLocker Drive Encryption–>Add Data Recovery Agent

image

This will start the Add Data Recovery Agent wizard.

image

Click Browse Folders and point it to the location where you saved the certificate. My example above was from the desktop, so got from there.

image

Double click on the certificate to load it.

image

Click Next and Finish.

You will see the certificate imported successfully.

image

Additionally, make sure that you have the below GPO enabled.  In Group Policy Editor, expand Computer Configuration -- >Administrative Templates -- > Windows Components -- >BitLocker Drive Encryption and ensure Enabled is selected.

image

Running Manage-bdeto get the status on the client you enabled Bitlocker on, you will see Data Recovery Agent (Certificate Based) to show it is currently set.

image

Thanks,

Saurabh Koshta
Naziya Shaikh


Just announced: Microsoft Ignite 2016 in Atlanta. Pre-register now for the lowest price.

$
0
0

In September 2016, Microsoft Ignite is headed to Atlanta, Georgia. Pre-register now and get ready for—

  • 1,000+ hours of content, 700+ sessions, and a multitude of networking opportunities
  • Insights and roadmaps from industry leaders
  • Deep dives and live demos on the products you use every day
  • Direct access to product experts
  • Interactive digital labs
  • Knowledge and answers direct from the source
  • Smart people talking tech everywhere you look

Pre-register now for the lowest price, and claim your spot in Atlanta, September 26–30, 2016.

If you want to learn more about Microsoft’s event line up in 2016, check out Chris Capossela’s blog post.

Control how your bower packages are installed with a gulpfile in ASP.NET 5

$
0
0

ASP.NET 5 beta 8 is out. Yes, that's a lot of betas, but it's important to get things right when you're doing something new like this. You can find instructions in our documentation for installing ASP.NET 5 beta8 on Windows, Mac and Linux.

ASP.NET 5 uses the NuGet package manager to get server-side libraries but for client-side things we recommend folks use Bower or npm. The most popular JavaScript and CSS libraries are there, and there's no need for us to duplicate them in NuGet. This means ASP.NET 5 folks get to use the same great client-side libraries that other open web technologies enjoy.

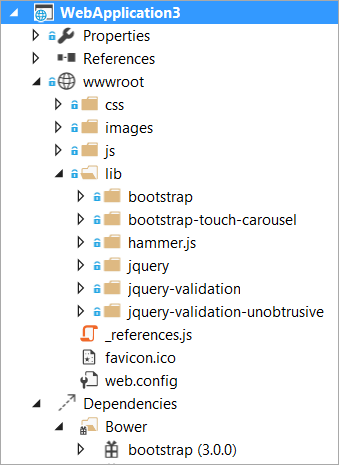
In very early builds of ASP.NET 5 we put those libraries in a folder outside the web root (wwwroot) into bower_components or npm_components and then used a gulp/grunt (think MSBuild for JavaScript) task to copy the files you want to deploy into wwwroot in preparation for deployment. However this confused a LOT of folks who weren't familiar with these tools. It also meant another step after installing a new JavaScript library. For example, you'd install angular with bower, then manually edit the gulp file to copy the .js you wanted into the folder of your choice, then run gulp to actually move it. These are common tasks for many of today's open web developers, but have been confusing for ASP.NET 5 users who don't usually work on the command line. So, this was changed a while back and your bower libraries show up right in your wwwroot.

bower stuff under wwwroot

While this is convenient change and great to starters, at some point you'll want to graduate to a more formal process and want to move your bower client libraries back out, and then setup a task to move in just a files you want. Let's take a moment and switch it back the way it was.

Here's how.

Update your .bowerrc and project.json

In the root of your project is a .bowerrc file. It looks like this:

{
"directory": "wwwroot/lib"
}

Change it to something like this, and delete your actual wwwroot/lib folder.

{
"directory": "bower_components"
}

Exclude your source bower folder from your project.json

You'll also want to go into your project.json file for ASP.NET 5 and make sure that your source bower_components folder is excluded from the project and any packing and publishing process.

"exclude": [
"wwwroot",
"node_modules",
"bower_components"
],

Update your gulpfile.js

In your gulpfile, make sure that path is present in paths. There are totally other ways to do this, including having gulp install bower and figure out the path. It's up to you how sophisticated you want your gulpfile to get as long as the result is that production ready .js ends up in your wwwroot ready to be served to the customer. Also include a lib or destination for where your resulting JavaScript gets copied. Could be scripts, could be js, could be lib as in my case.

var paths = {
webroot: "./" + project.webroot + "/",
bower: "./bower_components/",
lib: "./" + project.webroot + "/lib/"
};

Add a copy task to your Gulpfile

Now open your Gulpfile and note all the tasks. You're going to add a copy task to copy in just the files you want for deployment with your web app.

Here is an example copy task:

gulp.task("copy", ["clean"], function () {
var bower = {
"bootstrap": "bootstrap/dist/**/*.{js,map,css,ttf,svg,woff,eot}",
"bootstrap-touch-carousel": "bootstrap-touch-carousel/dist/**/*.{js,css}",
"hammer.js": "hammer.js/hammer*.{js,map}",
"jquery": "jquery/jquery*.{js,map}",
"jquery-validation": "jquery-validation/jquery.validate.js",
"jquery-validation-unobtrusive": "jquery-validation-unobtrusive/jquery.validate.unobtrusive.js"
}

for (var destinationDir in bower) {
gulp.src(paths.bower + bower[destinationDir])
.pipe(gulp.dest(paths.lib + destinationDir));
}
});

Do note this is a very simple and very explicit copy tasks. Others might just copy more or less, or even use a globbing wildcard. It's up to you. The point is, if you don't like a behavior in ASP.NET 5 or in the general build flow of your web application you have more power than ever before.

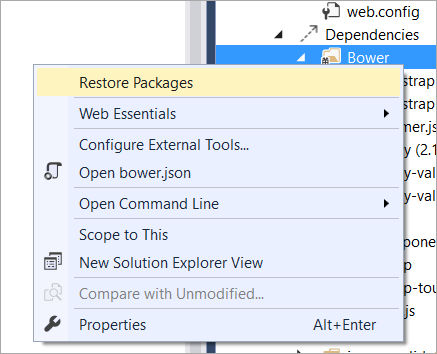
Right click the Bower node in the Solution Explorer and "Restore Packages." You can also do this in the command line or just let it happen at build time.

image

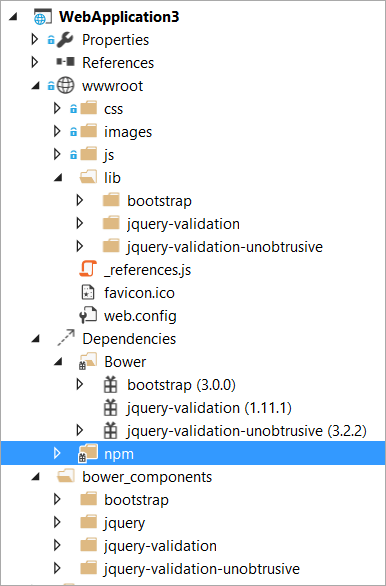
Looking in this simplified screenshot, you can see the bower dependencies that come down into the ~/bower_components folder. Just the parts I want are moved into the ~/wwwroot/lib/** folder when the gulpfile runs the copy task.

A new flow for my JavaScript

Feel free to share in the comments links to your blog posts on how YOU like your gulpfiles and build process to work!


Sponsor: Thanks to Infragistics for sponsoring the feed this week! Responsive web design on any browser, any platform and any device with Infragistics jQuery/HTML5 Controls.  Get super-charged performance with the world’s fastest HTML5 Grid - Download for free now!


© 2015 Scott Hanselman. All rights reserved.
     

Office 365 news roundup

$
0
0

At Microsoft, we’re making important changes in the way we do business. We’ve embraced today’s mobile-first, cloud-first world, committed to reinventing productivity and business processes, and revamped our approach to global markets. But some things haven’t changed. We continue to deliver innovative products and services to millions of individuals, businesses, governments and organizations worldwide, providing the tools they need to work, communicate and collaborate effectively—any time, any place and on any device.

As part of that commitment, we’re always working to increase the value and availability of Office 365.

Earlier this week, we announced that Office 365 will now be delivered to customers in India from local datacenters in Mumbai, Pune and Chennai, making Office 365 the first global commercial cloud service to provide productivity and collaboration services from within India. And as more Indian businesses benefit from the local availability of Office 365, the value of the service continues to grow daily.

Two key ways that we’ve made Office 365 more valuable for our customers are embodied in recent improvements to Microsoft FastTrack and the Office 365 Financial Services Compliance Program. Last week, we announced that we’re changing FastTrack from a one-time benefit to an ongoing program, and from an onboarding service to a customer success service designed to help you realize business value faster with the Microsoft Cloud. And this week we announced that we’re making the Financial Services Compliance Program publicly available for financial service customers, offering greater trust and transparency to financial service customers who may need deeper insights into our cloud service capabilities, risks and performance, plus contractual commitments to help them meet their regulatory obligations.

New features and capabilities in Office 2016 are also adding to the value of Office 365. Office 2016 takes the work out of working together by making it easier than ever for you to collaborate and share Word, Excel and PowerPoint documents with friends and colleagues. In addition, the new forecasting sheet functions and one-click forecasting in Excel 2016 help you analyze and explain your business data and understand future trends.

Meanwhile, we continue to improve Office 365 in other ways as well. We expanded our preview of the new Skype for Business voice and meeting capabilities in Office 365 to a total of 15 countries worldwide. We’re also making OneDrive for Business integration available to customers signing in to Sway with Office 365 work and school accounts, and we’re updating Sway for iPhone and iPad for seamless co-authoring and powerful cloud-hosted design assistance across more devices.

As we continue to transform our business, we will stay focused on our core values. And we will keep on providing productivity and collaboration solutions to help you succeed.

Below is a roundup of some key news items from the last couple of weeks. Enjoy!

Microsoft begins global release of Office 2016—Discover why people worldwide are excited about the release of Office 2016.

Microsoft’s cloud serves up Office 365 in India—Learn how Microsoft is expanding its cloud services globally and delivering Office 365 to customers in India from local datacenters.

7 secrets to successful online collaboration—Find out how online collaboration, the key to staying mobile and working remotely, is made easier with Office 365.

Your top questions about Office 2016 answered—Get answers to all of your questions about Office 2016 and its features and capabilities.

Office 365 to replace Redbird mail—Discover why Illinois State University chose Office 365 for its students and faculty.

The post Office 365 news roundup appeared first on Office Blogs.

Datazen Publisher for Windows 7 available now

$
0
0

We are pleased to announce the availability of Datazen Publisher for Windows 7 and like to take this opportunity to thank everyone who has taken the time to provide valuable feedback on the preview releases.

Datazen Publisher allows you to create and publish rich, interactive visualizations.

You can use the Datazen Publisher for Windows 7 in two modes:

1. Standalone App – allows you to create mobile reports from your local Excel documents and save them locally.

2. Connected to a Datazen Server - simply connect to the Datazen Server to access your on-premises SQL Server or other enterprise data sources, create beautiful visualizations for any form factor and then publish them for access by others on all major mobile platforms.

Datazen Publisher for Windows 7 offers feature parity with the Datazen Publisher app and the UI has been optimized for desktop scenarios. You can now create and publish data visualizations based on your personal preference
(mouse & keyboard or touch) or device that you are working on.

Datazen Publisher for Windows 7 is available for download on the Microsoft Download Center. Please visit the Windows Store to install the Datazen Publisher for Windows 8, Windows 8.1, and Windows 10.

For more information about how Datazen can help your organization get insights from your on-premises enterprise data please visit: http://www.microsoft.com/en-us/server-cloud/products/sql-server-editions/sql-server-enterprise.aspx#sqlmobilebiPublish

OpenSSH for Windows Update

$
0
0

Back in June, we announced our intentions to bring SSH to Windows by supporting and contributing to the OpenSSH community.  Our objective was to not only port OpenSSH so that it worked well on Windows, but to openly contribute those changes back into the portable version of OpenSSH.  Of the many options available, one clearly stood out: the previous work that NoMachine had already published in bringing OpenSSH to Windows.  The NoMachine port was based on OpenSSH 5.9, so we’ve spent the time since our initial announcement working with NoMachine to bring this port in sync with OpenSSH 7.1. 

With this initial milestone complete, we are now making the code publically available and open for public contributions.  We will continue to partner with NoMachine on development in this public repository.  Please note that this code is still very early and should be treated as a developer preview and is not supported for use in production. 

Here’s how our rough roadmap looks:

  1. Update NoMachine port to OpenSSH 7.1 [Done]
  2. Leverage Windows crypto api’s instead of OpenSSL/LibreSSL and run as Windows Service
  3. Address POSIX compatibility concerns
  4. Stabilize the code and address reported issues
  5. Production quality release

At this point, the roadmap is specifically around providing a Windows port of OpenSSH with complete feature parity and interoperability.  Our goal is to get to milestone 5 within the first half of 2016. 

We welcome your contributions, as well as feedback on any issues you run into.

Steve Lee
Principal Software Engineer Manager
PowerShell Team

Viewing all 13502 articles
Browse latest View live


<script src="https://jsc.adskeeper.com/r/s/rssing.com.1596347.js" async> </script>